Showing posts sorted by relevance for query art show. Sort by date Show all posts

Tuesday, May 22, 2012

In the Art Room: Art Show Part 2

I love this sweet interaction between the ladybug and the snail by a second grade artist.
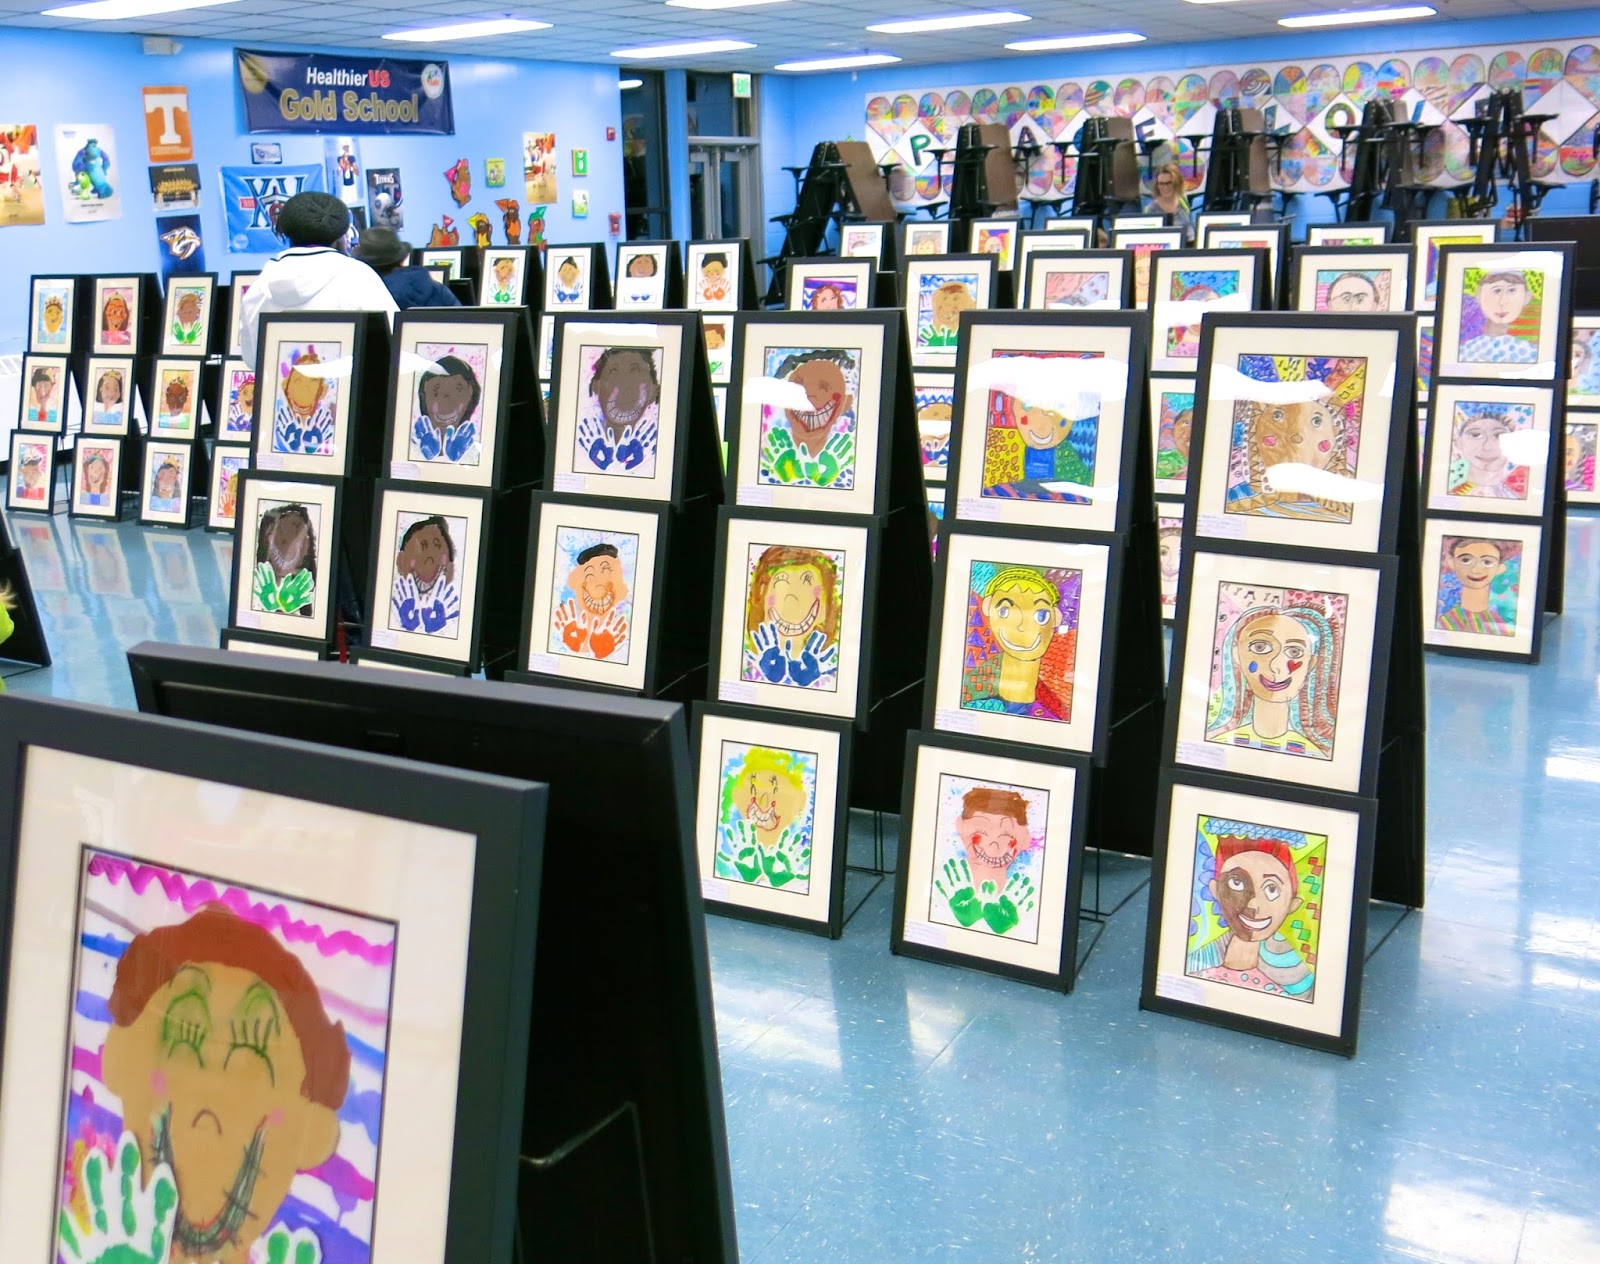
A week ago today, I was scrambling to get the last of the clay projects fired and the art room ready for a display of well over 300 clay projects. Now, on this here last day of school (sniff!), the art room is empty. And all of those clay projects are proudly displayed on someone's mantle, nightstand, coffee table or kitchen window sill. Such a happy thought.

Thankfully, hubs was on hand during the art show as my photographer. He managed to snap these photos of the clay display in my room. I'm attaching links to my clay lessons, if you are interested. Thank you for sharing this happy art show memory with me! Next up on In the Art Room: the Walk like an Egyptian performance. Last week's In the Art Room: Art Show Part 1 can be found here.
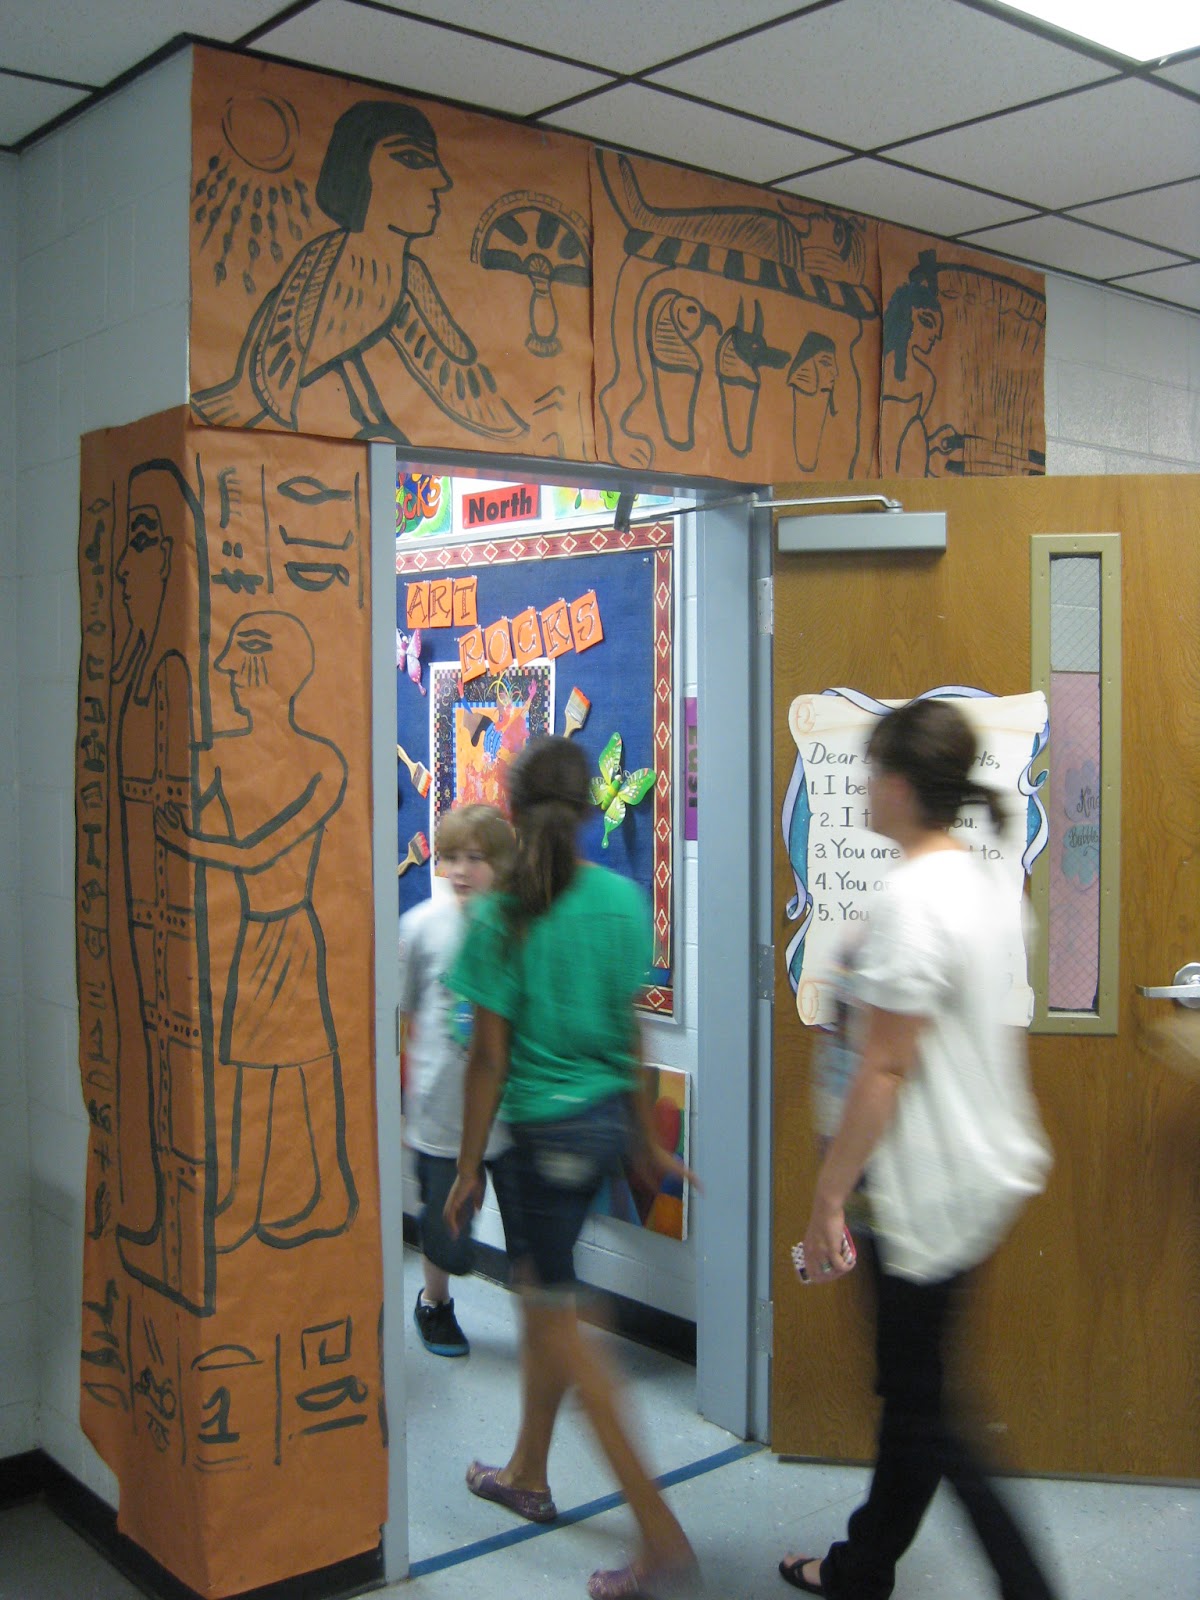
The Egyptian entrance to the art room. So glad hubs got a photo of this as it will be coming down soon. Next year's theme is in the works.

Entering at their own risk.

This is the sight you are greeted with when you enter my room. This is usually where my drum set and gong are...but for the sake of my sanity, these things were put away during the art show. Again, this is all going away shortly. I cannot wait to begin work on my new theme.

Because all of my first through fourth grade students had ceramics to display (the kindergarten kids clay projects were Butterfly Reliefs that you can see here), I had to make room for well over 300 projects. I used every table I had as well as all of my counter space for display.

The infamous fish taco clay project. I love this lesson, it's always a hit with the kids. These fish were created by my first grade students. This lesson idea comes courtesy of The Clay Lady.

I've altered the directions a bit, so here it is: lay a texture, like lace or burlap, onto your work surface; pound to Oreo thickness and remove from texture; using a skewer, trace a circle template; fold like a taco and pinch closed with the exception of an opening for the mouth; add eyes, fins, lips and viola! You found Nemo!

My counter covered in ceramics. Because the kids have also been learning about the artist Claude Monet and his garden in Giverny, all of our clay projects are pond-themed. You can see our Mammoth Monet Mural here. In keeping with that theme, I had the kids create drawings of their clay projects, like fish, lily pads and frogs. These drawings were then cut out and used as the "table clothes" you see draped over my cabinets and tables.

Sweet Monet-inspired lily pads created by my second grade artists. You can find the complete lesson here.

To decorate my word wall cabinets, I hung up these Flower Pot Collages that my wee kindergarten friends had just completed.

The clay frogs stole the show. I love big-mouthed and bright-eyed paint-brush-holding frog created by a super sweet third grade artist. Check out the froggy lesson here.

To spice up the display a little bit, we mixed the frogs, fish and lily pads up a bit.

With my former student teacher, the fourth graders created these sculptures of fictional heroes. This was a great lesson she created...the kids were to come up with ideas of what characteristics a hero would have and create a hero based from there. Some of the heroes were glazed while others where painted copper.

A seated heroine contemplating her awesomeness.

At the time, the students were also learning about the Statue of Liberty. Because she is made from copper, some of the students painted their heroes with copper paint.

Thursday, May 30, 2019

2019 Art Show: Glow Gallery!

Hey, friends! Last week, I shared with you the Pirate Gallery, which was one of the three galleries where my student's work was featured at our school wide art show. Today I'm sharing with you our Glow Gallery, the HIT of our art show. Each student had at least one work of art on display with my kindergarten friends having THREE works of art featured. Whew! Here is one side of the gallery with the lights off and the black lights on.
 And here it is with the lights on. Still just as beautiful, says me! I thought I'd take you on a tour of this gallery, complete with lights we used, projects each grade level did and supplies that work the best for black light. So, let's go!
I LOVE going through art shows, don't you?! So much happiness and color, baby, color!
 Full disclosure: This is a spare classroom. I had the luxury of having an entire room to dedicate to the gallery. I spent one entire day with the help of a parent covering the window and setting up the displays. The artwork was simply hot glued to the wall. The best way to do that without damaging the artwork or the walls is to add a flat bit of masking tape to each corner of the artwork on the back. Then add a small dot of hot glue to the tape and stick to the wall. When taking the art down, simply give the work a gentle tug and it will pop right off the wall. 
 My kindergarteners created three pieces of art for this gallery. The first were these clay slab fish. You can find this lesson here and in my clay book
They also made these fun snails from cardboard pizza rounds. They started by painting a spiral with a bingo dauber. Then they added color with fluorescent oil pastels and fluorescent paint (details on supplies in a moment). From there, they were attached to a paper towel tube and antennae were added. So cute! More details on this lesson soon, I hope!
 Some of my third graders made these amazing plaster and paper parrots! I think they are one of my favorite projects from the show.
 Another lesson which I hope to share with you soon...the kids loved making them!
 And they were so striking in the black light. 
But also great with the lights on.
Let's talk supplies for a minute because it's important you use the right stuff. 

* Sargent Brand Fluorescent Oil Pastels
* Jack Richeson Fluorescent Tempera Cakes
* Fluorescent Liquid Watercolor (optional)
* Fluorescent Tempera Paint (optional)

The last two we didn't use...we just stuck with the oil pastels and tempera cakes. But I will be getting the other paints for next year.

In a pinch, when time was running short, we did use fluorescent poster board and bingo daubers for some of the drawings. We did this because I only had one 30 minute art class with the kids before the big day...so we worked with the time we had. I wanted to insure that every kiddo had a work of art in this special room.
On the night of the art show, we did have a couple of teachers at the door to act as Black Light Bouncers as I knew this room would be busy. I didn't want a crowded room to ruin the experience for the kids or have any artwork potentially be damaged. We did have some glow face painting happening which was also fun for the kids. More details on all of the crazy things we had happening at our art show in a future post.
 Let me walk you thru who made what! By the way, each of these 2D works of art took only an hour (or two 30 minute art classes for me) to complete. 

Some first graders created the octopus (by following along with here) while some of my first graders drew the crab...a guided drawing lesson of mine. I'll be sure to share that with you too. I have a lot of sharing to do! 

Some second graders created the GIANT angel fish by following here while others created the octopus on the neon paper due to time limitations. 
My third graders made the sea turtles and my fourth graders made the sea horses.
 Now, let's talk lighting because that is the true key. It's the reason I avoided doing a gallery like this for so long because I just didn't have a clue what lighting to get. We ended up purchasing three kinds and I'll tell you, this one was easily my fave. Starting out, one is all you need IF you block out all the light in the room, making it completely black. 
We left the gallery up for several days because my admin loved it so much, she called in nearly everyone in the district to drop by and see it. Even with the lights on, it was stunning.
Have you done a black light gallery before? What tips do you have? This was my first so I'm sure I have A LOT to learn. I would love to hear from you!
 Super excited to start our black light gallery projects next year...even if it's MAY and I'm on summer break, ha!
 photo signature_zpsd10b3273.png

Thursday, May 24, 2018

In the Art Room: 2017-18 Art Show, 3D Displays Part 3

Here is the final installment of the 3D tour of our art show. Our school-wide art show features every work of art created by every student. The halls are filled with your 2D pieces (future blog posts on those displays!) while the art room showcases our 3D creations. You can see Part 1 and Part 2 of our art show tour of 3D works. Our art show was Superhero themed (tho you'd never know it by this display) and the kiddos were asked to dress the part. You can read more about that here
 My fourth graders stitched up these massive Pizza Pillows this spring and I knew I wanted a fun display for them. I had thought about creating oversized pizza boxes to put them in like we did with these clay pizzas created a couple years ago.
While they look cool, they only are impactful if you are standing right over them. So I got this idea to create a Pie in the Sky display!
I started by painting and hanging one paper panel and pizzas in front of it, just to see how it looked. I immediately loved it and decided to make the whole display this way. 
If you are interested in more details about this project, here's the video I created last summer. In this video, I am creating a variety of pizza plushies. However, for my kiddos, we went bigger. That's really the only difference.
Complete lesson here and here. 
Here's a terrible picture of how I hung the paper. I put a strip of masking tape across the back. Then I created a tab of masking tape by folding a piece of tape in half. From there I used two paperclips linked together. One went thru the tape tab and the other was stabbed into the ceiling tile. 
 To hang the pizzas, I simply used fishing line. I fed the line thru the pizza and hung it also with linked paperclips. To prevent the pizzas from twirling in the wind, I made sure they butted up against the paper so they would not rotate. 
This was definitely a show stopper...and the younger kids were all asking "when are we making THOSE?!" That's when you you know you got a winner!
 photo signature_zpsd10b3273.png

Monday, December 12, 2016

In the Art Room: Artome Art Show

Last Tuesday my school hosted their first ever Artome Art Show and I gotta say, it was FABULOUS! If you are not familiar, Artome is a fundraising company for the arts. To join the fun, you simply call or email Artome and let them know the number of students you have participating. In return, they send large sheets of paper that students can either create directly on or artwork can be added to. Also on the paper is a place for you to add the student's name, artwork title, grade, teacher's name and school. Once artwork is complete and the form is filled out, Artome provides you with a UPS shipping label. Slap that label on your box of artwork and ship it on to Artome. 

Then, two weeks later, THIS happens!
Two hours before our art show/winter program/book fair (we specials folks like to do ALL THE THINGS, ALL AT ONCE), two sweet Artome dudes showed up and set up our displays. The artwork could be organized anyway I asked...so I decided to mix it up a bit. Instead of having all kindergarten artwork together, I had them mixed with other grades. This added variety and also made it so folks went through the art show more thoughtfully.
Here's how the fundraiser portion works: Artome is paid $19 for each framed piece. Whatever amount you up charge is what you take. For example, we asked for $25 for each piece making our profit per work of art $6. We have about 320 students at my school and sold over half of the works of art. We did really well!
 I think next year we will do even better. Our program was for our 2-4th grade kids so many of our younger students were not in attendance. If there were, I think we would have sold even more. And, actually, we have...Artome allows a week of post-show sales for families who missed the show. 
Any unsold pieces will be removed from their frame and sent back to me to return to the artists. Also, this was so helpful: any artwork that was not completed in time to be shipped could still be framed the day of. That helped me out tremendously with my friends who were absent on art days.

Overall, it was a seamless fundraiser that resulted in happy artists and parents. Who could ask for anything more? 

Love to hear if you've given Artome a go and what your experience was like. 
 photo signature_zpsd10b3273.png

Sunday, April 28, 2019

In the Art Room: Why Bingo Daubers are an Art Teacher's Best Friend

My name is Cassie Stephens and I'M IN LOVE WITH BINGO DAUBERS.

There. I've said it. It's finally off my chest. And I'm here today to tell you that if you've not discovered the magical wonders of bingo daubers and all that they have to offer your art room, allow me to introduce you to "a whooole neeeeew wooorrllllllddddd..."
If you are unfamiliar, than you might be thinking: 

What ARE bingo daubers? Simply put, they are the little dot-makin' things that folks use when playing bingo. You can purchase them with ink in them...or empty so you can fill with what you like. I prefer diluted India ink but other art teachers have also used liquid watercolor. TEMPERA PAINT, even when diluted, does not work...I know...I tried.

Why are they magic? Because they provide a seamless line, much like that of a marker. In fact, in my art room, we call them "paint markers" and have three rules for using them properly: DO NOT SHAKE THEM, DO NOT PRESS HARD but, most of all, DO NOT SQUEEZE THEM as an endless stream of ink my flow out of the bottle if you do. Sometimes, the ink dries at the tip providing a scratchy line. If I know my kids are going to be using them, I test each one out during my plan time making sure they work and GENTLY squeezing them to get the ink to flow. 

Where can I get them? Here and here is where I get 'em!

How do I fill and refill them? Like I said, I put slightly diluted India ink in mine (I don't have a brand recommendation because it seems all India ink is created equally). When it comes to refilling them, I know you can buy some sort of contraption to remove the top but I just use a pair of pliers to pry them off. Over time, the felt on top of the marker may become worn out. You can buy just the replacement tops!

What can I do with them? I'm so glad you asked! Here are my Top 11 Fave Things to Do with Bingo Daubers (it's a workin' title...don't judge, naughty pants).
 1. Make Giant Painting Sheets! For our upcoming art show, I wanted to inspire excitement and decorate the walls to announce the event. I sketched out my pirate-y design in charcoal and then laid out paint for the kids to go to town. 
When they were finished, I went back over the black lines on spots where they'd gotten a little excited with the paint (that's putting it mildly) and added white highlights. 
And ta-da! Giant banners to announce our art show! I've seen many art teachers create huge coloring sheets in the same manner for their art shows or art activities. 
 2. Make Welcome Back Banners! If you are like me, you have a CRAZY schedule at the end of the school year. Field day, field trips, assemblies, you name it...it's nuts! And so are the kiddos. Last year, when our field day was rained out and my station was cancelled, I decided to have the kids create Welcome Back banners so that we'd have some color on the walls come fall. They had a blast, we used up excess art supplies and made a rained-out field day super fun. 
Much like the art show banners, here is our paint set up!
3. Heather Galler-Inspired Florals! What I love about the daub is that it forces kids to draw BIG! We never use pencils first, we just dive right in. It's a little scary but it's a great chance to talk about turning a "boo-boo" into something "boo-tiful!" 
More on this lesson (with video!) here...perfect for Mother's Day!
 4. Dean Russo-Inspired Animals! Our mascot is the tiger...and it was so fun creating these massive colorful tigers for our hall. 
We finished them off with our chalk pastel in Sta-Flo trick (see video here!) and oil pastels. 
5. Don't Let the Pigeon Drive the Bus! Kindergarten uses my bingo daubers the most in my art room. Many teachers have told me that they've not had success with kids and daubers...that might be because you gotta remind them of the three rules...with rule numero uno being DON'T SQUEEZE THE PAINT MARKER! This Mo Willems project is always a hit! Lesson with video here. 
6. Jasper Johns-Inspired Kindergarten Alphabet! This is a fave lesson of mine and many others. You can find the lesson details and the lesson video here. 
7. Chicka-Chicka Boom-Boom Kindergarten! We follow our first alphabet work of art with this one, a huge hit with my students. We watch the video version of Chicka-Chicka on YouTube and the kids love to sing along with it. You can find the lesson and video here. 
8. Romero Britto-Inspired Hearts! Easy and super great for learning about line, shape and pattern! All of these dauber works of art are HUGE too which I love. Details here. 
9. Fauve-Inspired Self-Portraits! Self-portraits are not my students fave thing to do...or my fave thing to teach. I think it's because the older my students get, the less confidence they have in making their artwork look "real." With that said, the bingo dauber frees them up, makes them relax and not get hung up in the details. Check out this post to see how we added color to these lovelies! 
10. First Grade Penguins! Oh yeah. These are pretty much the cutest...or, wait...are THESE cuter?!
11. Kindergarten Snowmen! I mean...look at them! Lesson and video here. 
 My third graders created these abstract name designs earlier this year with bingo daubers and I loved how they turned out. I don't have a lesson for this one yet...but will work on soon to have available for you and your kiddos!
 I've been in the middle of Art Show Prepland and the bingo dauber is saving my behind! I was able to crank out this pirate ship (which will be a photo-op prop) with a little help from the dauber. 
And I've even made SEVEN massive backdrops like this for the art show too, all with the dauber. So...if I've not convinced you yet that you need to get some bingo daubers in your life then I've just failed at life. Have a super week, y'all! 

 photo signature_zpsd10b3273.png