Tuesday, March 14, 2017

DIY: The Scissor Dress

Y'all probably know this by now but I'm on the cutting edge of fashion. My designs are, like, super sharp and on point. It's with shear delight that I dream up these crazy ensembles. I can get pretty snippy when what I've got in my wee little head doesn't work out...but when it does, I treat myself to a slice of pizza (I promise I'm almost done here). Shall we CUT to the chase?!

I made a scissor dress, y'all!
So I've been wanting to make a Matisse-inspired ensemble for a while...and while this is NOT it, the idea of creating a look that resembled his cut paper designs is what inspired this dress. If you follow me on Insta, you've seen the start of my Matisse dress (I'm struggling with it tho so I'd love some advice: have y'all ever used a free-motion foot? If I want to stitch something with many curved edges, is that what I'd need?). I'm excited that this dress came out of that other idea. I love how one idea can lead to another.
Please pardon the cat hair. Friends allergic to cats, I'm sure this photo alone gives you the sniffles. I found this dress at H&M and knew immediately that it would be perfect for my scissor dress idea.
 I mean, check out that neckline. Perfect! I started by sketching my pair of scissor directly onto the dress with chalk. Then I traced my lines onto a sheet of lining (seen below) and used that as my pattern pieces. 
 It really was so super easy. Originally, I was going to use silver fabric for the scissors but I couldn't find it in my stash. Instead I used the metallic silver velvet I had and red velvet. I think that was a much better choice. Stitching that thin shiney fabric is a real drag as it aways gets runs and puckers in it. I backed the blades with two pieces of shirting (that stuff you see above) and it made it so simple to stitch.
The scissor handles were a little more difficult. I only backed them with one piece of the shirting, not realizing it would make a difference. It did. It was more tricky to stitch and the lines aren't as clean and even. I'm okay with that tho. The curved lines can also be a drag to sew.
When I popped the dress up on Insta while it was on my mannequin, I got several, "uh, girl, you gonna wear something underneath that?!" comments. Y'all. I'm not J. Lo! I just so happened to have THE PERFECT fabric in my stash: the scissor fabric. And in the right color way too. See, being a fabric hoarder does have it's benefits. I used the Scout Tee pattern by Grainline Studio. I love that pattern as I can whip up a top in just over an hour. 
Did I mention that the dress has pockets? YAZ, KWEEN. Pockets give me life!
Today, I popped into the gym to chat with my P.E. buddies. When I did, the fourth graders asked if I was going to play Capture the Flag with them. One girl piped up, "She can't play! She might cut herself!" Good one, kid. Slow clap.
 photo signature_zpsd10b3273.png

Thursday, March 9, 2017

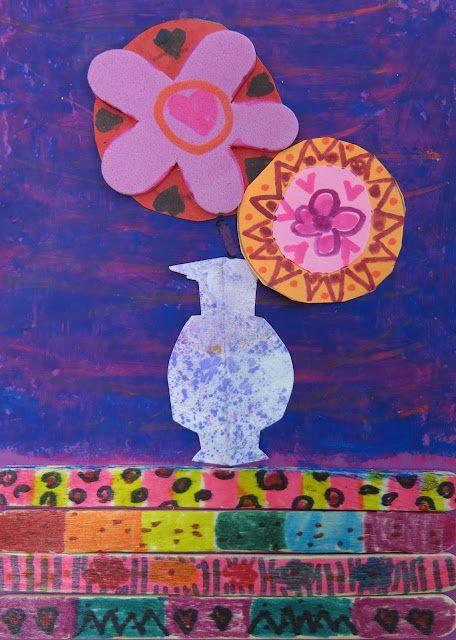
In the Art Room: Folk Art Still Life

 Hey, y'all! A handful of my second graders got really close to being finished with their Folk Art Still Life which was my sub plan while I was out last week. I am so thrilled with their hard work (as are they) that I just had to share. Many of them are still adding flowers and leaves so I'm only sharing a handful. Their next step is adding small details with puffy paint which you know I love as much as they do. Here is the lesson video that my sub used with all of my students, kindergarten thru fourth grade:
Speaking of sub, if you need any tips, tricks and/or sub plans, I just hosted a Facebook LIVE chat last night on that very topic! The chat and all of the commentary is archived on my official Facebook page if you are interested. We have been doing those live chats for the last couple of months and they are blast. Well over 100 art teachers join in each time and it's a great way to share. So if you aren't busy on Wednesday night at 8pm CST, be sure and pop by!
While they were with the sub, some of my students had one 30 minute art class while others had two. So what the sub was able to accomplish was beyond her control. What I love about having a recorded lesson (and a project that the kids are in progress) is that when I return, I don't have to scramble to slap together lesson plans. I can just pick up where the sub left off. 
 With the sub, my students were able to get their sticks done and glued down to the background. When I came back this week, my students worked on their vases and flowers. By next week, they should have all of their flowers and leaves complete and be ready to add some puffy paint. 
One thing that was not in the video was the oil pastel background. One of the kids added color to the background with the bright oil pastels and we all lost our minds...brilliant! So we all had to do the same. You know how that goes, right?!
I know they aren't complete...but I just had to share! I think these are so pretty and perfect for spring and Mother's Day. If you give this project a go, you'll have to let me know. 

 photo signature_zpsd10b3273.png

Wednesday, March 8, 2017

In the Art Room: String Art!

Tonight, on Facebook LIVE at 8pm CST, I thought we could talk about how to prepare for a sub. I'll share with you what I do to insure that I'll won't come back to a Hot Mess Express. I'd love to hear your tips. ALSO...I have BIG NEWS about our LIVE chats that I think you are going to love love love! So I'll see you real soon.

My lovely and sweet (ahem) spring-break-ready third graders are starting their string art project this week. We have prepared the boards by painting them (we are using cardboard pizza rounds purchased in bulk via Amazon) and adding texture. We also punctured holes in them to prep them stitching. Next week, we'll sketch out our designs and start stitching. Here's the video I created to introduce the kids to this process. Feel free to use and share in your art teacherin' world.
Even if you don't do this project with the kids, you might wanna watch it for the needle threading trick alone. Or you can just follow me here and catch a short clip.
There are many methods of string art but I'll be introducing my kids to ones that I call Spectrum and Radiating Design. I found the above, the one I call Radiating Design, to be a little more taxing simply because you have to get more yarn to make the lines go all the way around the board. 
This one I'm calling Spectrum. This one is fun because you can use a lot of different colors. It's up to the artist just how much stitching happens within the design. 
 My third graders were at the end of this project when I introduced this new one. So during the second half of one art class, when they were finished with their candy sculptures, I had them quickly color, paint and scrape a texture onto their boards. 
Today, the first half of class, we did this. I had a handful of kids that were absent the day so they worked on coloring and painting while the majority did this. Thankfully, we had this project to also work on. Have I ever told y'all that I have a habit of having the kids work in exactly 37 projects at once? I ain't proud. 
The kids are stoked! I can't wait to share with you what they create. 
 photo signature_zpsd10b3273.png

Tuesday, March 7, 2017

Art Teacherin' 101: Episode 31

If you've been joining in on my Facebook LIVE chats which I (attempt) to host each Wednesday night at 8pm CST, then you know it's a large crowd of art teachers from all walks of art teacherin' life: we've got high school teachers all the way down to pre-K. Our common bond is our love for creating art with young artists...and the gamut of feelings that come with that: joy, stress, frustration, celebration, etc. I look forward to our chats each Wednesday as it helps me know that I'm not in this alone and that the feelings I experience are shared by many. At the close of our chats, I'll usually ask what we'd like to talk about the following week. One art teacher tentatively threw out the topic of burnout. I think she was apprehensive to admit that she was experiencing this as what you often see here on this blog and on other social media platforms that art teachers use are the celebrations...not the frustrations. But, trust me, we ALL experience burnout. In fact, it was burnout that brought me to blogging!

It was several years ago and I was feeling stuck in a rut. I wasn't excited about the lessons I was teaching and it was reflecting in my art room. Then I would become frustrated when my students weren't excited either. It became a bit of a cycle and I knew I had to do something about it. So I decided to create a blog. I figured that if I had to weekly share a lesson that I was proud of, something that I'd created and whatever wacky outfit I wore, it might inspire me to try a little harder, be more creative and give my approach to art teaching the reboot it needed. 

That's what worked for me. If you are going thru a slump, you need to find out what is gonna work best for you. Maybe it's taking some art classes. Planning a craft night. Taking a mental health day. It's a super short life we live, y'all! We need to be healthy, happy and have the energy to share our joy for art. You gotta do what it takes to make that happen. But know that burnout is just a part of life. I think of life as a cycle. And burnout is just one of those phases that we all go through sooner or later. 

Love to hear what you do when you find yourself in a slump. And I hope to hear from you on Wednesday night over on my official Facebook page. See you then! 

 photo signature_zpsd10b3273.png

Monday, March 6, 2017

In the Art Room: Collage Landscapes with First Grade

Hey, y'all! Please pardon my absence. I know some of y'all were with me at the NAEA convention in NYC. I had all of these big plans to have blog posts and videos ready to roll while I was gone and then...time slipped away from me. Or maybe I just procrastinated my pants off as that is my nature. Regardless, I missed chatting with you here. I'm back now and, hopefully, back into the swing of things. If you'd like to see what my NAEA trip looked like, I don't plan to blog about it because I shared so much of it here. 

So let's kick things off with this fun collage landscape project I just wrapped up with my firsties! 
What I love about this project are all of the wonderful tie ins: we learned about pattern and how to create them, we worked with watercolor and tempra paint, we explored texture, went on a "cloud hunt" outside, learned origami and collage...and landscape. All while chatting out folk artist Kerri Ambrosino. Whew! That's a whole lotta artin'. 
Kerri Ambrosino is a Mexican folk artist. This is not the only project the kids are doing that is inspired by here. We are also creating these still life pieces. I love this artist's colorful work and I really thought she'd be a great way to introduce my students to pattern. 
Another reason this project was so successful was because of the supplies we used. Let me tell you what we used and the steps we followed to create these happy landscapes:

Supplies:
Day 1 and 2

* Gallery oil pastels in florescent by Sargent 
* Crayola Mixing Colors watercolor paint
* 18" X 6" sheets of white paper
Here's a collection of the painted pattern papers drying. I loved them just like this!
I have 30 minute art classes, twice a week. On our first day, I had folded the paper lengthwise in 8 equal sections. The kids used their pastels to draw a line down each one of the paper creases. From there, they drew a different pattern inside each section. The following art class, we had a reminder on how to use watercolor paint properly and used yellow, turquoise and magenta paint to explore oil pastel resist. 
Supplies:
Day 3 and 4

* 12" X 18" construction paper, any color
* Blue and white tempra
* Bristle brushes
* Texture tools. We use random things found at the Dollar Tree: dusters, sponges, scrub brushes, you name it.

On Day 3, the students were exploring tints and textures. We went "shopping" for a sheet of 12" X 18" construction paper in any color the kids liked. They applied white paint first in good sized globs on their paper. Then they added smaller paint puddles of blue. From there, they used their texture tool to blend the color, create tints and texture. This kind of painting is always a blast for the kids. 
On the following day, the kids were instructed to TEAR their pattern paper lengthwise. This was to create hills and valleys for their landscape. I had a handful of kids use scissors instead of tearing and the results were just as beautiful. 
When gluing, I tell the kids to put glue on the bottom straight line of their landscape and have that edge align with the bottom of their paper. From there, they add glue to the long edge of the other paper, pull back their front hills like a giant and place the other torn sheet behind the front one. This is a great way to introduce kids to foreground and background.

Then we went on a Cloud Hunt! This was so simple, short and effective. I simply marched the kids outside chanting "going on a cloud hunt!" We looked up at the sky and spent no more than a hot minute or two tracing clouds with our fingers. When we popped back inside, drew clouds in white oil pastels and traced them in the colors of our choice. 
Early finishers could create patterned suns and sun rays. I love a good spike-y sun, not even gonna lie. 
On our final day, we did some origami! I did directed origami and in five minutes, we had our houses created. The kids then returned to their seats and used paper scraps for the doors and windows. Polka dots were added with paint and Q-tips. 
Their sweet little origami houses drying. 
Today the kids added their houses and any other details they might want. They are just the sweetest thing ever and they put me in such a happy spring mood. Love to hear about your favorite landscape lessons!
 photo signature_zpsd10b3273.png