Showing posts sorted by relevance for query Clay. Sort by date Show all posts

Monday, May 1, 2017

Art Teacherin' 101: Episode 33

If you are anything like me (and bless, as we say in the South, if you are), then you prolly got that art ed degree of yours without being a total pro in all forms of media. I didn't take a single printmaking or ceramics class in college and I got a C in textiles (which is a fave but at the time, I was huffing too many paint fumes, er, REALLY into my painting class, to be bothered with warping that freakin' floor loom). What I did get is a two year degree in oil painting because...you know, that's something we teach to the 10 and under set. Ahem. All that to say, we are expected to be at least somewhat knowledgable about the media we share with our students. But, let's be honest, a lot of times, we are learning right along with the kids. 

Now, I've been at this art teacherin' game for sometime now (18 years but who's countin'?) and I have learned a thing or two along the way. One thing is for certain: kids LOVE clay. However, it can be frustrating to teach if you lack experience. Since I've been around the art teacherin' block a time or two (wink-wink, nudgenudge), I thought I'd share some of my fave art teacherin' clay hacks with you. Here you go:
 Let's talk about some of the things I've shared and just where you can find them. 

* Clay mats. I mentioned The Clay Lady and her clay mats. I seriously have had mine FOR YEARS. They are worth the cost of $2 each. 

* Toothbrushes and doggie bowls. Seriously, what would we art teachers do without places like The Dollar Tree?! Toothbrushes are perfect for teaching scoring and doggie bowls are awesome for holding slip while preventing spills. 

* Texture! A visit to your thrift store will provide you with a good stockpile of texture for your clay adventures. Placemats, cable knit sweaters, burlap, stamps, you name it. If it has a texture, your clay will capture it.

* Skewer sticks. Perfect for cutting, drawing and carving into clay.
Something I failed to mention: what to do with those projects that kids work on for more than one class? To store these effectively, I have a stockpile of old and large zip lock baggies. The kids write their names on the bags in Sharpie, wrap their project in a damp paper towel and place gently inside the back. I tell the kids not to zip their bags shut as that usually traps air inside. Instead, I tell them to push the air out and tuck the opening of the bag under their project. This will keep their clay workable for about a week. 

If you would like to continue this clay chat, you are in luck. All throughout the month of May, I'll be hosting clay chats (and craft nights, so come armed with clay!) right here, every Wednesday at 8pm CST. You can work with any ole clay you like...however, I'll be using the clays made available in this kit which you can purchase here. For more info on what we'll be up to, check here

And now, I thought I'd share with you some of my fave clay projects over the years (many with video links!) for you to take back to your own Art Teacherin' Town. LOOOOOVE to hear your fave clay projects and words of wisdom. Please feel free to leave in el commentos below. 
This clay project was one that I did with my second graders FOR YEARS. They love it, it's a great way to introduce texture, slab, coil and glaze. It's also a quickie and with my short art classes, it worked very well. 
This was a fun project my third graders did one year. If you've taught clay before, then you've probably done the coils-in-a-styrofoam-bowl project (I know I have!) a different spin on that is having the kids use slabs of clay to create flowers. We had a spring theme one art show and these fit in beautifully. 
I almost always do a clay project that emphasizes texture with my kindergarteners. I'll share all of those projects...but this one is always a fave: texture butterflies
This is another kindergarten clay project with an emphasis on texture. This project is also shared in my clay book...but with homemade clay! 
These clay fish by my first graders always crack me up! They had so much fun creating the silly expressions on these a couple years ago. If every glaze is not an option, here is a fun alternative: florescent oil pastels and watered down black paint! 
Inspired by the painted elephants in India, my fourth graders created these fun guys one year. 
Funky frogs were created by my fourth graders one year. They had so much personality! This was a project we worked on over the course of a couple of art classes...which really allowed the kids to get creative. 
One year, to go along with our Asian theme, my fourth graders created these fun pandas. Each had their own wild and wacky personaltiy. 
To go along with that theme of Asia, my third grade kiddos created these Chinese dragons which they had a great time doing.
So I might have a thing for animals and clay...what do you think? My kindergarten and first graders created these pinch pot pets a couple of years back when our art show theme was to raise money for a local animal shelter. And, what do you know, animals are our theme again this year! 
That year, my second graders created this version of pinch pot pets: two pinch pots put together to create the body of their animal. 
And my fourth graders created these! Definitely a favorite by both me and the kiddos. 
Yet another spin on pinch pots and animals: using the pinch pot as a container. Our school mascot is the tiger and this particular year, second graders created tiger pinch pot containers
 Now last year, I decided to go for a food theme and create the art room into a 1950's style diner. These projects were not shared in detail like my others because...I was in the middle of writing my clay book and these projects are all featured in that book! The book is written to be used with no kiln fire clay...but, as you can see, you can use kiln fire clay as well. You can scoop up your book here
 My first graders served up these coffee and donut delights. 
 Second grade backed up cupcakes. Y'all better believe the retro lover in my totally enjoyed decorating for this art show!
 Third graders made hamburgers and fries...complete with all the fixin's. 
While others made pancake containers with hand painted paper plates. 
A kid and crowd favorite were the pie containers. The kids had so much fun googling pies and sculpting their favorite. 
While other classes did pizza containers. I reached out to a local pizza place for the boxes to display the pizza in. 
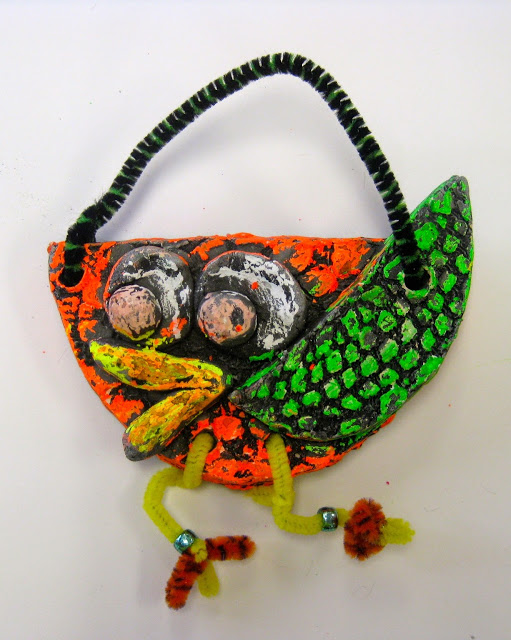
This year, we are back at it with an animal theme! We are transforming the art room into a pet shop. Third grade is in charge of the reptiles
Fourth grade had a blast creating these bobble head pets
But a crowd favorite so far are these fun and funky birds by second grade. They crack me up! 

Many more clay projects are coming up so stay tuned. However, if you just can't wait, you can see a handful of clay projects that have not been shared here but are on my YouTube channel. I always upload there first...so if you'd like to stay up to date, you might consider hitting subscribe. 
 photo signature_zpsd10b3273.png

Monday, March 27, 2017

In the Art Room: Clay Chameleons!

If you follow me on Instagram, then you've seen me over-sharing all of the clay projects that my kiddos will be creating during Clay Week. I like to go with a theme when it comes to clay as that makes the art show seem cohesive. Last year, we went with the clay theme of a 1950's Diner where all the kids created clay food. It was a big hit and a whole lot of fun. 

This year, I decided to go with a Pet Shop theme! You can actually view all of the clay videos I've created for my students right here (and feel free to use them). I add new art teacherin' videos every week so if it's something that you are interested in, you might want to subscribe.

Today, my third grade students watched this video in bite-sized pieces and were able to create their chameleon from start to finish. We did use up more than our normal hour long art class...thankfully, I have a plan time after this class and the teachers were kind enough to let me use some of their instructional time for the kids to finish. I work with some super supportive folks, y'all! Otherwise, this project would have taken us about an hour and a half.
I get a lot of questions on how I show my students my videos because they are pretty long. I don't show the video in it's entirety as that would be too much information for the kids to process. Instead, I show bite-sized portions. Then I send the kids to their seats to work. When a handful of them have finished and trickled back to the floor, then I call all of them to join us, finished or not, and we watch the next portion. For these guys that meant they learned how to make a leaf and then created it; came back to learn about how to make the body and legs of the chameleon and created it; and finally, they learned how to create the head and attach to the leaf. This keeps us up, active, busy and working the entire time. 
Have I told y'all lately that I wrote a clay book? You can scoop it up for preorder right here. When I first became an art teacher some 18 odd years ago, I'd never even taken a ceramics class. And yet...my first year teaching, clay was in my curriculum. With no kiln and a small budget, I had to create clay for my kids to use. Without much info online at the time, I scoured the public library for recipes and ideas. I learned many recipes and included them in the book. In fact, all of the projects in the book are made with no-kiln clays...but have been tested out with kiln fire clay. So it's for everyone!
Working on a book filled with 52 projects meant that I had to dream up, snap photos of and write about, well, 52 projects. Y'all, that's a lot! I learned many a thing working on that book...and I believe it has made me a better clay teacher. 
If you find clay to be intimidating as I once did, I have a surprise for you! I'm going to be offering a Crash Course in Clay here during the month of May! Follow me on Facebook and I'll keep you posted on the details. Here's a peek at how I set my tables up for clay: doggie bowls for water (from the Dollar Tree and they NEVER spill!), toothbrushes for scoring, skewers for carving, cutting and creating design, clay mats (which I have had for well over 10 years) from my friend Danielle McDanielle, aka The Clay Lady, usually lots of texture tools and sponges for wiping hands when they start to feel too dry. What do you keep on hand during clay time?
Oh! And I busted out the marker caps to make these fun eyes for the chameleons.
I'm thinking we will glaze these after firing. I hope I have some room in my budget to splurge on the glaze with the flecks of glass in it. I think that would be perfect for these little guys. I'll be sure to do a follow-up post once complete. 
I've tried many a thing when it comes to finishing clay projects: gouache, oil pastel and dip in black tempera and glaze. Which is your preferred method? 
By the way, this clay project could just as easily be done with air dry clay! You'll have to keep me posted if you give it a go. 
 photo signature_zpsd10b3273.png

Sunday, July 1, 2018

DIY: Polymer Clay Snack Foods Necklace

 As you might have guessed from my last post, I'm on a bit of a polymer clay bender. I have this habit of going thru phases when working with different art supplies. When I'm needle felting, I needle felt EVERYTHING;  when I'm painting the walls of my art room, NOTHING IS SAFE; and when I decide to make miniature snack foods out of clay, watch out! 
I've got sushi, pie, popcorn, cupcakes, donuts, pizza, tacos, nachos, pretzels, lollies, pancakes, ice cream, bacon -n- eggs and more! I have to blame some of this on my friends over on Instagram who gave me a TON of ideas for what to sculpt. So many that I ended up with enough charms for not one necklace but also two charm bracelets! 
I hope this helps!
Because the grand majority of clothing in my closet is just as busy as this necklace, I decided to pair it with the dress I painted and stitched. Yes, this would be one of the more tame pieces of clothing in my closet. Surprised? I didn't think so. 
Wanna make some snack food charms of your own? You totally should! I even made a video tutorial showcasing how to make the tacos, nachos, donuts and sushi! Once you conquer those, you can take on all the snack foods. Here's a little list of supplies:
 * Sculptey Clay...or whatever your polymer clay of choice might be. I like the big ole 24 pack of the clay for a wide range of colors. Be sure and use all of the craft store coupons you can find as this stuff ain't cheap.

* Jump Rings...that's the little metal circles you'll want to add to your clay piece before popping it in the oven. I just slide mind in the back of the clay, sinking them about half way in. You'll be adding two jump rings per creation...but you'll only need to add one before baking. The other one can be added once the clay is cooled and easier to handle.

* Jeweler's Tools...or pliers. You'll need small tools to pry the second jump ring open and add it to the one that is already on the clay. Each charm will need TWO jump rings. If you only use one, then your charms will hang sideways. With the addition of the second one, your charm will hang straight on and be visible to all of your admirers. 

* Elastic...I use elastic string for my necklaces as I truly hate creating jewelry and working with tiny findings and jump rings. So being able to slide my necklace over my big ole head Candy Necklace style works best for me. 

* Modpodge...I used that to seal and protect my charms once they were out of the oven and cooled. 

* Wooden Beads...You can find a variety of wooden beads in the wood department (heh-heh) of your local craft store. I use acrylic paint to add color to mine. 
 My favorite part of making this necklace was making the charms...obviously. I made so many! I still want to make more. But do I really need ANOTHER snack food jewelry item? Probably. 
 Some tips about polymer clay: it's weird. Sometimes it can sit out forever and never harden and other times, it becomes like a rock. 
They sell a kind of polymer clay softener at the craft store for exactly one million dollars (but seriously, it's ridiculously pricey for the size of the bottle). OR you could simply add just a drop of baby oil to the hardened clay, rework and TA-DA! You are back in business. 
 Another tidbit: I used to sort and store my clay by color in styrofoam bowls and/or thin plastic containers. When I went back to reuse the clay, it had eaten holes right thru the styrofoam! I shared that on my IG and most folks said they had success keeping their clay in plastic bags or thicker plastic containers. I now store mine in a wooden drawer with dividers. WHO CAN EAT THRU STYROFOAM?! I mean, that stuff isn't even biodegradable! 
 My students LOVE making food items out of clay. In fact, one of our art shows was a 1950's diner where all of the food was sculpted from clay. I think they would so love making these tiny foods...they have tiny hands, they could handle it, right? (okay, MAYBE on a slightly larger scale!)
You can also find a ton of clay food times in my kid's clay book! Shameless plug, over and out. 
By the way, is it one MILLION TRILLION degrees where you are? I went outside to snap these photos and was dripping sweat within the first three minutes. Summer in Tennessee is no joke, y'all. 
I need to hit my sewing room and start up on my Back to School ensembles but I so wanna make more charms. I made art supply shoe clips out of this clay a couple years ago but now I think I need a art supply charm necklace too. Oh boy. The polymer clay creatin' journey continues! 
 photo signature_zpsd10b3273.png

Tuesday, June 27, 2017

In the Art Room: Clay Tacos!

Hey, friends! I thought I'd share with you a fun clay project that you can do with either kiln fire or air dry clay: Clay Tacos! I did this project with my kindergarten kiddos and it was a huge hit. It also taught them a ton: clay can capture texture; how to create a sphere, coil and a slab, the holy trinity of clay sculpture; how to adhere clay with an alternative slip and score method. So here you go: Clay Tacos!
One thing I love when working with clay and kiddos is introducing them to texture and clay. We step on the clay, pound it into textures, you name it, we try it. My favorite thing is to have a variety of lace, doilies and burlap for them to experiment with. 
With a class of 20 kids pounding clay flat, it is going to sound like a crazy roll of thunder (with echoes of lots of laughs from the kids) but I have found it to be the quickest and easiest way to introduce the kids to creating a slab. 
With a beautiful textured piece of clay, the possibilities are endless! In fact, I'll be sharing EIGHT of my favorite air dry clay projects using this method and more at the Art Ed NOW conference
Have y'all signed up? You really should, it's a ton of fun. 
I explored EVERY air dry clay on the market (seriously) when working on my clay book which is now available for sale here! Many of the air dry clays have the look and feel of kiln fire so it's a great way to introduce kids to the magic of clay even if you are kiln-less. So get you some clay and make you a clay taco today! 
 photo signature_zpsd10b3273.png