Serving up the final installment of our 2019 art show for y'all today! This here is the 2D portion of our art show where every work of art that every kiddo has created all year long is on display! You can check out our Glow Gallery Tour and our Pirate Gallery Tour here! In this blog post, I thought I would share a link to each and every one of these lessons you see! This will give you an idea of what projects I teach (2D, that is) throughout the year. If you are interested in details on this art show: how it's hung, who does the hangin', how it's taken down and sent home, then you might want to watch this tour I created to answer those questions for you:
Please feel free to leave any questions about what you see here or on my YouTube channel and I'll be sure to answer them.
Let's take a tour of theses projects! We'll start with kindergarten. My kindergarteners always have the biggest amount of artwork because their lessons are shorter. I started the beginning of the year with my lessons on line. Those projects did not make it to the art show as they were sent home at the start of the school year. From there, we did the rainbow lesson and Mouse Paint project.
One of the more popular lessons for kindergarten on my blog is this one. This lesson is always followed by my Chicka Chicka Boom Boom project which you can find here.
Our snowmen were a lot of fun to create this year too. We learned all about the cold colors and painting spiral lines.
A new lesson I came up with this year were the heart prints. We were able to get many prints created and used our two favorites for our work of art.
With our printing plates, we created these beauties! Super fun and stunning!
The kindergarten gallery is almost always my favorite!
Although first grade sure does take a close second. Let's talk about their projects. One of my favorites this year were our Mad Scientists!
A classic that we've done many years in a row are our Royal Self-Portraits. I love that we have two selfies in this art show: one as royalty and one as kid-genius. Perfect for my kids!
We also did those heart weavings that you see with the stitched edge. With the heart we cut out from our construction paper for the weaving, we created these Romero Britto inspired pieces. You can see a variation of that lesson here.
All of the artwork and the kids who created them make me this happy.
Let's move on down to second grade! These kids had many works of art both in the Glow and Pirate Gallery that their wall seems a little empty. Don't let that fool you: we are always crankin' out some art!
Speaking of, let's move on down to third grade! You'll notice these kids also did the Chris Uphues lesson...in fact, all of my students did as it was a sub plan. One lesson of mine that was especially popular was the landscape project! I had run out of paper (omg, an art teacher without PAPER, hello!) and had a lot of cardboard pizza rounds...so we improvised! The kids also created those amazing Sandra Silberzweig-inspired self portraits!
My students did two kinds of weaving, tree weaving and circle weaving. Two kid favorites. These are also featured in my new book!
One lesson that I'll be sharing soon is this one! If you can't wait, then check out this blog post as this lesson is a variation.
This is another lesson that I'm excited to share with you soon!
This third grade display brings me so much happiness!
My fourth graders spent the start of their school year making pillows! We made pizza, donut and emoji pillows, all of which are in my sewing book.
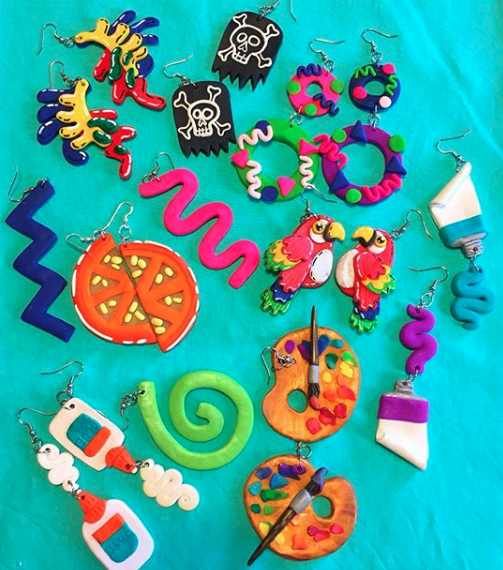
What lengths will you go to in order to avoid unpleasantries? Me, I go to great lengths to dodge sewing. The thing is, I get myself into this sewing pickle every single time. It always starts with the super cute fabric. Currently, I'm in to BIG AND BOLD prints that I usually score at IKEA. Case in point: that bold orange print you see in the background there. I'm currently working on sewing it into a dress but I'm closing in on zipper and hem time and I REALLY don't like zipper and hem time. So, I made earrings to go with my yet to be complete dress!
Polymer clay (I like to use the brand Sculpey) is a clay that comes in a variety of colors and you bake in the oven to harden. I used it a lot in this book. When I wrote that book, I really wanted to include that kind of clay because my students and I love it so much. I keep a stash at home for when I want to work with it because it's so stinkin' fun.
If you are new to polymer clay land, I thought I'd make a little video to walk you through how I made these earrings. Really the only supplies you'll need are the clay, some jump rings, French hook earrings and jewelry tools.
When making polymer clay earrings, just a couple things to remember:
* Polymer clay is self-adhesive. Meaning you don't have to use glue to get the pieces to stick together. Just press and go! * Keep them light! You wouldn't think these would make for heavy earrings but they can if you aren't careful. In fact, the palette ones below, while my fave, are the most heavy and can only be worn for a short while. * Don't put the hole too close to the edge of the design. I learned this the hard way. If you make it too close, the clay just might break when you are sliding the jump rings in. * Don't make the clay too thin. Okay, it's a balance...light enough to be wearable, but not so thin that they break when adding the earrings. * Allow the clay to cool completely. I have noticed that when I take the clay out of the toaster oven, it tends to still be a little bendy. It will harden as it cools. * Bake at a lower temp than suggested if using a toaster oven. I like to use a toaster oven because they heat up faster and require less energy than my oven. That being said, they do tend to bake stuff a lot hotter...and I've burnt my share of polymer creations because of it. For that reason, I'd say bake at 200 for about 5-7 minutes.
My little stash of polymer clay earrings.
I also dig using paint pens on them when they come out of the oven...although I have noticed that the paint does tend to rub off over time.
Hey, friends! Last week, I shared with you the Pirate Gallery, which was one of the three galleries where my student's work was featured at our school wide art show. Today I'm sharing with you our Glow Gallery, the HIT of our art show. Each student had at least one work of art on display with my kindergarten friends having THREE works of art featured. Whew! Here is one side of the gallery with the lights off and the black lights on.
And here it is with the lights on. Still just as beautiful, says me! I thought I'd take you on a tour of this gallery, complete with lights we used, projects each grade level did and supplies that work the best for black light. So, let's go!
I LOVE going through art shows, don't you?! So much happiness and color, baby, color!
Full disclosure: This is a spare classroom. I had the luxury of having an entire room to dedicate to the gallery. I spent one entire day with the help of a parent covering the window and setting up the displays. The artwork was simply hot glued to the wall. The best way to do that without damaging the artwork or the walls is to add a flat bit of masking tape to each corner of the artwork on the back. Then add a small dot of hot glue to the tape and stick to the wall. When taking the art down, simply give the work a gentle tug and it will pop right off the wall.
My kindergarteners created three pieces of art for this gallery. The first were these clay slab fish. You can find this lesson here and in my clay book!
They also made these fun snails from cardboard pizza rounds. They started by painting a spiral with a bingo dauber. Then they added color with fluorescent oil pastels and fluorescent paint (details on supplies in a moment). From there, they were attached to a paper towel tube and antennae were added. So cute! More details on this lesson soon, I hope!
Some of my third graders made these amazing plaster and paper parrots! I think they are one of my favorite projects from the show.
Another lesson which I hope to share with you soon...the kids loved making them!
And they were so striking in the black light.
But also great with the lights on.
Let's talk supplies for a minute because it's important you use the right stuff. * Sargent Brand Fluorescent Oil Pastels * Jack Richeson Fluorescent Tempera Cakes * Fluorescent Liquid Watercolor (optional) * Fluorescent Tempera Paint (optional) The last two we didn't use...we just stuck with the oil pastels and tempera cakes. But I will be getting the other paints for next year. In a pinch, when time was running short, we did use fluorescent poster board and bingo daubers for some of the drawings. We did this because I only had one 30 minute art class with the kids before the big day...so we worked with the time we had. I wanted to insure that every kiddo had a work of art in this special room.
On the night of the art show, we did have a couple of teachers at the door to act as Black Light Bouncers as I knew this room would be busy. I didn't want a crowded room to ruin the experience for the kids or have any artwork potentially be damaged. We did have some glow face painting happening which was also fun for the kids. More details on all of the crazy things we had happening at our art show in a future post.
Let me walk you thru who made what! By the way, each of these 2D works of art took only an hour (or two 30 minute art classes for me) to complete. Some first graders created the octopus (by following along with here) while some of my first graders drew the crab...a guided drawing lesson of mine. I'll be sure to share that with you too. I have a lot of sharing to do! Some second graders created the GIANT angel fish by following here while others created the octopus on the neon paper due to time limitations.
Now, let's talk lighting because that is the true key. It's the reason I avoided doing a gallery like this for so long because I just didn't have a clue what lighting to get. We ended up purchasing three kinds and I'll tell you, this one was easily my fave. Starting out, one is all you need IF you block out all the light in the room, making it completely black.
We left the gallery up for several days because my admin loved it so much, she called in nearly everyone in the district to drop by and see it. Even with the lights on, it was stunning.
Have you done a black light gallery before? What tips do you have? This was my first so I'm sure I have A LOT to learn. I would love to hear from you!
Super excited to start our black light gallery projects next year...even if it's MAY and I'm on summer break, ha!