Showing posts with label art day. Show all posts

Monday, October 22, 2018

In the Art Room: Guided Drawing, Part 2

In light of yesterday's post, I thought I'd share a follow-up blog post. One reason I find most folks argue against guided drawing is the following:

It is too restrictive.
It leads kids to believe that there is only one way to draw.
It puts too much pressure on the kids.

AND I AGREE...if guided drawing is a tool used incorrectly in the art room, it can be all of those things. So I thought I'd share some tips and tricks that I use in my art room that eliminates the pressure, the restrictiveness and the notion that there is only one way to create.

I tell the kids that we are all unique and our artwork should reflect that. 
We have a little pep talk before drawing: each of us is unique and that's a wonderful thing. We are all going to hear the same directions...and each of our artist's brains are going to hear and translate those directions differently...and our artwork will reflect that. 

I tell the kids that if I had wanted copies of artwork, I would have just MADE copies. But I want to see their artistry, their work of unique art. 

I call our Guided Drawings, Practice Drawings. 

I tell the kids that this drawing that we are doing together is just practice, not perfect. If they aren't happy with their drawing, DON'T WORRY ABOUT IT, IT'S JUST PRACTICE...and you can do another one next art class. This eliminates the pressure of trying to be perfect (and how is?!).

I also tell the kids that they are not to throw away that drawing. If they do decide to redo their drawing the following art class, they are to use their initial drawing as their guide...and keep it. Take it home, color it, give it to mama, give it to me. But the trashcan is NOT an option. 

I've also noticed that by the time the second art class rolls around, most kids have forgotten what little thing bothered them and are happy with their drawings.

ALSO...having kids practice on dry erase boards as they draw along with you makes a big difference. Then they can take that drawing to their seat and copy from that onto a piece of paper. 

When we draw on the floor, we either use pencils with no erasers or Sharpies. I don't want the kiddos to use their art time erasing holes in their paper. 

We talk about Beautiful Oops! 
What a great time to talk about all the endless options you can do if you draw something unexpected. It's a happy accident. Let's see where it takes you!

WE KEEP IT SUPER SILLY...
And that really helps release the pressure the kids may feel. I recently recorded myself teaching my kindergarten how to draw Roy G. Biv. If you are interested, you can see how I try to keep it silly, fun and light for the kids. 


 photo signature_zpsd10b3273.png
Read more »

Saturday, October 13, 2018

In the Art Room: Sketchbook Covers

Well, better late than never ever, amirite? My students are just now getting rolling on their sketchbooks tho that's no fault of their own. I've been doing sketchbooks with my kids for years now ... and had a pretty fool proof way that worked for me and the kids. But there was always one thing kind of bothering me...that I never had a way for them to add informational pages to their sketchbooks. You know, like an Elements of Art reference sheet or, what I'm really excited about, some Art History Rocks sheets. So this year, instead of using manilla folders with pages stapled inside, my kids are using pronged folders that we can add pages to!
Because my students are working on their weaving and sewing projects right now, they are all finishing their work at different speeds. While allowing time for the kids to finish AND providing my early finishers with a quality drawing lesson, I created this sheet. It worked GREAT! My students drew lightly with pencil first on their folders then showed me their drawing before going over their lines in pencil. If you'd like this sheet, you can download it here. 
 This is the work of a couple third graders after they finished their weavings. They were so stinkin' proud of their work! The ABC sheet is one I found online. You can find it here along with a great video. 
For the background, we looked at the work of Jen Stark and talked about creating a repeating line pattern. The kids chose a line and simply repeated it in any way they liked. Again, they were working independently so lots of options were open to them. color was added with markers. 

The kids are so proud of their covers so far. They'll continue adding to these as an early finisher project. I CANNOT WAIT to introduce them to our first Art Rocks theme and get them rockin' in these books. Stay tuned!
 photo signature_zpsd10b3273.png
Read more »

Sunday, October 7, 2018

DIY: Roy G. Biv Costume!

As y'all might recall from my last post, my kindergarten is in the middle of what I'm calling Rainbow Bootcamp. We've been learning the order of the colors in the rainbow in many ways...always kicking off our lesson with my very favorite They Might be Giants song Roy G. Biv
Well, next week is Spirit Week for our Scholastic Book Fair at our school. What that means is each day this week, we are dressing up in accordance with the theme for the book fair. The theme is Enchanted Forest...which has made for some very interesting dress up days. One of them being "Dress like a Gnome or a Fairy Day". Now. At first I was like "wait, whut?! What in the world am I supposed to dress like on that day?!" 
Oh. Duh.
Making this costume was so easy that I thought I'd share the process. The supplies I picked up at the craft store where:

  • Martha Stewart plates at Michaels! Those were used to create my prism wand. I sandwiched a dowel rod between two plates with some hot glue and viola!
  • Dowel rod
  • Fabric for the beard
  • Quilter's batting for the beard
  • Elastic or a ribbon to tie the beard
  • Poster board for the hat
  • Sparkle rainbow adhesive foam for the hat
Lemme tell you, I was not looking forward to making the prism...I initially had a foam block and a lot of glitter in my cart. But when I saw those Martha Stewart plates, I thought those would be so much easier to assemble! Also...I started out with sparkle ribbon for the hat. But each roll was $5 and that was getting expensive. Turns out the adhesive glitter foam was much better and, at only a $1 a sheet, much cheaper. 
I'll keep you posted on how the kiddos react! Oh! AND for the rest of the outfit: overalls and top from Forever21; socks from Sock It to Me; clear boots from my bestie!

 photo signature_zpsd10b3273.png
Read more »

Thursday, October 4, 2018

In the Art Room: Painting Rainbows with Kindergarten

This week, I took my lil kindergarten friends on a trip to Rainbow Bootcamp! We watched the Roy G. Biv video by They Might be Giants (on YouTube and every bit of awesome!) and then we dived in to painting our very own rainbows. Here's a clip of the lesson I shared with my students:
I have 30 minute art classes with my little friends. This was how I introduced painting rainbows with tempera cakes on that very first day. My kindergarten friends have been painting up a storm with watercolor, tempera paint and now tempera cakes! I like to use Alphacolor's Biggie Cakes for tempera. They have all the colors EXCEPT purple...which I show the kids how to make by painting a second blue stripe and painting red on top.
By the time our second 30 minute art class rolls around, we are ready to add our sky. We use chalk for this portion and learn how to blend the chalk in. So much fun! Next up, we'll create clouds and a sun to finish off these masterpieces. 
We wouldn't be learning about rainbows without some wild and crazy ensembles. Stay tuned to how this lesson progresses!

SIDE NOTE: For some reason, many of my videos are being hidden on my channel under "restricted mode". I have no control over this and YouTube ain't gonna do nothing about it because, honestly, they don't care. So, if you are unable to see some of my videos, try turning off restricted mode on your device and you'll be able to view a ton. Sorry for the inconvenience! Thanks for understanding. 
 photo signature_zpsd10b3273.png
Read more »

Tuesday, October 2, 2018

Teaching Kindergarten: Vincent van Gogh

Teaching kindergarten is currently my most favorite thing. Maybe it's this particular group, maybe it's because I've finally caught up to being just as crazy as they are...I dunno but I do like it. I've been sharing a lot of videos of myself teaching kindergarten (as well as those older kiddos) on my Instagram but I'm limited to only sharing one minute clips. I thought it would be fun to share the longer version here. I LOVE watching other teachers teach...and I have a feeling you might feel the same. I always learn SO MUCH! I also learn SO MUCH from recording and watching myself (1. I talk too much and 2. I talk too much). I totally recommend you give it a shot. Several of my classes were learning about Vincent this week and I thought I'd record my intro...so, here you go! 
If you enjoy this video, you can find more like it on my YouTube channel. I'll keep you posted on how our lesson progresses!
 photo signature_zpsd10b3273.png


Read more »

Tuesday, September 25, 2018

DIY: Top Favorite Fall Crafts

Fall is my very favorite. Halloween is my very favorite. If you've been around this blog for a couple of sessions then you know that it's this time of year that I'm usually firing up the hot glue gun, busting out the Celluclay and creating things that go bump in the night. This year...well, I'm just a little busy with other things to craft any spooky goodness. However, I do believe I'm pretty well stocked in all things frightening. So I thought I'd put them all together in one big ole blog post! All links will take you back to the original post which, more than likely, will have a how-to video. Happy Crafting!
1. Probably one of my all time favorite fall creations were these Zombie Head Planters. This was at the height of Walking Dead/Zombie popularity (remember when EVERY movie was a zombie movie?! Not that I'm complaining but, really, how many zombies movies do we need?!). I loved creating the expressions for these dead dudes!
2. These Halloween miniature pieces were fun to craft on an afternoon. The pumpkin dude was created from paper clay found at the craft store. And the little painting was a copy of a vintage Halloween creation. 
3. UGH, THIS PHOTO MAKES ME LOVE HALLOWEEN SO MUCH! I created these creepy heads with Styrofoam head forms found at Joann's, cheesecloth and liquid starch. That creepy mummy just might be my favorite.
4. The things you can do with that liquid starch and cheesecloth combo, y'all! This was a vintage music box thingie that I transformed into Frank and his Bride. Can I get a gig where I just sit around and make Halloween stuff 24/7? BECAUSE THAT WOULD BE AMAZING! 
5. When I found this old jewelry box at the thrift store, I KNEW I had to make it into a book of spells. Weird? Probably! But I'm telling you, Celluclay is magical and you can make just about anything with it!
6. On that same thrifting trip, I found a bunch of bottles and decided to craft potion bottles from them!
7. I've got my eye on you. All of 'em! How-to video included in this creep-tastic EYE POPPING blog post...sorry, I had to. 
8. What I really love most about creating is taking something boring and transforming it into something insane. This was a little "Country Store" bird house type thing...that I completely spook-i-fied. I love the little light at the top! Details here. 
9. Wow, you're such a chatterbox! Did I mention that I love creating with Celluclay? Okay, lemme tell you what it is: it's basically a paper pulp type of clay. It comes in dry form and all you do is add water. I love to add it to an armature, whether it be one I made or one I've thrifted. Once the creation is dry, I usually paint them all black and dry brush the color on top...I love the antiqued look it gives. Details on these guys can be found here. 
10. Yes, in case you are wondering, that IS a candy corn tree. More deets on that in a second. First, can we talk about that eye-popping dude? Loved creating those creepy skulls!
11. Gangster Bats! Beware...they'll give you an offer you can't refuse. 
12. The Halloween creation that started it all...these guys! I made them back in 2015 and they are still my most favorite thing! LOOK at those faces, so silly and happy. Details here.
13. The Bride has ALWAYS been my favorite...mostly because I find the actress, Elsa Lancaster, so striking! This was so much fun to paint...I need to paint more, I miss it. Mixing all those different tones tho? NOT my favorite!
14. Is it even fall without Day of the Dead creations?! I think not...they speak to my love of color on these cloudy days filled with crunchy brown leaves. These planters were so fun to paint!
15. We travel a lot during the fall...mostly to our haunted house events. I love to have a craft on hand to work on and embroidery is usually my go-to. This reversible necklace was created during one of our Halloween adventures.
16. Hosting craft nights is one of my favorite things...something I don't make the time to do right now...but hope to in the near future! My artsy friends and I created these guys on a craft night a couple years ago and they are still my favorite. 
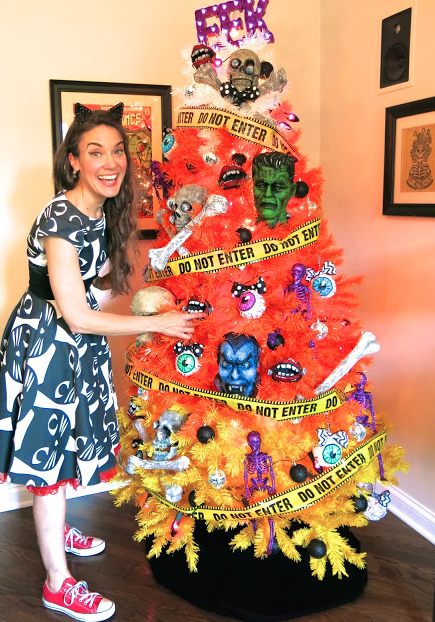
17. Decorating a candy corn tree counts as a fall craft, right?! This tree is from Treetopia and it's just about the best thing ever. I have a rainbow version in my art room!
18. I've never officially blogged about my Hitchhiking Ghosts painting inspired by Disney's The Haunted Mansion because I felt like I never finished it! But I kinda don't mind it in it's ghastly ghostly state...and I'm pretty sure I'm just too lazy to finish it.

And there you have it! My Top 18 Fave Fall Crafts! I'll be continuing this lil series with my fave fall art projects for kids and, of course, my fave fall ensembles. Yay! It's fall, y'all! 
 photo signature_zpsd10b3273.png
Read more »

Monday, September 24, 2018

In the Art Room: Chris Uphues!

Well...something super duper and magical happened to me this weekend while I was taking a little trip to Orlando...I got to met Chris Uphues and Jennifer!

You.Guys. I have been WILD AND CRAZY for these two for a while now. They are simply the best. SERIOUSLY. I mean, look at this amazingness first of all...
And having met them, I can tell you, they are just as bright, happy and loving as each and every heart you see right here. Seriously, y'all. My mom and I sat down with them, totally interrupting Chris' mural painting time, and they made us feel so welcome, happy and warm just to be around them. I've never met two people who were as cute and kind as these two. I could literally hang with 'em all day!
When I discovered through some excited messaging with Jen that we'd be in Orlando at the same time, I knew I wanted to make a meet up work. I mean, I've been creating lessons and sharing my love of Chris' work for a while now! 

Since I'd be meeting them...I decided to have my students learn about Chris while I was away. So...Chris taught art for a pinch while I was gone, even if he didn't know it. 
Sweet baby Jesus in the manger, there is nothing, NOT A THING, I hate more than prepping for a sub. Can I get an amen up in here?!

THAT being said, I did create some drawing sub plans for my kids and I thought I'd share 'em with you. My students and I LOVE Chris Uphues and I am so excited to share this drawing lesson with them. When I'm out, I like to keep my sub life easy: so a lesson for ALL GRADE LEVELS with LIMITED SUPPLIES AND PREP it is! Yippie! Happy sub means happy classroom to return to.
I told my sub that the classes that only have 30 minutes will probably only get to the dry erase board sketching. They're also reading the book The Shape of my Heart at the start of art class. 

For my hour long classes, they will also sketch and then, after a short time, meet again on the floor to view the rest of the video. 

What's up next for these drawings? Just you wait and see (which is code for I HAVE NO IDEA BUT I'M UP FOR SUGGESTIONS!). 
Also...stay tuned. I'll create a post in the next day or so with free downloadables of the handouts I created. Until then!
 photo signature_zpsd10b3273.png
Read more »

Tuesday, September 18, 2018

In the Art Room: Creating

Okay, so, two things: I made a poster for my students in my art room and I'm sharing it with you, if you like. You can scroll down and click for a free download. Second thing: if you don't like the poster, don't print it. And that's all I'm going to say about that. The end.
Okay, I lied. I have more to say. I created this anchor chart for my students. PDF right here. Nearly all of my kiddos fall under the "real creating" category. They work hard, they follow process steps, they are engaged and love coming to art. But I do have those friends who are "fake creating". They bother other artists, they rush through their work and they are careless creatives. Some might say "this is how they create". Look, I know my students. I know they all create differently. And I know when they are being lazy, distracting and careless. This is not how one grows as an artist. 

If you've seen videos of me teaching, then you know I am all about the silly. I am all about teaching to different learners. But I am not about to forfeit the art education of my students for the sake of other students who are not giving it their individual best. 

Like I said, take the poster or leave it. You do you. I'll keep doing what I believe to be the best for my young artists. They are my top priority. 

 photo signature_zpsd10b3273.png
Read more »

Sunday, September 16, 2018

What the Art Teacher Wore #206


 Hey, sweet friends! I hope your week was a wonderful one...mine started out so super amazing as I had a visitor all the way from Australia! Thank you so much, Belinda for hanging out with me and my students. They LOVED having you as much as I did!

Nearly all of my students were painting this week, from kindergarten through third grade. This was great because it meant low prep for me (aside from the initial painting prep which, as you know, is time consuming!). I love painting and I love teaching painting with my students. In fact, you can find out all about our supplies, set up and routines here! 

And, in case you are wondering, yes, my kids did draw all over this dress! Actually, they drew self portraits in the frames that was printed on this fabric and then I stitched it into a dress. You can find out more here. 
My third graders spent two art classes painting these large Chinet plates for their circle loom weaving project. On the first day, we reviewed painting routines and created concentric circles. On the second day, we painted patterns on our plates. These make me so stinkin' happy! I cannot wait to weave with these guys tomorrow!
My latest new favorite thing: lidded ice cube trays. I found mine on the Walmart website but they are available in lots of places. The reason I love them: they gonna keep my paints from drying out. I've tried egg cartons and regular ice cube trays...but the paint always dries. Hoping these prove to be the solution.
 Since we are all painting, I thought wearing this dress would be the safest bet! Loved chatting with the kids about how I created it. Details here. 
 My third graders are killlin' it with these plates and I'm so excited! I talk a lot about craftmanship in my art room...and you can read about that here. 
Kindergarten hopping on the Kandinsky train with these smaller cardboard circles they are painting for Dot Day. We totally didn't make the Dot Day deadline...and that's okay with me. These are so sweet!
 So I'm doing something crazy: I'm doing two different weaving lessons with my third graders! While one group is circle loom weaving, another is tree weaving. Before we could paint a landscape on our plates, we had to create two landscape painting sketches. These turned out so stinkin' pretty! Proper blog post on these to come...they will def be framed and featured in the halls soon!
 My first graders completed their HUGE 14" dots this week! I adapted a lesson that I shared here. On the reverse, we'll be doing something different than the blog post...I'll keep you posted. We will be hanging these like mobiles and I'm so stoked to see them up!
 Another day of painting, another painted dress by me. 
 After creating their two small painting sketches, my third graders had to pick their favorite to paint on their plate. I'll keep you posted on how their tree weaving goes! 
 YOU GUYS. LIKE, WHY?!
 I got a ton of questions on painting with children this week. So I did a blog post and have a podcast dropping later this week on this very topic!  
 Check out my new art teacherin' tool belt! Chrissie makes them CUSTOM to your interests! I love mine. You can find out more about Chrissie and her designs here. 
 FINALLY getting our Getting to Know You sculptures up. I meant to go in to school on Sunday and knock it out...no dice. 
Did y'all celebrate Dot Day? We did...we just didn't get everything up in time. Or AT ALL...and that's okay. I'm excited to see everything complete and on display. 
I cannot wait to share with you my sweet second grader's embroidery lesson. Stay tuned!
 photo signature_zpsd10b3273.png
Read more »