Showing posts sorted by relevance for query LOVE prints. Sort by date Show all posts

Wednesday, March 7, 2018

In the Art Room: Second Grade Kindness Prints!

I have been oversharing this lesson so much on my Instagram because I LOVE IT! My second graders learned so much in the making of these kindness prints: how to create a printing plate, make marker prints, pull ink prints, burnish their printing plate with spray paint, steel wool and aluminum, use Model Magic to mix colors and create a heart and...last but not least, pick a word of kindness that best resonates with them. DID I MENTION THAT THIS LESSON PACKED A PUNCH?! Holy cats! But, y'all. I'm in LOVE.
 So, how did we create these masterpieces? I created a video to share the process. I thought I'd break it down class-by-class what we worked on. Keep in mind that I have 30 minute art classes with my 2nd graders...so I'll be breaking down my lesson in baby bites for those of you that have hour long classes. Just combine my two days and you'll know what you can accomplish in one class of an hour.
Day One: Chatted about Robert Indiana, looked at his LOVE sculpture. From there, we switched gears and began drawing the designs on our printing plate. First with one color ink pin and then a different color to insure that we made the lines deep enough.

Day Two: Continued tracing and then started coloring our designs with water soluble markers. Early finishers pulled the first of the marker prints.
 Day Three (week two): We spent the class pulling marker prints. Once you print one, you simply recolor and print another! 
Day Four: EVERY ONE'S FAVORITE: INK PRINTING! These kids loved ink printing...and pulled a million amazing prints. The key is having a tray that is rectangular (so the kids only roll up and down; I'm using the lid from my tempera cakes) and using ink. Sorry, no skimping here, paint just won't cut it.
Every two kiddos shared an ink tray and a brayer. I used the same ink and brayer for two classes, back to back. No issues with the ink drying...prints pulled were still beautiful!
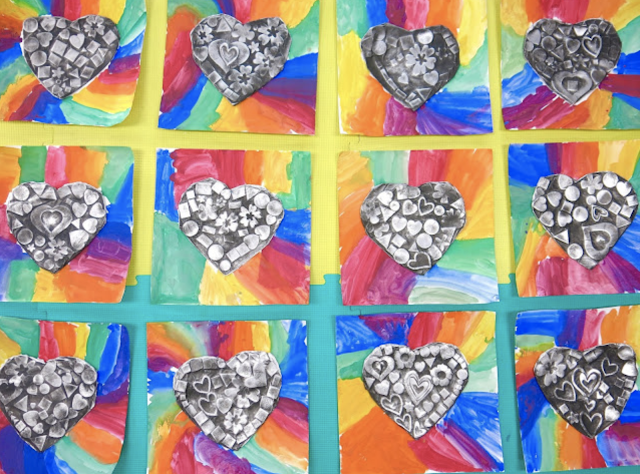
 Day Five (week three): I've had the idea of the kids doing something with their printing plates for some time now...and I really thought they would be great embossed. Here's the key: the prep is a little on the heavy side. I laid all of the plates on a large sheet of paper, gave them a shot of 3M spray glue and covered them with inexpensive foil. Then I sprayed them all with the $1 a can matte black spray paint from Home Depot (this is the ONLY paint to use when doing this kind of project, it burnishes off the easiest!). Then the the kids burnished off the spray paint and they were amazed with the results. Some even wanted to add color:
 While pretty, I would recommend skipping this step. It just about killed my Sharpies as the tip of the marker was ruined by the spray paint particles. 
Day Six: We made Model Magic hearts! The kids could pick any two primary colors and white. They rolled them, twisted them until they got their desired color/design. Then they shaped them into hearts. They had to also decide upon their word of choice...so they would know where to place their heart. Their heart would act as the dot to the I or the O.
Day Seven: LAST DAY! We used strips of 4.5" X 1" pieces of paper to create our words. They were glued down. Then the kids picked a construction paper frame and decorated it with sparkle tape I found at the Dollar Tree!

A long project? YES. Did they learn a lot of new styles, methods and techniques? YES-YES! I would definitely do this again...I can't wait to hang these in the hall!

 photo signature_zpsd10b3273.png

Sunday, August 4, 2013

What the Art Teacher Wore #72

Hello, Final Summer Monday: Yep, that's right. Come tomorrow, we'll be back to school. Thankfully we've got a couple more days to get our act together before the kids return. Oh, and speaking of kids, tomorrow is Meet-the-Teacher night which is always super fun. And I totally spent the majority of the weekend working on a dress for the occasion. More on that soonish. dress: vintage, DIY-update by me; belt: Pin Up Girl Clothing (I wear this thing TOO MUCH); shoes: thrifted Crocs (that's right, I said Crocs, can you believe it?)
What is up, ya'll? It finally stopped raining here (it's seriously been the rainiest summer ever in Tennessee. And that's great, I can dig it, but my yard looks like a Chia Pet on 'roids. Which sounds way cooler than it looks. Imagine Carrot Top's hair as a yard. Got that in your mind's eye? I told ya it wasn't pretty). 

So I was able to tackle said Rainforest Cafe Yard this morning and was almost finished when the neighbor's super-friendly, always-on-the-lamb golden retriever decided to drop by for a "Hey, whatcha doin'? It looks like fun! Can I help? Oh, wait, I gotta pee. On your mailbox. Okay, I'm back! Whatcha doin' now? Before you tell me, can I sniff your privates? Please?! Because that would be awesome. Oh, wait, I gotta pooh. Right where you haven't mowed yet. Be right back!"

And, when he returned, that sweet pup proceeded to drool the slimiest of drool all down my leg. Guh, just the thought still makes me do a little dry heavin'. So I've still got a pinch of yard work to complete. And for that reason, Ima gonna hafta to keep this post a pinch less long-winded than most. You're welcome.

Oh! And I'm including an artist along with my outfits this week! I used to be so good at that and then I, well, went on summer vacay and turned my brain off. I love the work of Hokusai so I thought I'd share it wit ya this week. Enjoy and I'll be back soonish!
The Great Wave off Kanagawa (aka The Wave), circa 1830 - 33, Katsushika Hokusai. So, when I think of Hokusai, I think of The Wave. This work was the first in his series of woodblock prints titled Thirty-Six Views of Mount Fuji. This work, like most of Hokusai's wood block prints, is an example of Ukiyo-e art. Translated, that means "pictures of the floating world" and in you-and-me terms, that means works of art created between the 17th - 20th centuries with landscape motifs. Or big fat wave motifs. Either one.

Self-Portrait in the Age of an Old Man, Hokusai. Katsushika (best name ever) Hokusai lived from 1760 - 1849. And in that time, he became one of the most outstanding creators of Ukiyo-e with his woodblock prints and paintings. During his lifetime, block printing was a new thing that he obviously took to. Dude created around 30,000 block prints during his lifetime.

My First Handmade Dress Tuesday: I found this forgotten dress in the back of my closet the other day and had to get it out. I sewed it about 5 years ago and it was my first wearable garment. It's actually based off a prairie style skirt. All I did was pull the thing up to cover my lady-bits and add shoulder straps. Without the belt, it's a total tent but that's just between you and me. sweater, yellow necklace: thrifted; shoes: Crocs; hair flower and dress: made by me

South Wind, Clear Sky. Another one of Hokusai's Thirty Six Views of Mount Fuji. This series of prints is really what catapulted Hokusai to fame during his lifetime. He was already well-known in his home country of Japan. But when copies of these prints traveled abroad, his work became widely recognized and appreciated. Among his most famous fans? Vincent van Gogh.
Catching Up with Friends Wednesday: And by "catching up" I mean "putting them to work". Two of my buddies helped me put up that Anthro tree (which seriously has a Little Shop of Horrors feel to it), another took some bottle caps off my hands and then I grabbed dinner with my future student teacher. Who will be put to serious work, muhahaha. I got a car that desperately needs a washin'. dress and sweater: thrifted; belt: H&M; sandals: Chacos
Lilies. I love Hokusai's work but I really got a think for his flowers. Especially this piece. I do believe that blue in the background is my favorite color. I love everything about this work of art.
Back at It Thursday: Our first days back to school involve lots of sitting. So here I am practicing. Sunglasses are excellent at meetings because they hide eye-rolling and sleeping. Now if I could just work on that mouth-hanging-open/snoring part, I'd probably have a lot more people fooled. dress: DIY here
Goten-yama Hill. Again, I love the color palette. Those blues with the pink, my fave.
Fun Friday: I really work at the best school ever. It was our first day back in our school building as a team and it felt so nice to catch up with everyone. We had some long-time staff members chat with us on the history of our school and it was goose-bumpy good. It definitely made me excited (ish) to be back. dress: thrifted; belt: Anthro; shoes: Frye; flower: made by me; necklace: ancient Target
Cranes. Look at how beautiful and perfect those cranes are. And to think they were created with just a few simple brush strokes. Brush paintings really seem to have the idea of "less is more" down, don't you think? It looks so simple yet it takes a lifetime to be able to paint like this.


Saturday, January 21, 2017

In the Art Room: Happy Hearts Inspired by Chris Uphues

Hey, friends! Second grade-land has just finished off a fun project with a strong focus on LOVE. My theme this year has been kindness and with Valentine's Day right around the corner, I really wanted to focus on all things love-y. Because, let's face it, the world could use a whole lot more love right now! 
And if these happy hearts don't help spread the love, I don't know what will! 

Another focus this year has been to introduce my students to more contemporary artists and also street artists. During my search, I discovered the artist Chris Uphues and completely fell in love (sorry, I had to) with his work, especially his happy hearts! 
If you aren't familiar, Chris is an artist based out of Chicago whose heart murals can be found there as well as in New York and Los Angeles. When I discovered his work, I was immediately struck by how happy it made me! I knew the colors, energy and joy in his work would really resonate with my students. Y'all should really check out his website...I love that his hearts can be purchased in the form of reasonably priced prints, patches and pins. I've got a cart full! 
I would totally cover a wall in my house in these! I mean, who wouldn't?! 
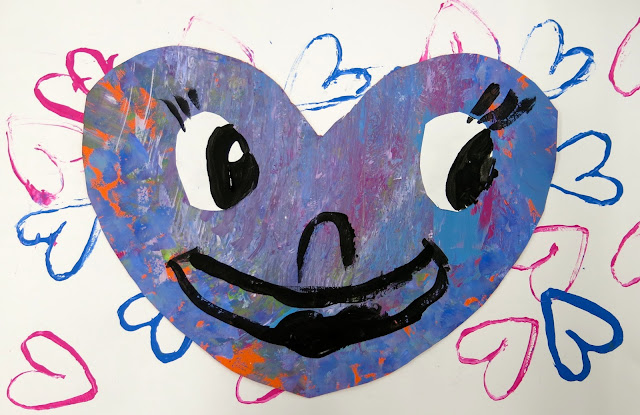
For the Happy Hearts pieces that my second graders created, we used the following:

Day 1:
* Black and white paper, 12" X 18"
* Tag board heart stampers
* Paint in yellow, magenta and turquoise

Day 2-3: 
* Painted papers, construction paper, scrap papers for hearts
* White paper for eyes
* Black paint
* Scissors and glue
Day 1:

I see my second grade kiddos for 30 minutes, twice a week. On our first day together, we chatted about Chris and his work. I introduced the kids to printing and we printed a black paper and a white paper full of hearts. To see how the heart stampers were created, watch the first 5 minutes of this video
On day 2, students learned how to cut out hearts. Many students knew how to do this already...but I had several that didn't. This was a great introduction to symmetry! I also offered them oval, circle and other shaped templates for the eyes. Once those were glued down, black paint was available for the artists to paint the faces. I had printed off several sheets of Chris' hearts to give the kids ideas for expressions. 
By the end of the second day, we had a ton of these! I love how happy and fun they are. 
Over the next couple art classes, the kids created more hearts and began adding them to the printed backgrounds. They so enjoyed creating these expressive heart faced characters. This project was a huge hit with them! 
Each kid was super engaged in creating their heart collages. When I told them that we'd be moving on to another project next week, each class shouted "WHY?!" They couldn't stop making these hearts! I just might have to give them one more day to keep on heartin'. 
As they worked, the kids had stories about each heart and how they interacted with each other. We had heart moms, dads, babies, grandparents, you name it! 
As they worked, the kids laughed at their hearts, showed them off to friends and pulled ideas from one another. 
Before gluing, we did chat about composition, overlapping, emphasis and scale. I wanted to remind the kids of these thoughts as they worked...but made sure not to weigh in too much as I really wanted to see where their ideas would take them. 
 Because, I mean...look at how fun and funny they are!
I'm so looking forward to showcasing these throughout our school along with all of our other LOVE-based projects. Just a quick scroll through this blog and you'll find half a dozen love-based projects we are currently working on in the art room. 
The best part is, I've tagged Chris Uphues on several posts showcasing the kids' hearts on my Instagram and he's been so sweet to respond! The kids have loved hearing his positive feedback. 
It's made us feel all...happy! Like this. 
 
If you are looking for a fun lesson for your students that introduces printing, symmetry, expression, collage and the amazing contemporary artist Chris Uphues, I strongly recommend this fun lesson! Love to hear from you if you give it a go!
 photo signature_zpsd10b3273.png

Thursday, December 31, 2020

21 Art Lessons with the Theme of Love!

Who's ready to kick off this new year with a whole lotta love, color and bright, fun lessons? BUT who's also not done any real thinkin' about said lessons?! If you said ME to both of those questions than I gotta tell ya, YOU AND ME BOTH. Luckily, I've done a whole lotta love lessons over the years and put all 21 of 'em right here in this blog post. If you follow the links to these, you'll find videos for most and lesson details for ll of them. Have fun creating!
Learn how to draw each of these cuties in these how to draw videos, found here
Kindergarten tried their hand at printing with this project and had such a blast! 
These relief hearts by kindergarten were a hit and definitely a lesson I hope to repeat soon! 
Of course, you can't celebrate all things love and Valentines-y without sharing the work of Chris Uphues with your students! We've done a couple lessons inspired by him. This one is a collage and printing project. 
This lesson has always been a hit on my blog with other art teachers and my students. In fact, I created this lesson as a sub plan so it's been a hit with my subs too! You can find all the details and video here.
My students created this HUGE collaborative mural inspired buy Britto. Lesson video here!
First grade created these huge Britto-inspired hearts with bingo daubers, bleeding tissue paper and paint sticks. Lesson details here. 
Ready to tackle printmaking with your students? Here's a lesson I've done a couple of years now with my second graders: Robert Indiana-inspired LOVE prints! 
I created these hearts with wings with foil, Celluclay and plaster strips! They are super simple to make. More here. 
Inspired by those hearts, I created a lesson for my second graders to make these
A couple of years ago, I did a professional development with the faculty and staff at my school. We created these My Heart Has Wings sculptures. Details here. 
Here was a fun lesson where we were able to use our messy mats as apart of our masterpiece! Not only that but this project provided two heart-tastic pieces for the price of one. These...
And these!
If you are looking to have your students create a large collaborative piece, you can see what each grade level worked on to make this piece here
Looking for a quick lesson that introduces students to three contemporary artists who used love and hearts as their theme? Check out this blog post with a video lesson! 
James Rizzi is always a fun artist to share with your students. We loved creating these love birds!
Here's another lesson we do just about every year in first grade: these woven and stitched hearts! All the lesson details can be found here. I created a variation of this lesson recently where students weave together strips of paper in their skin tones. You can find it here. 
These candy hearts were created by my fourth graders and we used plaster strips to create them. It was so fun to see these all come together and display them in a large candy heart box! Lesson details here. 
Early finishers of the candy hearts lesson moved onto this project when they were finished! 
Wow, did the third graders have a blast with this one! We made plaster chocolates that looked good enough to eat! All the lesson details here. 
Need a quick lesson with a contemporary artist inspiration? Try this JGoldcrown lesson on for size!


photo signature_zpsd10b3273.png