DISCLAIMER: I am offering these lessons, handouts and videos to you for free. PLEASE do not take my lessons and sell them. Because that would be super crappy of you (yes, someone is doing this. Yes, they are super crappy). Thank you. Going to NAEA in Boston next week? Need some sub plans? Y'all, I got you COVERED! Today I'm sharing my favorite VIDEO sub plans and my tips and tricks to planning for being out. There's nothing like the amount of WORK you gotta do just to take some time off. I'm here to make your life a little easier, I hope. So, without further ado, my Top Ten Sub Plans! Let me just start by saying that the sub plans I am sharing were created for my kindergarten through fourth grade kids. I ALWAYS make a lesson that's age appropriate for all my classes. This makes my prep life so much easier and the life of the sub all the better. For more tips and tricks, check out this video!
1. James Rizzi Cities! This sub plan was a huge hit with all of my kiddos. They started it while I was away and I was able to easily slide back in to a low-mess/low-stress project for them to continue. Lesson, handouts and video can be found here!
2. Loud Mouth Collages! My kids thought these were the most fun ever...while I thought they were the most funniest ever. Complete video lesson and plans here!
3. A Colorful Village! Again this is another lesson that the kids work on while I'm away and we finish up with oil pastel and watercolor when I return. Easy, fun and super colorful. Video and lesson here!
4. Chris Uphues Inspired Hearts! Who doesn't love Chris Uphues and his happy artwork?! My kids love learning about him. I've not only got a video lesson but I have a short clip of an interview I did with Chris and his wife Jen. More here!
5. I am a Super Star! This lessons is so fun...it really incorporates so much, from mixed media to literacy to a good ole boost to the self esteem! I DID ask the sub to make the stars for the kindergarten before they arrived because I'm not that crazy. Lesson here!
6. Collage Monsters! Another fun lesson that the kids really enjoyed. This one required more prep than most, just an FYI. Complete details and video here!
7. Kerri Ambrosino-Inspired Still Life! Need a pop of colorful happy for spring? Try this sub plan on for size. So fun and we busted out the PUFFY PAINT! Lesson here.
8. Wings Mural! I know, you've seen it a thousand times...but the lesson originated here! The feathers were created while I was out on jury duty, I believe...and then we assembled it when I returned. Lesson and video here.
9. Britto-Inspired Collaborative! I love having the kids work on collaboratives when I'm out. It means we have a big beautiful work of art to hang when I return! Lesson video and details all right here!
10. Monochromatic Self Portraits! Lastly, here's a lesson that's always a hit: monochromatic self portraits. We love hanging these in rainbow order for a beautiful display. Have your kiddos follow along with me in this video!
There are PLENTY more lessons and videos on my YouTube channel so be sure and give those a glance if none of these strike your fancy. And be sure to subscribe, I upload videos and content all the time. If you are gonna be in Boston, see you there!
As some of y'all might know because I've been talking about it nonstop (I often wonder just how I have acquired so many nice friends that allow me to ramble on and on without complaint. My guess is that they've formed some sort of support group), I've been out of school for several days due to el jury duty-o. You can see what I wore here cuz you know you wanna. Anywho, knowing that I was gonna be out for so long, I knew I'd have to leave some legit sub plans. So I created a couple of videos and was super pleased to see that both the kids and the subs were happy with the result. AND LOOK! Check out what they made whilst I was doin' my civic duty!
This is JUST ONE of the MANY huge banners that the kids created! Each child, kindergarten through fourth, created a quarter of a heart. Students with extra time then worked on making the letters. I was so excited to see them today that I used my planning time to hot glue them into place. To do that, I "borrowed" a roll of bulletin board paper from our work room, unrolled it onto my art room floor and set to work a-gluing. Like I said, this is just one big banner...the kids also created ones with letters that spell out SMILE, HAPPY and PEACE. They'll be going up on a large wall in our school cafeteria. But this one I was so stoked about that I grabbed a couple of teacher friends in the hallway and had them help me slap it up on the wall this afternoon.
Our inspo for this project came from the artist Romero Britto and the art teacher Jenny K! Jenny has a great drawing sheet that features Britto and his designs. Knowing that I was going to be out several days, I really wanted a project that the kids could work on happily and successfully and be something that could brighten up and spread the good word of LOVE throughout our school!
On the first day I was out, I left this video for my sub to share with the students. I've never done video'ed sub plans before but I gotta tell ya, I'm NEVER going back to paper plans! This was fun and easy for both the sub and kids. And a happy sub is one that spreads the good word. I heard from my admin and teacher buds that both of my subs were thrilled to work in my room. Of course, I took the guess work out of it and made their day cake!
Today was my first day back and it's also my busiest of days. You now how it feels when you've been gone for many days, you feel completely out of the loop! I really felt relieved coming back knowing that my room was going to be in order and that my students would continue this project. Here are my kindergarten friends coloring away.
Many of you asked me about the art stix I refer to in the video. My students have a set of these and they are well loved. They are made by Prisma and are essentially the led of a color pencil. The colors are fantastically vibrant and the kids love using them.
My younger students, kindergarten through first, created the bottom of the hearts while my older ones did the top. The reason behind this is that my older students have longer art classes and therefore more time to work on the big spaces. The papers the kids used are 12" squares. My sub and I used templates to create the thick line diagonal line that you see as well as the heart hump line (I know there's prolly a better word then heart hump but you knew what I was talking about, didn't you?!).
So that they could spot their part of the heart later, the student's name was written along the edge of their design.
Once I started laying out the hearts I felt like they needed a little something more. So I flipped some upside down and noticed the diamond negative shape that was created. It was then I got the idea to have the kids create letters for those spaces. That's what this follow up video is all about...
I put the sub in charge of tracing letters and the kids cut them out before decorating them.
This was such a successful sub plan that even though I'm not finished with assembling all of the pieces, I just had to share it with you right away! You know, in case you wanna do something like this for Valentine's Day. It's definitely a no-fuss type of project. Definitely one to consider at the start of the new school year when you want to introduce all of the elements of art and start your year with that WOW! factor. If you are interested in more of my lil videos, you can subscribe to my youtube channel here.
In other fun and exciting news, you can hear my podcast interview with the INCREDIBLE Patty Palmer of Deep Space Sparkle, here! And if you do this lesson, please let me know, I'd love to hear your tips, tricks and see your student's end result!
Hey, y'all! A handful of my second graders got really close to being finished with their Folk Art Still Life which was my sub plan while I was out last week. I am so thrilled with their hard work (as are they) that I just had to share. Many of them are still adding flowers and leaves so I'm only sharing a handful. Their next step is adding small details with puffy paint which you know I love as much as they do. Here is the lesson video that my sub used with all of my students, kindergarten thru fourth grade:
Speaking of sub, if you need any tips, tricks and/or sub plans, I just hosted a Facebook LIVE chat last night on that very topic! The chat and all of the commentary is archived on my official Facebook page if you are interested. We have been doing those live chats for the last couple of months and they are blast. Well over 100 art teachers join in each time and it's a great way to share. So if you aren't busy on Wednesday night at 8pm CST, be sure and pop by!
While they were with the sub, some of my students had one 30 minute art class while others had two. So what the sub was able to accomplish was beyond her control. What I love about having a recorded lesson (and a project that the kids are in progress) is that when I return, I don't have to scramble to slap together lesson plans. I can just pick up where the sub left off.
With the sub, my students were able to get their sticks done and glued down to the background. When I came back this week, my students worked on their vases and flowers. By next week, they should have all of their flowers and leaves complete and be ready to add some puffy paint.
One thing that was not in the video was the oil pastel background. One of the kids added color to the background with the bright oil pastels and we all lost our minds...brilliant! So we all had to do the same. You know how that goes, right?!
I know they aren't complete...but I just had to share! I think these are so pretty and perfect for spring and Mother's Day. If you give this project a go, you'll have to let me know.
The other day, I had to take a day from school. I created a sub plan video for my sub to use with my first through fourth grade classes. My younger kids worked on 9" X 12" paper because they have 30 minute art classes. My older students worked on 12" X 18" pieces of paper since they have an hour. I created this video and a simple handout. When I had returned, the students had gotten as far as tracing their designs in Sharpie. They were SO EXCITED to continue working on these that I put their current projects aside to let them finish. Here are a handful of fourth grader's pieces that have been finished and are in process.
I'm loving each and every one! Since this was such an engaging lesson for the kids, I thought I'd share it with y'all. If you are going to NAEA this coming week and in need of a lesson, you might consider using this!
In addition to the video I created for my sub, I also made these handouts. That way the kiddos would recall a simple breakdown of the lesson. Feel free to reproduce for your art teacherin' world.
I also had a production of a James Rizzi cityscape as well as some images of the Nashville skyline. The kids were told they could create ANY city they wanted: real or imagined. Many of my students are interested in the buildings of Nashville since we live so close so that's why I included that visual.
My students were also allowed to use my how to draw books which is why you'll see some recognizable cartoon characters on the buildings. Several of them also used my mirrors so they could create self-portrait buildings or simply see how to portray different emotions.
I did notice that some students got a little lazy when it came time to create doors and windows. So I reproduced a doors and windows idea sheet from line drawings printed from the internet. This really helped encourage more creativity.
So many of them just went wild with this lesson and they really loved it!
When I returned, I introduced them to Vincent van Gogh and we spent a lot of time learning about him, looking at his paintings and chatting about his brushstrokes. Then we looked at The Starry Night and used that as our inspiration for our skies.
For that we used both oil pastels and markers. Once our skies were full of dashed lines, we simply added water!
From there, we used the warm colors (ahem, well, some of us did) to add color to the sides and top of the buildings. Afterward, water was added. This was a super non-mess way to create a vibrant and creative masterpiece.
Unfortunately, my kiddos are in various stages of finishing. Why have we not been able to invent a All Finished At The Same Time Machine yet?! Ugh, the worst. So here as some spectacular almost-finished masterpieces.
This is easily a lesson that ALL of my students adored, from first grade all the way up to fourth.
And certainly one that a sub, even if not an "art" sub, could handle.
I know a James Rizzi lesson isn't anything new...but I thought this was a fun and SIMPLE take on it that even a sub (or us...when we are nearing spring break and need that easy project that also keeps them engaged!) could use.
Speaking of sub days...who is going to NAEA?! I'm so excited, I've never been to Seattle before.
I won't be leading any sessions but I will be doing TWO meet-ups and I'd love to see you.
You can join me on Friday in the Activa booth where you can make and take one of these cuties! Or just hang out and chat.
Or come hang out on Saturday with me and the podcastin' gang from AOE! Tim will be there along with the AOE team so it will be super fun.
Hello, friends! I've been packing and preparing for my upcoming trip to Chicago for NAEA and I'm so excited. While I do love me some art teacherin' conferencing, I don't love the multi-day sub plan preppin' it entails. The subs I've lined up are super-fab and I know they will have fun creating with the kids. However, they aren't art teachers by trade so I do like to have sub plans that are not only easy for them to follow but ones they can do with all my classes. This means less confusion for them and less supply prep for me! I think I've come up with a plan and I thought I'd share it with y'all in case you wanna use it too.
It's an autobiographical three-dimensional star! Our school-wide art show is coming up and I love to have the kids do a little writing about themselves. What better way to let their star's shine than with this fun project?
I mean, check out that three-dimensional star, y'all! I created both a sub video AND a photographed step-by-step. This way, if technology-town decides to be uncooperative, my sub-o can use the visuals. I'm printing each of the following photos with directions and plan to have them posted for both the students and the sub to refer to. But, before I get to all that...LET'S TALK ABOUT NAEA 2016!
I'll be presenting a handful of times and meeting y'all at the AOE "Meet the Bloggers" event! Here are the deets... * "Come Blog with Us - Three Art Ed Bloggers Share Tips" Thursday, March 17th // 12 - 12:50pm McCormick Place, North Building, N426c, Level 4 A presentation I'll be doing with some of my fave bloggy friends, Laura Lohmann and Phyllis Brown! Thursday, March 17th // 12 - 12:50 // McCormick Place, North Building, N426c, Level 4 * "Dress Like a Masterpiece: Needle Felting Wearable Art!" Thursday, March 17th // 1:30 - 3:20pm McCormick Place, Lakeside Center, E272b, Leve 2 PLEASE NOTE: This is a ticketed event. It is currently sold out. Sorry, buddies! * "Leaving a Legacy Without Losing Your Mind" Friday, March 18th // 8- 8:50am McCormick Place, North Building, N227a, Level 2 I'm so excited to present with Janine about something we are both passionate about: school-wide collaboratives! For some reason, NAEA has me listed as Cassandra Stephens (which, technically, is my name but I ain't fancy so I never use it!). * "Meet Your Fave Art Teacherin' Bloggers!" I'm super excited to meet y'all and my fave art bloggers! Here are the deets in a super cute graphic that I didn't create (thanks, Alecia and AOE!)...
I'm seriously cannot wait to see/meet/chat/high five all y'all! But until then, let's sort out these subbie plans, shall we? Below is the video I am leaving with the sub. I don't anticipate that she'll get thru the entire lesson while I'm away. However, this will be a super great way for me to ease back into things, what with the kids all working on the same project. I like a mellow-comeback after being gone for a spell, don't you? Here's a wee list of supplies used in this here art makerin':
* Copy paper cut to a square 8.5" X 8.5" * Sharpies * Markers * 12" X 12" black construction paper * Metallic markers * Glue * Chalk
This project was inspired by my current obsession with Sly and the Family Stone and the song Everybody is a Star. Take a look-see!
And here's my sub plan video! (By the way, in case this sub plan doesn't suit your fancy, check this one. Also, I'm always sharing video'ed plans here so you might wanna subscribe). Sidenote: I am going to have my sub create a stockpile of these stars for my kindergarten friends and for any kids who have a hard time following the directions. We don't wanna leave any artist behind!
(Please ignore the crazy image...and the fact that I have blue chalk smeared on my cheek for about 1/8th of the video). In case the video isn't the best format for y'all, I also snapped step-by-step photos because I'm such a giver. Here you go!
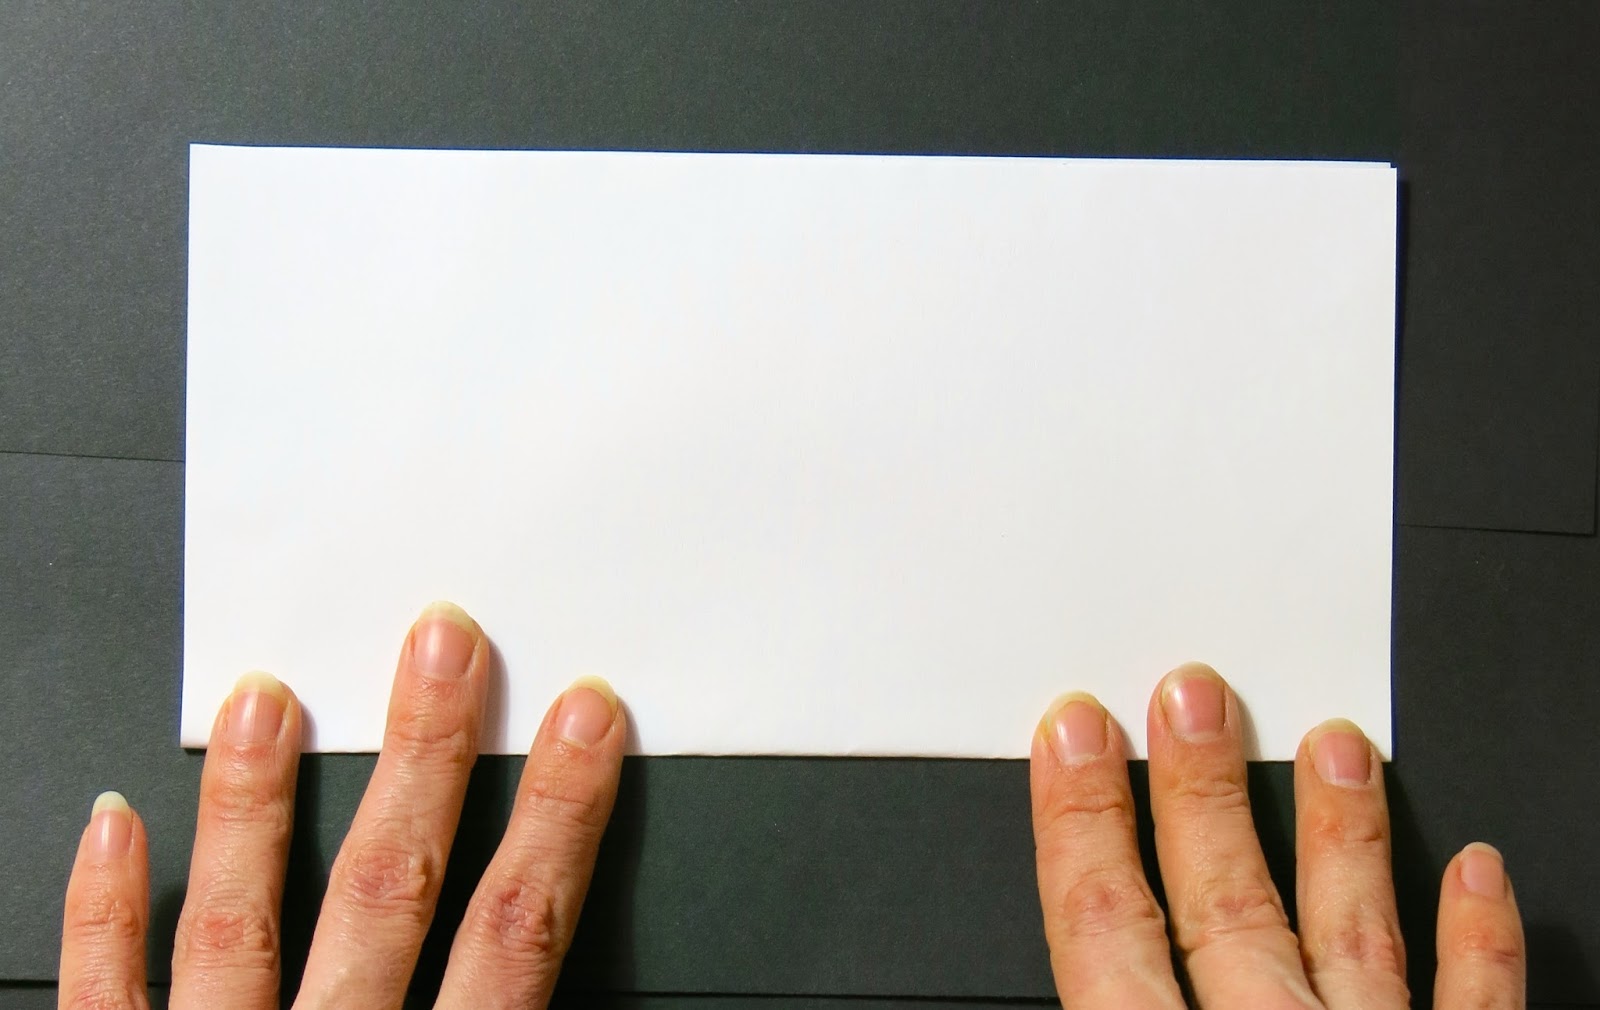
1. Fold copy paper square in half.
2. Be sure to press the fold down firmly.
3. Each corner has been labeled (my apologies for the blurry photo).
4. Take corner C and bring it to the middle of the line segment between corners A and D.
It should look like this. Press the fold firmly.
5. Then bring D up and fold a small triangle.
Press firmly.
It should look like this!
6. Now bring the left hand side over to the right.
It might be difficult to fold all of those papers. Be patient with yourself and your paper!
It should look like this.
7. Now, using a pencil, put a dot in the corner of the two angle lines on the left side...
and another dot on the other side just a little below the middle of that line segment.
Like this!
8. Connect the dots with a cut line and...
Snip!
9. Open it up and you are now the proud owner of a three dimensional star! Congratulations!
10. Now, using a Sharpie, start in the middle of your star and trace each creased line that you made with all of that folding.
You'll end up with ten sections to your star. Each section you can decorate with a different pattern and design.
Here are some ideas for you!
11. Draw your designs in each section.
12. Use markers to add color.
13. Once you are finished, place your star in the middle of a piece of black paper and trace it.
Your pencil lines will be barely visible and that's perfect!
14. Let's write about what makes us a star! As you write, be sure to hop over the outline of the star. You might want to begin each sentence with "I am a star because..."
Fill up that whole page!
15. To get your star to pop out, all you have to do is fold along the long lines of the star.
The long lines of the star should be folded up (that's called a mountain fold) and the short lines of the star should be folded down (that's called a valley fold!).
16. Add a tiny dot of glue to each tip of the star.
17. Press each tip of the star and hold for about 10 seconds to get it to stick.
18. Use chalk to color on your pencil line of the star.
Which should look a little like this when you are done.
19. Use your finger to push the chalk away from the star.
20. Let's do the same thing to the outside edge of the square! Color...
Then smear and viola! You are finished and YOU are a STAR!
Art teacherin' friends, I do hope to see y'all real soon! PLEASE feel free to use this lesson. I'd love to see what your kids create. You can always snap a pic and share it on instagram (you can find me here) with the hashtag #everybodyisastar.