Showing posts with label art class. Show all posts

Monday, May 8, 2017

In the Art Room: First Grade Fish UPDATE!

First grade just finished up their clay fish sculptures and before they get placed in our art show display, I thought I'd share them with you. This was a fun project where we used speckled glaze (Jungle Gems by Mayco) and a metallic watercolor. Here's how these cuties were created:
I see my firsties for 30 minutes twice a week. On the first day, we created the base, complete with a starfish (Patrick!) and seaweed. After the kids left, I added a hole in the base and their names to the bottom. On the second day, we created our fish. I did the same thing to the fish...it was tricky writing their names on such a small surface, but I managed to get it done. 
 After the pieces dried for two weeks, I fired them in the kiln. I then dipped the bases in a gold watercolor to completely cover them. From there, the kids used metallic watercolor paints for the seaweed and starfish. Glaze was used on the fish. I encouraged the kids to use at least three coats of glaze for complete coverage. 
The speckled glaze really is the coolest. And the kids love the surprising change they see once their creations have come out of the kiln. 
After all of that fun was done, I had the pleasure of gluing the pieces together. I used chopsticks (I had a donation given to me) that I broke down to a smaller size. After gluing a couple of tall fish, I realized that they might be more inclined to tip over and break than the shorter ones. 
They are much more stable with the smaller sticks. And super cute, I might add. I want one for my home!
The kids had a lot of fun adding texture to their fish which really turned out beautifully with the glaze. 
By the way, when first adding the holes to the bottom of the fish and the base, make sure you wiggle the stick back and forth a bit. Clay shrinks as it's drying and the wiggle will keep the clay opening the right size for the stick. 
Our Pet Shop themed art show is next Tuesday night...I'm slowly getting the art room ready for the transformation. I can't wait to see these fun fish on display. I'll be sure to share!
 photo signature_zpsd10b3273.png
Read more »

Thursday, May 4, 2017

In the Art Room: Kindergarten Creates Arlo Needs Glasses

 We are winding down the year and heading to the art show...which means art projects now need to be short, sweet and a review of what we've learned. Today, kindergarten did a review of both pattern and texture while listening to the tale of Arlo and his need for glasses!
These cuties were created in 45 minutes and it was go time from the moment they walked in the door. I LOVE author Barney Saltzberg (his book Beautiful Oops is an art teacherin' fave) and I'm a big fan of Arlo Needs Glasses. Unfortunately, I don't own a copy but I did find a sweet little YouTube video of a boy reading the book. 
The kids were immediately interested in Arlo and couldn't wait to create. I had them gather up an 11" square piece of construction paper with any color of their choosing and a paintbrush. Once at their seats, the kids wrote their names and then used oil pastels to create a colorful rubbing. After a few minutes, we did a guided painting together. Here's the one minute version:

So much fun!
I loved how sweet and cute each Arlo was and so did the kids. I overheard the kids talking about how much they loved their creation. "I like mine and so does Mrs. Stephens!" to which another replied, "She likes everyone's art. That's her job." It's true. 
There were a lot of squeals when I said that we'd be finger printing. 
 I love how some of them look like koala's in glasses!
Once paintings were completed and drying racked, the kids met me on the floor to create the pipe cleaner glasses. 
 I played the book video again while those who finished early with their glasses helped those who struggled. 
 As they finished, I had the kids bring the glasses to me. I placed them on a large sheet of paper and wrote their names on the paper. Once the paintings were dry, I took them off the drying rack and hot glued them to the paintings. 
One more masterpiece for our pet-themed art show! Since the artwork for kindergarten is already hung, these just might be displayed on the cabinets in the art room.
 This one is so stinkin' cute...
 And this one completely cracks me up!
 Kindergarten is a tough beast to tame...but this project was definitely one that got them excited (more so than usual!) and one that I would def do again.
How about you, what are some of your fave kinder lessons? 
 photo signature_zpsd10b3273.png
Read more »

Wednesday, April 26, 2017

DIY: Folk Art Fish UPDATE!

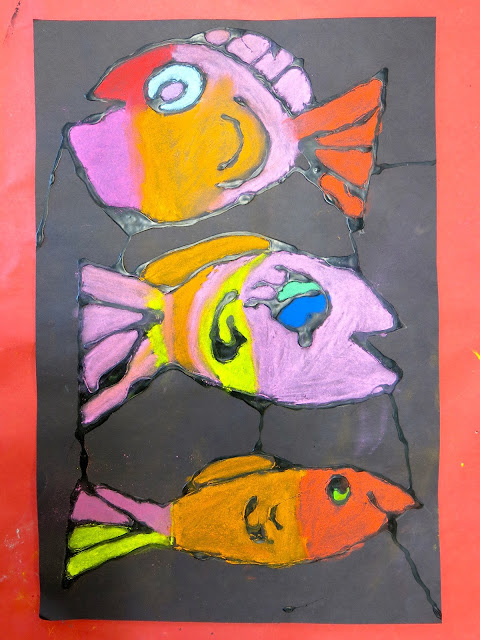
My sweet second graders had to push the pause button on this project last week to tend to painting and bedazzling their exotic birds. But now that those are done, we were able to bring back our Sandra Silberzweig-inspired folk art fish and work on them a bit more today. Almost all of the kids finished them off in 30 minutes (which is pretty awesome, considering these are 12" X 18"!) and they were so thrilled with themselves...as was I!
You can check out (and feel free to use!) the complete lesson right here: 
My students did this project in three 30 minute classes. On the first day, we chatted about Sandra, her work and the use of line and black glue. We drew our fish and went over our lines in glue. If you go to this post, I share how I make black glue. 
 The following art class, we began working with the chalk. This project is perfect for my second graders as they are about to embark on their chalked ceiling tile project super soon. You can check out what my second graders have chalked in the past both here and here. I'm not sure what they'll be chalking this year...but I need to figure it out soon! I'll be sure to share with you right here. 
The key to working with chalk is getting the kids the right stuff. So much chalk is filler and junk. The end result is usually very light in color. I love Koss Brand Chalk, even it if is hard to find. We purchase ours through Amazon. I love the subtle colors in this artist's work. 
 Compared to how bold and vibrant this one is!
 I seal all of our chalked projects with Aqua Net. I have noticed that the nozzle on the 'Net has changed and it now does not come out in a nice stream but speckled. However, if you hold the can far enough away from the work and spray, it's fine...and the speckles (mostly) disappear. It's much cheaper than fixatives.
This is usually how I lay them out to spray. Take 'em off the drying rack, spread 'em out and spray away!
They are going to look stunning at our art show!
 photo signature_zpsd10b3273.png
Read more »

Friday, April 14, 2017

Chalked Folk Art Fish

Need a happy and colorful project for your kiddos that reviews the elements of art, introduces the artist Sandra Silberzweig and allows them to explore the messy and fun medium of chalk? Well have I got a project for you! Here's the lesson video...
Please forgive the quality. I filmed this video at school using my iPad (I normally use my camera) and the iMovie app. I really love filming short clips this way as it's lightning fast! However, when I watched the video back on my laptop, I noticed the quality was not what I had hoped. 
I get asked often about making a video for the art room. I created this video last year at about this time when I was just starting to get my feet wet with filming. I use almost all of these techniques still so if you are interested in creating filmed content for your kids, you might find this helpful!
Back to the lesson: I'm doing this project with my second grade kiddos. This will probably be the last project for the year as they still have a couple of their clay projects, hot outta the kiln, to paint. We are going with a Pet Shop theme and my students created these birds:
They have all come out of the kiln so cute! I purchased some florescent paint, feathers, beads and wire for us to embellish them. I noticed on the bottle of paint I purchased that it says it works in black light...so now I'm on the hunt for a black light for the art show. How fun would that be?
 All that to say, since we are going with a Pet Shop theme, any final projects created will feature animals or fish! My students are using 12" X 18" paper (I used half that in the video) because I wanted big, bold and colorful art. On the first day, we traced the template and did the glue drawing, all in 30 minutes. 
I am going to rethink my black glue recipe for next year. I use tempera paint and Elmer's Glue All...but I think the paint is too thick as the bottles sometimes get clogged. Next year, I'm going to try using India ink as my buddy Ginger uses. That being said, I do kind of like the variety of thick and think lines that the glue produces. 

Y'all know I've caught the Black Glue Bug this year. Check out what third grade created: 

And fourth grade: 

 What I love about chalk work is how vibrant it is. 
We have a couple more days of work left on these lovelies so I'll keep you posted on what happens next. Until then, enjoy your long weekend!
 photo signature_zpsd10b3273.png
Read more »

Monday, April 10, 2017

In the Art Room: Stitched Monsters, Update!

Now that Clay Week(s) has come to an end, it's back to business as usual in the art room. In order for all of my kids to work with clay at once, I have the kids "push the pause button" on whatever we are currently working on. That means, after clay week, we un-pause and resume what we left behind. For fourth grade, that meant our Stitched Monsters! Here is the lesson video I created for this project. Feel free to use in your art teacherin' town!
Out of all the projects we have done this year, my kids have ranked this one very close to the top. Clay was a first place winner, of course, but it was a tight race. Many of my students have started sewing at home, bringing in their pillows, monsters and other creations. I remember when I was first introduced to hand sewing as a kid. It felt like a whole new world of creating was opened up to me. I think the kids are feeling the same. 
 I really liked having the kids use Smart Fab for the body as this made it easy for them to see thru and insure they were "capturing" the arms and the legs of the monster as they stitched. Once the stitching was complete and the monster was flipped to the correct side, if they noticed that part of their arm or leg was not securely attached, the kids had to go back and restitch. This really taught them the importance of good, even stitches. 
Once flipped, the kids had to complete a sketch of their monster. This sheet asked them questions about their monsters to really get their creative juices flowing. Once the sketch was done, they were to slide a card into their monster, cut the shapes of the face and glue them down with tacky glue. The card inside made it so the monster would not be glued together. 
Not until the kids started stuffing their monsters did they really seem to understand that they were creating a stuffie. One told me he was going to go home, make a bunch and sell them. Right on, dude! I had many requests to take them home today...but I need them for the art show! Give me a month, y'all.
Have y'all done stuffed monsters with your kids? I know there are may ways to go about making them. 
 Earlier this year, one of my sweet students gave me a small stuffed monster with a rectangular body and dangling arms and legs. That look is what I based this pattern on. 
Learning to sew monsters this way taught my students how to properly pin, stitch and create a monster. I definitely think this is a lesson worth repeating! 
Love to hear about your students stitchery projects! 
 photo signature_zpsd10b3273.png
Read more »

Monday, March 27, 2017

In the Art Room: Clay Chameleons!

If you follow me on Instagram, then you've seen me over-sharing all of the clay projects that my kiddos will be creating during Clay Week. I like to go with a theme when it comes to clay as that makes the art show seem cohesive. Last year, we went with the clay theme of a 1950's Diner where all the kids created clay food. It was a big hit and a whole lot of fun. 

This year, I decided to go with a Pet Shop theme! You can actually view all of the clay videos I've created for my students right here (and feel free to use them). I add new art teacherin' videos every week so if it's something that you are interested in, you might want to subscribe.

Today, my third grade students watched this video in bite-sized pieces and were able to create their chameleon from start to finish. We did use up more than our normal hour long art class...thankfully, I have a plan time after this class and the teachers were kind enough to let me use some of their instructional time for the kids to finish. I work with some super supportive folks, y'all! Otherwise, this project would have taken us about an hour and a half.
I get a lot of questions on how I show my students my videos because they are pretty long. I don't show the video in it's entirety as that would be too much information for the kids to process. Instead, I show bite-sized portions. Then I send the kids to their seats to work. When a handful of them have finished and trickled back to the floor, then I call all of them to join us, finished or not, and we watch the next portion. For these guys that meant they learned how to make a leaf and then created it; came back to learn about how to make the body and legs of the chameleon and created it; and finally, they learned how to create the head and attach to the leaf. This keeps us up, active, busy and working the entire time. 
Have I told y'all lately that I wrote a clay book? You can scoop it up for preorder right here. When I first became an art teacher some 18 odd years ago, I'd never even taken a ceramics class. And yet...my first year teaching, clay was in my curriculum. With no kiln and a small budget, I had to create clay for my kids to use. Without much info online at the time, I scoured the public library for recipes and ideas. I learned many recipes and included them in the book. In fact, all of the projects in the book are made with no-kiln clays...but have been tested out with kiln fire clay. So it's for everyone!
Working on a book filled with 52 projects meant that I had to dream up, snap photos of and write about, well, 52 projects. Y'all, that's a lot! I learned many a thing working on that book...and I believe it has made me a better clay teacher. 
If you find clay to be intimidating as I once did, I have a surprise for you! I'm going to be offering a Crash Course in Clay here during the month of May! Follow me on Facebook and I'll keep you posted on the details. Here's a peek at how I set my tables up for clay: doggie bowls for water (from the Dollar Tree and they NEVER spill!), toothbrushes for scoring, skewers for carving, cutting and creating design, clay mats (which I have had for well over 10 years) from my friend Danielle McDanielle, aka The Clay Lady, usually lots of texture tools and sponges for wiping hands when they start to feel too dry. What do you keep on hand during clay time?
Oh! And I busted out the marker caps to make these fun eyes for the chameleons.
I'm thinking we will glaze these after firing. I hope I have some room in my budget to splurge on the glaze with the flecks of glass in it. I think that would be perfect for these little guys. I'll be sure to do a follow-up post once complete. 
I've tried many a thing when it comes to finishing clay projects: gouache, oil pastel and dip in black tempera and glaze. Which is your preferred method? 
By the way, this clay project could just as easily be done with air dry clay! You'll have to keep me posted if you give it a go. 
 photo signature_zpsd10b3273.png
Read more »