Join us tonight right here at 8pm CST on Wednesday to chat about BURNOUT. We've all been there. Let's share our stories and talk about ways of lifting ourselves out of burnout and getting the fire back into our art teacherin'. See you real soon! Hey, y'all! Just thought I'd do a wee update on this incredibly fun project my students just wrapped up. They learned all about contemporary artist Peter Anton, created a heart-shaped box armature, covered it in papier mache and made fun plaster-cast chocolates. We are finishing them off this week and I thought I'd share.
Here's the lesson video I shared with my students. This project took us about three one-hour art classes.
Supplies: * Tag board for heart: one 8" square * Tag board for sides of heart: 1" X 24" * Stapler * Tape * Newspaper cut into strips on the paper cutter * Papier mache paste. We used wheat paste after checking for gluten allergies. * Paint for the heart * Plaster. We used Art Plaster by Activa Products * Containers to make the "chocolate". We used ice cube trays and egg cartons * PUFFY PAINT!
Day One: We made the armature. We were in the middle of wrapping up another project so we did the armature in one class and early finishers completed their previous project.
Day Two: We did our papier mache! It was good messy fun. Then we did an insanely fun clean up...
I hosed the tables down with shaving cream and let the kids spread it out and draw and play in it for a good five minutes. Then we had a Clean Up Game. Here's how it worked: I placed a tub of water and sponges on each table. I told the kids that WITHOUT TALKING, they were to wipe down their tables and get their table the cleanest in the room. I even provided old hotel key cards for the kids to scrape off the glue. You have never seen kids work so hard! If you go here, and scroll down a pinch, you can catch a couple short clips of my kids in action.
Day Three: We picked out three to four plaster cast chocolates and painted them in a couple different shades of brown. While those dried, we painted our heart-shaped boxes. With about 10 minutes left of class, I busted out the puffy paint...and the crowd went wild! The boxes will be sealed with sparkle puffy paint before being placed on display. This project was definitely a kid fave. Love to hear if you've given this lesson a go in your art room!
If you need a quick color theory activity, have I got the thing for you! My first grade is in the middle of a folk art-inspired landscape project (details to come) and they are currently learning about pattern, creating tints, the parts of a landscape, y'all know the drill. Today I wanted them to create some beautiful papers for the details of their landscape. But how? Painting with marbles, that's how!
Using the same trays that second grade used for floating chalk prints and shaving cream marbling, I just dropped two primary colors and white at one end of the tray before the kids arrived. They were to pick any color of paper they liked, write their name and teacher code on the back and place the paper with the name down into their tray. Each tray got a large marble and they just started rolling.
I have a ton of these trays so each student was able to have their own. After they thought their paper was covered to their liking, they could get another paper, swap trays with a buddy who might have different primary colors and start rolling.
This was a huge hit, y'all. The boys were super into it. I heard them excitedly talking about what colors they were creating and the different types of lines their marble made. I was asked if we could do it every art class.
Not gonna lie, rinsing out all of those trays was the most taxing part. Other than that, it was the perfect on-the-fly activity with a super powerful impact.
I can't wait to share with you what they create with these beauties. And I now know what my kindergarten friends will be doing this week as well.
In second grade we are working like crazy with our short 30 minute art classes to try our hands at two different paper treatments: floating chalk prints and shaving cream marbling. My goal has been for all of my students to attempt both processes twice before the end of class. It's a go-go-go kind of class but it's a lot of fun. When I shared a couple short videos of my students working on these papers, I got a lot of questions about the process. So I created a video that will walk you through each. I'll also go through the supplies needed in this here post. Here's the how-to video:
Supplies for floating chalk prints:
* Paper. I used 6" X 9" papers. These will be used for the covers of their Rainbow Book. I only order between 80- 90 lbs paper for the art room.
* Chalk. We used Freart Chalk by Prang. I like this chalk because it's high in pigment and thick like sidewalk chalk.
* Tongue depressors. We used the big ones which you can get cheap at the Dollar Tree.
* Tub of water. I made it so each my students had their own tub to save on time. I see my second graders at the end of the day so this meant I didn't have to hustle to move the tubs for my next class.
If you watch the video, you'll see just how easy this process is...and how beautiful the results are.
I have a feeling the kids are going to have a hard time deciding which beautiful papers to use for the covers of their Rainbow Book!
The best part is, you don't have to "set" these creations as you would normal chalk pieces!
For shaving cream marbling, you'll need the following: * Shaving cream. We used cheap dollar store stuff. * Liquid watercolor. * Paint brushes. * Tongue depressors. * Paper.
This process required more steps so some of my students would get excited and forget those steps. I made sure to appoint my Art Teachers in Training who did a wonderful job reminding kids of the steps. Yay!
I did not change out the bins of shaving cream or water. For the floating chalk prints, it was not necessary. For the shaving cream, it just meant that the following prints had more color.
Again, so pretty! I can't wait to see these on the covers of their books. Here are the books they are creating:
I have done shaving cream prints before...but never in a closed container. I am never going back, y'all! The mess is contained...like, literally.
Have y'all done these kind of prints before? I'd love to hear about it! I'm also curious to know what you did with your beautiful papers.
I'll be sure and update you with our completed Rainbow Books!
I'm excited to share with my students and y'all another installment in that series of videos that I'm calling Field Trip! I got the idea to visit contemporary artists and film them in action to share with my students. The goal is for them to see living artists creating and know that creating art takes many forms from mural painting to folk art to...printmaking. Which brings me to these two good lookin' folks, Chris Cheney and Nieves Uhl of Sawtooth Print Shop.
They are seriously so much fun!
I met Chris and Nieves at a workshop hosted by The Frist Center for Visual Arts. We had so much fun that when I was dreaming up artists to visit, their studio immediately came to mind. Not surprisingly, they were totally open to the idea and were gracious enough to carve time (see what I did there? "Carve"...get it?!) out of their busy schedule to show me just how they create their prints. They were so thorough in their explanations that I believe kids will understand their process.
Personally, I just loved exploring their space and snapping photos for their vintage typeface. I was told most are purchased from former printmakers who no longer have a means to print or a desire to do so.
I loved how clearly they explained the reasoning behind carving backwards. I know I would mess that up ALL.THE.TIME. I don't know how they do it.
Both artists did their internship at Hatch Show Print which must-see if you are ever visiting beautiful downtown Nashville.
I felt like I learned so much from this field trip as well! Seeing the process of how their posters are creating was like taking a step back in time. I think that showing this Field Trip! video will be a great introduction to any printmaking unit.
Since we're talking about printmaking, I thought I'd add some of my favorite printmaking projects and videos to this post.
You don't need fancy printmaking supplies to create great prints with your students. In a pinch, you can use styrofoam sheets, markers, paper and a damp sponge. If you've never tried marker prints, they are a game changer! First grade created these lovely prints with that method. More details here.
Last year, third grade tried their hand at printmaking with these beautiful cityscape prints.
For that, we did use ink but markers could have been used as well.
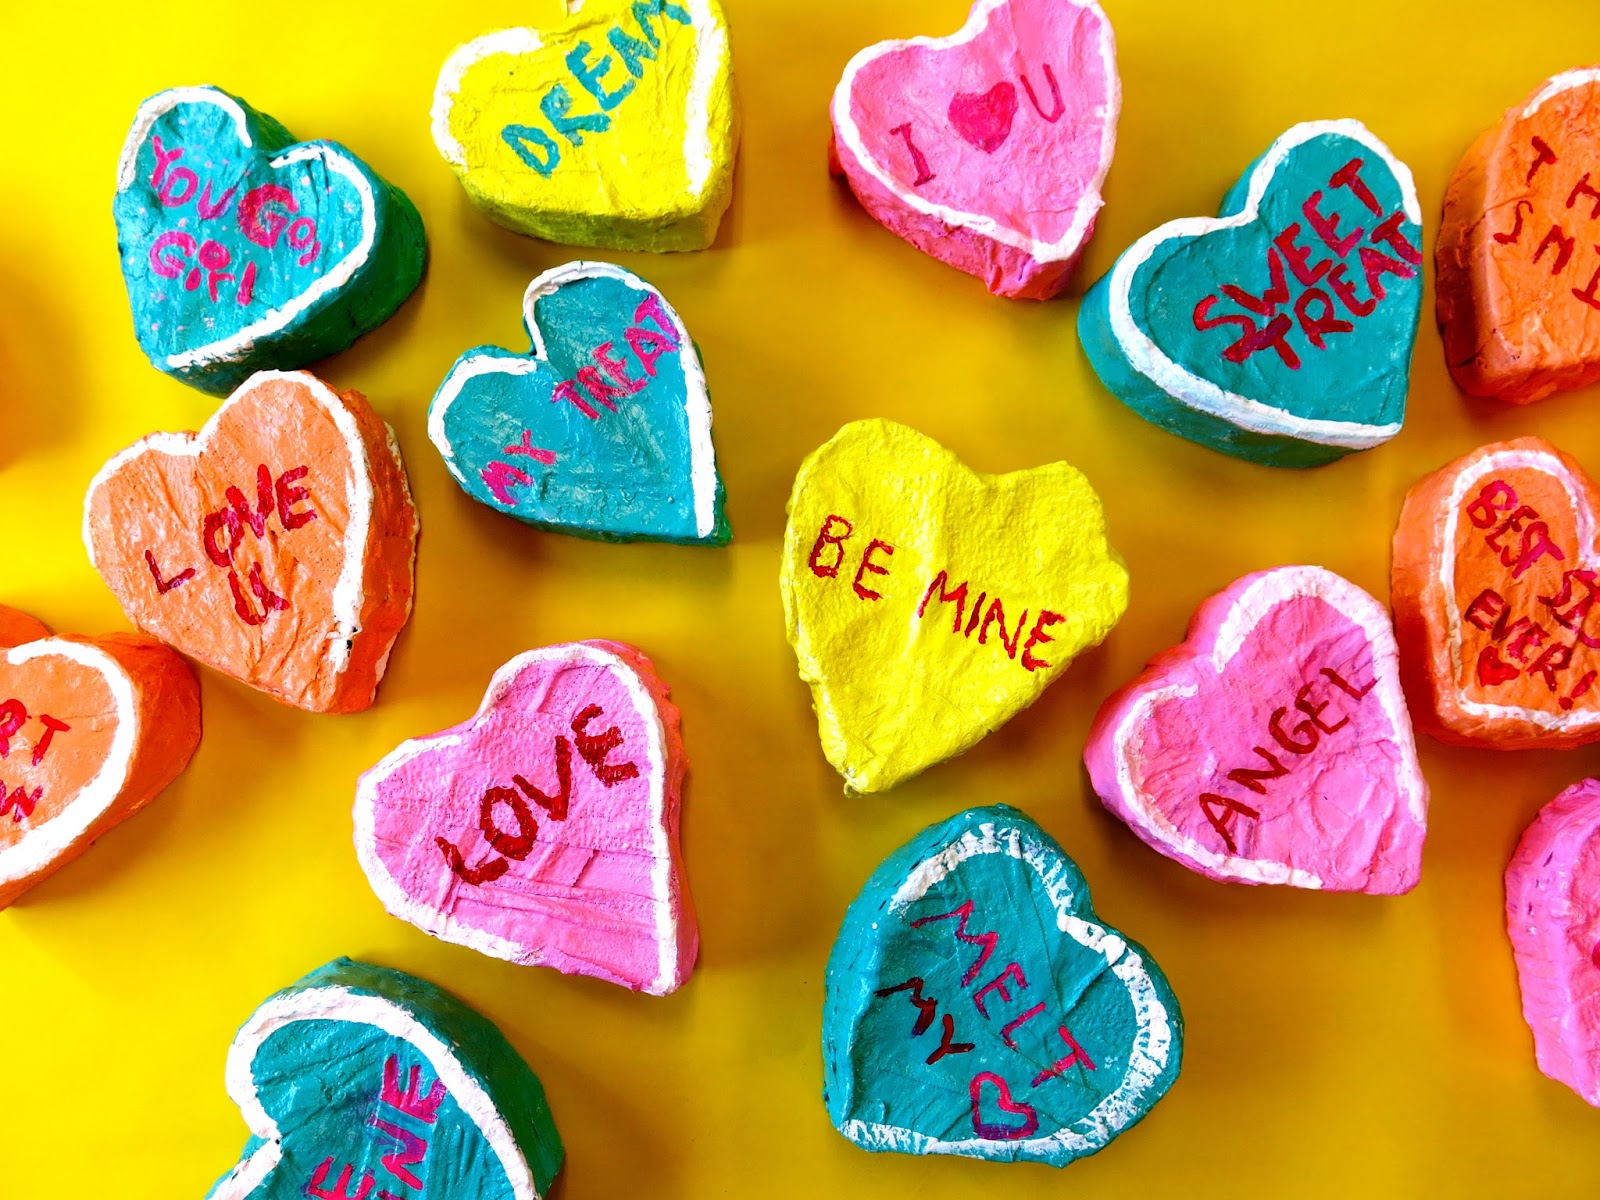
My fourth graders are wrapping up their Candy Heart Sculptures and I thought I'd share how they turned out. The kids loved creating these and were thrilled with their work. I'm not much of a project-repeater but this one might have to be done again! Here's the process video I created to share with my students and you:
I know several of y'all did this project with your students and mentioned that paint was flaking off. I only saw a little bit of that...so I'm thinking it might be the paint used. It's a constant search to find paint that is both nontoxic and good quality paint without being super expensive. We used a combination of Blick tempra, Sax Versa Temp and Chroma paint. I did seal the hearts with a quick couple swipes of ModPodge to prevent chipping and add a little shine.
I knew the struggle would be with the lettering...which is why in the video, I cover it so thoroughly. I'm happy I did, I think they did a great job painting their words on that lumpy bumpy plaster.
Knowing that I'd have some early finishers, I grabbed four large boxes out of the recycling bin and put those kids on candy box painting duty. I had primed the boxes with white paint the night before and just drew on it in pencil. If I have time, my plan is to grab some laminating film and make it like a window in the box. Early finishers also wrapped up this drawing lesson:
I'll be certain to share their drawings soon!
The sayings the kids picked out was my favorite part. I thought it spoke so much about the kid creating the heart.
I had printed out a list of the hundreds of sayings that Necco has used every year on their hearts. I told the kids they could come up with their own saying...or use one of Necco's. All I asked was that I check what they planned to write first. I didn't have any issues with inappropriate sayings...but I didn't want to take my chances.
Love to hear from y'all if you gave this project a go! I'm off to put these on display in the library.