So, I totally thought I shared this video lesson with y'all in a previous post but after some digging, I couldn't find it on my blog! So sorry! I oftentimes post a video to my YouTube channel without adding it here simply because I'm crazy and forgetful. However, if you subscribe, you can stay up to date on my instructional videos (along with some other stuff) that you are more than welcome to use in your art teacherin' world.
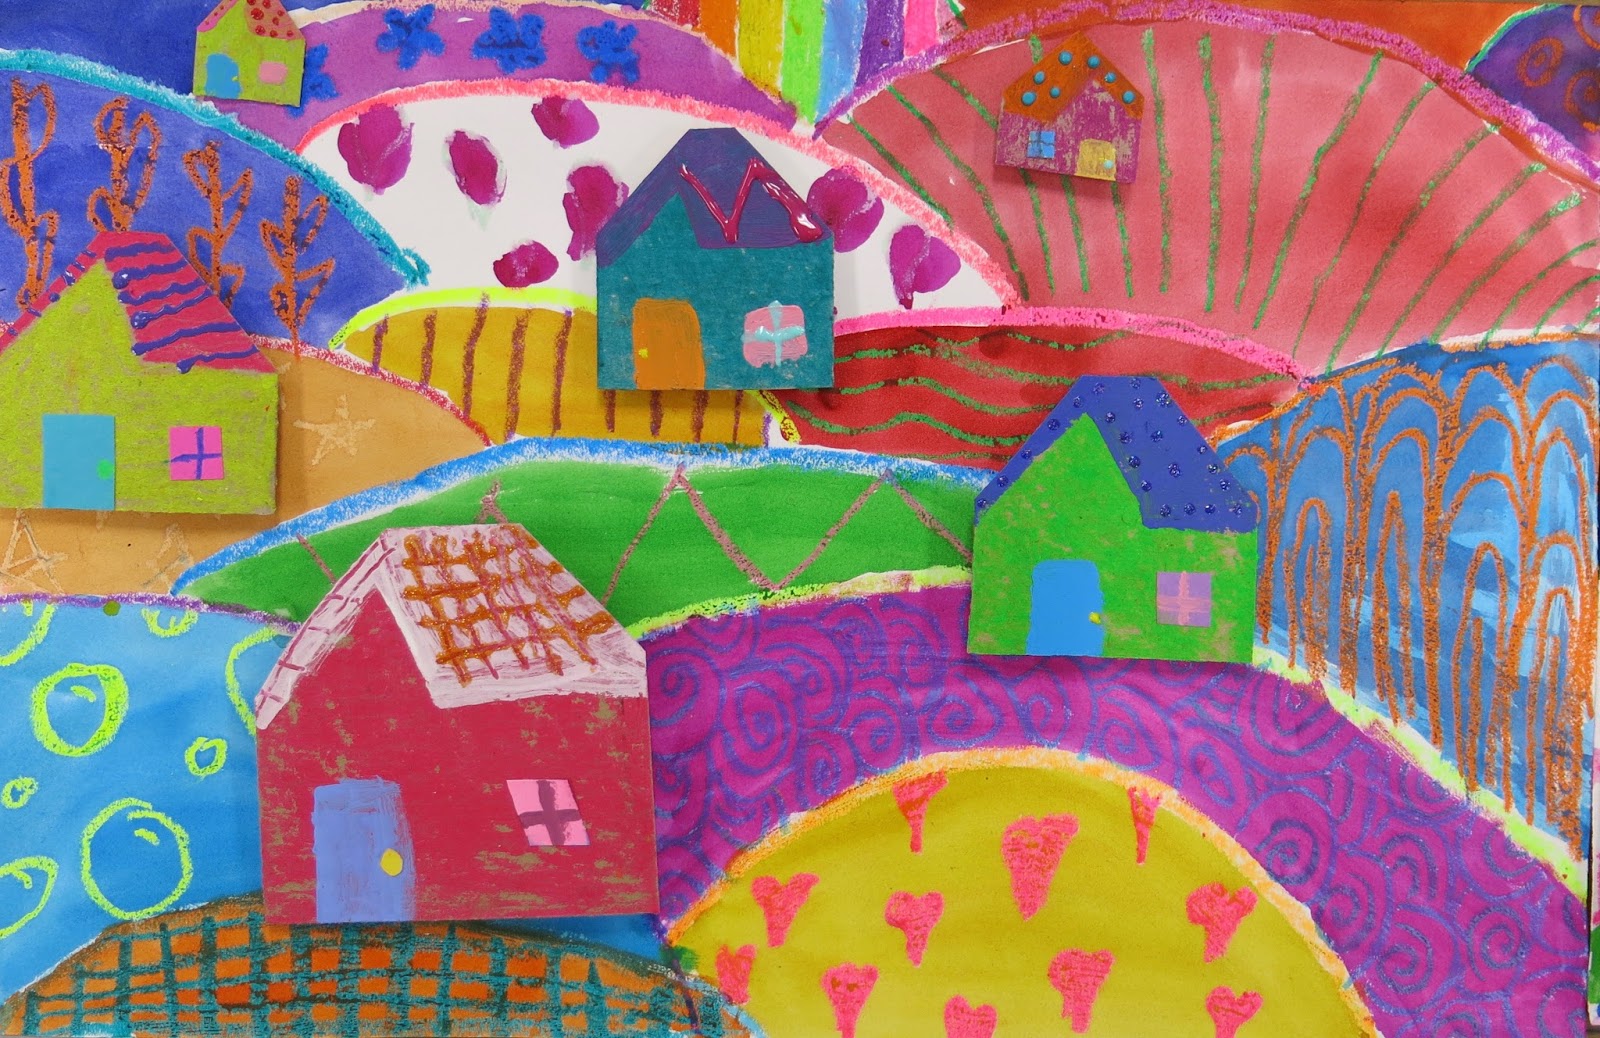
But first, let's talk about these amazing third grade patterned landscapes!
Forgive me but this blog post is gonna be photo heavy...I'm just in love with this project! Every single one turned out so happy, colorful and bright. Here's the video used to teach this lesson:
This did take us about three and a half art classes. While working on this project, my early finishers worked on this lesson which was a great tie-in what with the pattern review:
My students are now obsessed with drawing three dimensional houses!
I'm going to tell you exactly what art supplies we used for this project because, let's be honest, one of the reasons these look so good is because they are so bright and colorful. Kid artists deserve to use quality art supplies just like grown folk. That's easy to say...but not always easy to afford. The supplies I'm about to share are not bananas expensive...but they aren't your bargain basements fare either.
To start, my students used fluorescent oil pastels by Sargent. These are my favorite to use when we are creating a watercolor resist because of how bold and bright they shine through the paint.
They run about $7 a pop...and I purchase enough for two kids to share. You can find them in just about any art supply catalog. We don't use these all the time...like I said, we love them for resist. I've shared these many times before on my blog, I just love them!
I love both liquid and watercolor paint. However, I wanted the kids to use pan watercolor paint for this project because I'm still learning the liquid watercolor paint ropes. How much water do I add to dilute? It looks black in the cup and that confuses the kids...you get the idea. I'm working on my issues with liquid. When it comes to pan watercolor tho, not all are created equal. I LOVE Crayola's Mixing Colors:
Okay...here's the deal. I didn't always love Crayola's watercolor paint until I discovered theses guys. Here's the deal: DO NOT BUY THIS SET unless you don't have any watercolor trays. Instead, by the refill colors in the set. Here's what I have: I got rid of the black, white and brown from my watercolor trays. Now I have refill pans that I simply pop out and replace of the following Crayola watercolors: red, red-orange, orange, yellow, green, turquoise, blue, blue violet, purple and magenta. I place them in the paint pan in that order.
These photos have not been altered...that's truly how bright the watercolor and oil pastels are! Now you see why I love 'em so!
For our houses, we used cereal boxes. I sent out an email at the start of the year asking for cereal boxes simply because we need that cardboard for projects like this!
The kids used "naked" oil pastels to do a rubbing on the house before either collaging the doors and windows on or painting them. That was a hot mess of a day, not gonna lie. We had paint, cardboard, paper, glue and puffy paint all on the tables.
As far as puffy paint goes, I like Tulip brand that can be purchased in most craft stores. It's expensive at about $3 a bottle...but I LIVE for puffy paint and so do my kids!
Once the houses were dry and the background was complete, the assembly was ready to happen.
I am the proud owner of a TON of foam core from matting and framing artwork. I simply chopped that into bits for our pop out foam.
To really get those houses in the foreground to stand out, the kids made sure to double up the foam core. One piece was used for those in the middle ground and either one or none for the background.
With these complete, my students are moving on...we are now onto creating self portraits for our winter art show!
I decided to give myself a wee break and use a lesson from last year for our selfies...it was a huge hit so I'm excited to give it another go:
We'll be using my favorite chalk brand for this project: Faber-Castell!
Alright, I did say this post was going to be photo-heavy, right?
But, can you blame me?! Each one is just so happy!
I definitely will be doing this project again. I can't think of anything I'd change about it.
Even when some friends went wild with the puffy paint, it worked!
You'll have to keep me posted if you give this project a try in your art room. Please be sure and tag me. Not only would I love to see but it also helps others find the details on the lesson.
Just a peak at the foam core. I stressed that none should be visible from the front of the house.
Now that my fourth graders have made their contribution to our school-wide collaborative (details to come, stay tuned! I'm STILL trying to figure out my life, y'all) and completed their sketchbooks and their first couple of sketching tasks, it's now time for them to move on to the art makin'! I have decided to kick off the school year with landscape for all of my students. I also decided that I wanted my kiddos to learn about contemporary artists (and it so happens, all female artists!). It's with that in mind that I introduce you to the lesson I'll be sharing with my fourth grade artists: Chalk Landscapes inspired by the artist Claire West!
These drawings are my teacher examples...I had so much fun creating them, I couldn't stop! You can see the process in this video I created to be shared with my students:
Now let's take a closer look at some of Claire's work...
Isn't her work beautiful? I love the colors! They are so rich and stunning. I knew chalk would be a good way for my students to capture that incredibly rich hue.
I also love how her work really shows depth. What a great way for my students to learn about the horizon line, back-, middle- and foreground.
Here are the supplies we will be using for this lesson: * Chalk I really like Faber-Castell's chalk. It's vibrant and rich with no fillers or junk. They are my fave! * Liquid Starch! The magical ingredient behind this amazing process. * 11" X 17" Paper I went ahead and cut an inch off the normal 12" X 18" paper so that matting and framing will be easier in the future. * Paint! This will come later...but we'll use a variety of colors of tempera paint.
This project will probably take us some time. A couple of classes for the chalk and starch...and maybe one class for painting. I'll keep you posted on our progress.
Why I am so smitten with the starch trick: no messy chalk pastel dust! No need to spray with hairspray or a fixative! No smearing! I'm so in love. Big shout out to my good friend Jennifer Avarado for sharing this trick with me.
More landscape lessons for my other grade levels are in the works so stay tuned. I'll keep you posted here and on my YouTube channel.
A while back, I had two third grade classes that were a head of the pack (I see my third and fourth grade classes combined, meaning I have two classes at once. It's how I am able to get an hour with my older kids). I didn't want them to jump ahead to the next project so I got a WILD hair (I get many, it turns out) and decided that they should learn about James Rizzi and create a giant Rizzi City...in one class period. Crazy is as crazy does, whatever that means.
I allowed the kids to pick their Rizzi City Building Teams with groups of 4 kids. I had a mountain of large painted papers for the kids to pick from as the base for their building. Smaller papers were used for the roof tops.
I often have a stockpile of such papers because when my students finish early, one of the options for them is to go paint some pattern papers. I'll lay sheets of bulletin board paper out, paint a pattern on it and they are to repeat the pattern. These papers are then used for large projects such as this.
After the teams picked their building paper and roof, they set to work with scissors, glue and mountains of papers for windows, doors and faces. We'd spent some time going through a prezi I had created on the artist, so we were feeling all sorts of inspired.
Once the pieces were glued down, the kids were allowed to use white and/or black paint to add details. The kids really loved working together to create their building and they turned out so fun and happy. A fellow teacher said they reminded them of PeeWee's Playhouse which you know is a HUGE compliment!
For our art show next week, I thought I'd get these bad boys up! There is a cork strip behind the buildings. With the help of my P.E. buddy, I got the buildings pinned in place and just added a couple of lines of hot glue to the tops of the buildings. They'll stay up until the start of the new school year. OR when the Fire Marshall says to take 'em down.
Then I got ANOTHER wild hair and decided that the buildings needed some clouds above them. This was totally a pinterest idea, y'all. I picked up a set of 6 light up lanterns at the local craft place and, with the help of my other P.E. buddy (what would I do without my specials team?!), we hot glued cotton batting to the lanterns. They won't stay up for long, just until the art show.
The fact that they light up pretty much makes my world go round.
If I had all the time in the world, I would have had the kids then create a Rizzi-inspired cityscape. But, alas, this was just a go-between project to slow down a group that was speeding ahead.
This has gotten a lot of giggles from the kiddos (and adults!). These buildings are as fun as Rizzi's paintings, says me.
So much to do until the art show next Tuesday...but I can scratch this off the list!
We had more buildings than we did space...which meant that some of the buildings had to flank our It's Okay mural from last year. I can't bear to take it down, I love the message!
Um, yes.
I can't wait to give y'all a tour of the art show...until then, have a fun Friday!
If you are anything like me (and bless, as we say in the South, if you are), then you prolly got that art ed degree of yours without being a total pro in all forms of media. I didn't take a single printmaking or ceramics class in college and I got a C in textiles (which is a fave but at the time, I was huffing too many paint fumes, er, REALLY into my painting class, to be bothered with warping that freakin' floor loom). What I did get is a two year degree in oil painting because...you know, that's something we teach to the 10 and under set. Ahem. All that to say, we are expected to be at least somewhat knowledgable about the media we share with our students. But, let's be honest, a lot of times, we are learning right along with the kids.
Now, I've been at this art teacherin' game for sometime now (18 years but who's countin'?) and I have learned a thing or two along the way. One thing is for certain: kids LOVE clay. However, it can be frustrating to teach if you lack experience. Since I've been around the art teacherin' block a time or two (wink-wink, nudgenudge), I thought I'd share some of my fave art teacherin' clay hacks with you. Here you go:
Let's talk about some of the things I've shared and just where you can find them. * Clay mats. I mentioned The Clay Lady and her clay mats. I seriously have had mine FOR YEARS. They are worth the cost of $2 each. * Toothbrushes and doggie bowls. Seriously, what would we art teachers do without places like The Dollar Tree?! Toothbrushes are perfect for teaching scoring and doggie bowls are awesome for holding slip while preventing spills. * Texture! A visit to your thrift store will provide you with a good stockpile of texture for your clay adventures. Placemats, cable knit sweaters, burlap, stamps, you name it. If it has a texture, your clay will capture it. * Skewer sticks. Perfect for cutting, drawing and carving into clay.
Something I failed to mention: what to do with those projects that kids work on for more than one class? To store these effectively, I have a stockpile of old and large zip lock baggies. The kids write their names on the bags in Sharpie, wrap their project in a damp paper towel and place gently inside the back. I tell the kids not to zip their bags shut as that usually traps air inside. Instead, I tell them to push the air out and tuck the opening of the bag under their project. This will keep their clay workable for about a week.
If you would like to continue this clay chat, you are in luck. All throughout the month of May, I'll be hosting clay chats (and craft nights, so come armed with clay!) right here, every Wednesday at 8pm CST. You can work with any ole clay you like...however, I'll be using the clays made available in this kit which you can purchase here. For more info on what we'll be up to, check here.
And now, I thought I'd share with you some of my fave clay projects over the years (many with video links!) for you to take back to your own Art Teacherin' Town. LOOOOOVE to hear your fave clay projects and words of wisdom. Please feel free to leave in el commentos below.
This clay project was one that I did with my second graders FOR YEARS. They love it, it's a great way to introduce texture, slab, coil and glaze. It's also a quickie and with my short art classes, it worked very well.
This was a fun project my third graders did one year. If you've taught clay before, then you've probably done the coils-in-a-styrofoam-bowl project (I know I have!) a different spin on that is having the kids use slabs of clay to create flowers. We had a spring theme one art show and these fit in beautifully.
I almost always do a clay project that emphasizes texture with my kindergarteners. I'll share all of those projects...but this one is always a fave: texture butterflies!
These clay fish by my first graders always crack me up! They had so much fun creating the silly expressions on these a couple years ago. If every glaze is not an option, here is a fun alternative: florescent oil pastels and watered down black paint!
Inspired by the painted elephants in India, my fourth graders created these fun guys one year.
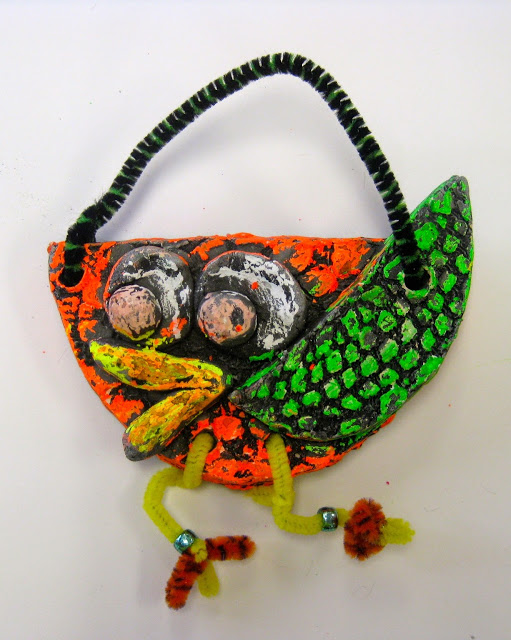
Funky frogs were created by my fourth graders one year. They had so much personality! This was a project we worked on over the course of a couple of art classes...which really allowed the kids to get creative.
One year, to go along with our Asian theme, my fourth graders created these fun pandas. Each had their own wild and wacky personaltiy.
To go along with that theme of Asia, my third grade kiddos created these Chinese dragons which they had a great time doing.
So I might have a thing for animals and clay...what do you think? My kindergarten and first graders created these pinch pot pets a couple of years back when our art show theme was to raise money for a local animal shelter. And, what do you know, animals are our theme again this year!
That year, my second graders created this version of pinch pot pets: two pinch pots put together to create the body of their animal.
And my fourth graders created these! Definitely a favorite by both me and the kiddos.
Yet another spin on pinch pots and animals: using the pinch pot as a container. Our school mascot is the tiger and this particular year, second graders created tiger pinch pot containers.
Now last year, I decided to go for a food theme and create the art room into a 1950's style diner. These projects were not shared in detail like my others because...I was in the middle of writing my clay book and these projects are all featured in that book! The book is written to be used with no kiln fire clay...but, as you can see, you can use kiln fire clay as well. You can scoop up your book here.
My first graders served up these coffee and donut delights.
Second grade backed up cupcakes. Y'all better believe the retro lover in my totally enjoyed decorating for this art show!
Third graders made hamburgers and fries...complete with all the fixin's.
While others made pancake containers with hand painted paper plates.
A kid and crowd favorite were the pie containers. The kids had so much fun googling pies and sculpting their favorite.
While other classes did pizza containers. I reached out to a local pizza place for the boxes to display the pizza in.
This year, we are back at it with an animal theme! We are transforming the art room into a pet shop. Third grade is in charge of the reptiles.
But a crowd favorite so far are these fun and funky birds by second grade. They crack me up!
Many more clay projects are coming up so stay tuned. However, if you just can't wait, you can see a handful of clay projects that have not been shared here but are on my YouTube channel. I always upload there first...so if you'd like to stay up to date, you might consider hitting subscribe.