Showing posts sorted by date for query candy heart. Sort by relevance Show all posts

Monday, January 16, 2017

In the Art Room: Candy Heart Drawings

Just a note: I'm constantly updating my YouTube channel with new lessons that y'all are free to borrow. The lessons don't typically make it to a blog post until several days or weeks after I've shared them there. To keep updated on those videos, y'all might wanna subscribe here. And please let me know if you use the videos in your art teacherin' world, I'd love to see what your kiddos create!

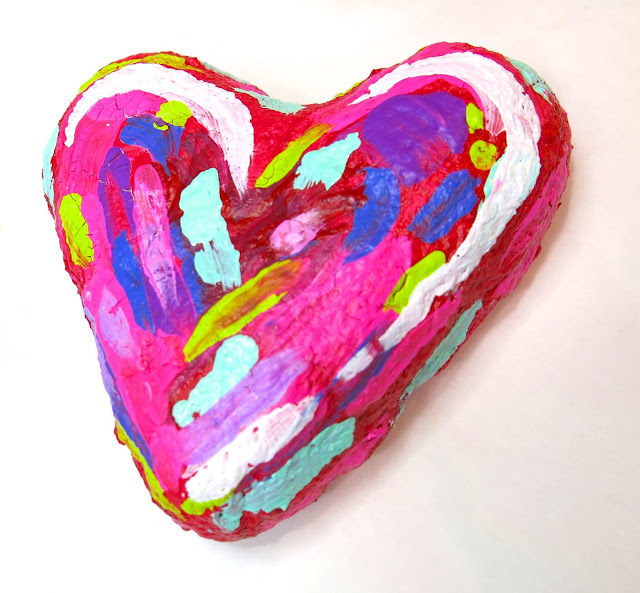
Currently, my fourth graders are creating large scale candy hearts (shown below, lesson here). Because my students work at different speeds, I wanted to have an additional project that they could work on if they finished a phase in the sculpting project early; would tie-in with their sculpting project; would introduce drawing three dimensionally and would be fun...and that's how this Candy Heart Drawing lesson came to be!
I did something very similar to this idea last year when my fourth graders created these large scale crayons and pencil sculptures and worked on these collaborative crayon drawings in addition. This Candy Heart Drawing project could easily be a collaborative drawing project as well...which was originally my intention. But with some kiddos still sculpting while others were ready to draw, it just didn't work out that way. But, if you do this lesson with your students, it would be something that you could definitely try! 
Complete lesson video with tons of technique and vocabulary for your students!
Full Disclosure: I am currently working with Faber-Castell and creating lessons using some of their art supplies. I agreed to do so after testing their supplies out personally and with my students. I feel very confident in the quality of these oil pastels. 
Here is what I found: 

* There is less breakage. Often the oil pastels my students use crumble and break. These did not nor did they produce as much "oil pastel crumbs" as the brands I have used in the past.

* They don't roll off the tables! I love the hexagon shape of the pastel.

* The pack I had didn't have a huge assortment of color...but we don't need it! With the baby oil trick, you are blending the colors and producing a wider range of color and value. 

* They are bigger and will last longer. I used to order a different brand that was about half the size and we wore those out. These are definitely going to last. 
 If you decide to do this lesson and you want to have visual steps for your students, here you go. I having the visuals up as well as the video rolling (on silent, if it has already been played once) can be a helpful reminder of the steps. 

Supplies:

* 12" X 18" watercolor or heavy stock paper. Because you'll be using baby oil, thin paper will not work. 
* Oil pastels
* Baby oil
* Q-tips
* Heart-shaped templates (not necessary but helpful)

1. Trace several hearts all over the paper using the template. Think about a spilled box of candy hearts. Have some hearts overlap, other only partially on the paper.

2. Create the illusion of three dimensional hearts by drawing only on the right or left side of the heart. 
 3. Using an oil pastel, outline your heart and then color in one direction. 
 4. Cross-hatch over that with a white oil pastel. 
5. Using a Q-tip and baby oil, blend the colorful oil pastel and the white together to create a tint, or a light color. 
 6. To create depth, color only the top and bottom of the side of the heart in color and the middle in white.
 7. Blend with Q-tip and baby oil.
 8. Think of what you'd like your Candy Heart to say. Write it out on a piece of paper the same size as your heart. 
 9. On the reverse side, color very hard with a pencil using cross-hatching. Place the paper heart over the oil pastel heart and trace your words. 
 A copy will appear!
 10. Go over your words again in red oil pastel or a color of your choice. Continue with this process until your masterpiece is complete!
 My students have already started their hearts and they are looking fabulous! I'll be sure to share a follow-up post when they are complete. 
Feel free to share this lesson and video with your students! I'd love to hear from you (and see the amazing work of your kiddos!) if you do. Have fun!
 photo signature_zpsd10b3273.png

Saturday, January 14, 2017

What the Art Teacher Wore #172

Allow me to just kick off this here What the Art Teacher Wore by saying No, I did not create that AMAZING felt flower Frida-esque crown I am wearing. It was created by art teacher Linda McConaughy who was so sweet and kind to send it to me. You can check out and purchase Linda's designs here. If there is something you have in mind, message her! And, if you've ever been to NAEA, you might also know Linda by her paint brush crown pieces (you can see me wearing mine here!). In fact, she'll be at NAEA in NYC this March (as will I, so excited) so you can check out more of her wares there. Thank you so much, Linda, I LOVE my flower crown and my students did as well. Matched my color wheel shirt completely!
 Target, You have the Best Kid's Clothes: I ain't ashamed to admit I just about purchased the entire Cat and Jack line at Target...for myself. Yes, it's kids' clothes. No, I don't care. That color wheel shirt is currently on clearance for something crazy like $2, y'all! top and skirt: Cat and Jack for Target

So. Did y'all survive Friday the 13th, the full moon and Mercury Retrograde (I'm not exactly sure what that is but if it had anything to do with the painting of one's hands and then licking it off episode I witnessed this week, I ain't down with it)? Thankfully, I have a long weekend to recover. It was my first week back after the break and we hit the ground running: weaving, sculpting, painting, printing. You name it, we were doing it. And all of it was in the name of LURVE...
 Before break, my firsties had finished these weavings. Honestly, I had NO idea what we were going to do with them until Monday morning. I remembered that before break, these kids had whizzed through weaving. So I decided to see if they could handle a little bit of hand stitching. Y'all, they rocked it! You can check out the complete lesson here
With all the possible bad luck floating around, I decided to ward it off with some freaky evil eyeball jewelry. You can see more of this craziness here. I'm so on a 80's kick right now, y'all. I've had a hair crimper in my Amazon shopping cart for a week now. 
 The Problem with Wearing Kid's Clothes: Is that half of your students wear them too. I was told that I match several kiddos in our school, a couple in kindergarten and a few in first grade. Yep. I've got the fashion sense of a 6 year old. Sounds about right. top: Cat and Jack; skirt and tights: Target; boots: Frye
Second grade printed this week and learned about the artist Chris Uphues. I love his artwork but his street art hearts are my faves. The kids really got into his work. Lesson to come!
 Wonderful Wednesday: I was so excited about Wednesday because my fourth graders started on their Candy Heart Sculptures! sweater: thrifted; pins: vintage; top: JCrew; skirt: resale find at Buffalo Exchange (I knooooooow!); yellow tights and hot pink fishnets: who knows
We got out armatures complete and started on the process of cutting the plaster into strips. I wasn't about to do that myself so I put the kids on that one. Next week, we cover in plaster!
 When You Look as Ridiculous as You Feel: All day long. That's what happens when you dress like a kid, y'all! top and skirt: more Cat and Jack. I done told you I bought everything they had. Gift cards from Christmas came in mighty handy; shoes: Aldo
Second grade had so much fun printing hearts that I decided to create more stampers and have kindergarten do it as well. You can see how I made the stampers here. More to come on this lesson! 
All Eyeballs on Me: Yep, I had to. Details on this dress here. Shoes from Modcloth
 photo signature_zpsd10b3273.png

Wednesday, January 4, 2017

Hearts with Wings Sculptures

GOING LIVE TONIGHT, JANUARY 4TH AT 8PM CST RIGHT HERE. We'll be chatting about What We Wish We Knew our first year(s) teaching. Chat soon! Until then...

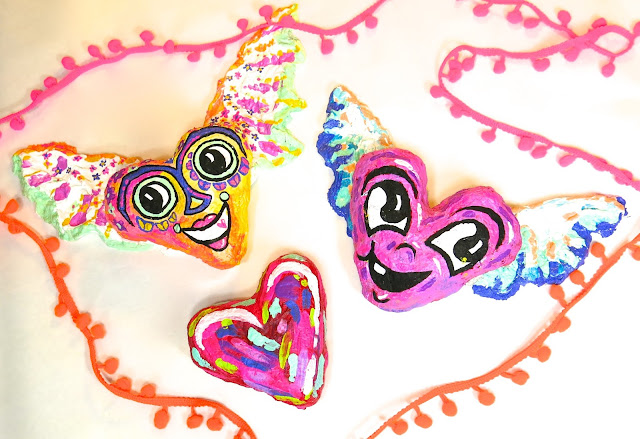
How about a fun heart sculpture project where kids discover an artist and use them as their inspiration? That's exactly what I had in mind when I came up with this simple and effective project using papier mache pulp and plaster! My buddy Natalie Waggenspack over at smART Class (one of my favorite art teacherin' blogs!) inspired this lesson. Here is the process video with an introduction to the artists I found inspiring:
Originally I was calling this project the Jim Dine Hearts Sculpture...but I didn't want my artists to feel limited to one artist. Shoot, they don't even have to use an artist's style as their inspo, they can come up with their own. But if you are looking for a project where your students do a little bit of artist investigation, I think this would be super fun.
I think this project would best be suited for students from third grade on up. I'll be doing the Candy Heart Sculpture with my fourth graders so I might either reserve this lesson for next your or try it with my younger kids. Here are the supplies needed:

* Aluminum foil. I really liked using the sheets of foil as they were precut and just the right size.

* Activa Product's Celluclay or Fast Mache. Both are very similar and work great. If I were doing this with my kids, I would definitely premix the clay. 

* Activa Product's Rigid Wrap Plaster. Used for the wings.

* Tempra or acrylic paint.
 I love the work of contemporary artist Chris Uphues (I know my students will as well...check out his street art, so fun!) and he inspired this heart. 
And I had Frida in mind when I painted this heart. I really loved creating these hearts and see so much potential with this project. 
Love to hear from you if you give this project a try! Don't feel limited to the sculpture supplies I used. I really think a variety of mediums could be used to create these fun hearts.

Full disclosure: Activa Products and I are working together to create fun projects with their products. I received these sculpture supplies from them. Thank you, Activa Products! 

 photo signature_zpsd10b3273.png

Monday, January 2, 2017

In the Art Room: Candy Heart Sculptures!

Hello, Cutie Pies and Love Bugs, won't you Be Mine on this Candy Heart Sculpture adventure? I'm so excited (and maybe a pinch sugar'ed up from one too many candy hearts) about this project I've got planned for my fourth graders. I've been kicking this idea around for sometime...but there were some issues I thought the kids might struggle with. After finding solutions that will make their sculpture making adventure a little easier, I put it all together in this here video.
To make your own Candy Heart Sculpture, you'll need the following: 

* Tag or poster board, one 2" X 24" and two 8" squares
* Scissors
* Stapler
* Tape
* Rigid Wrap Plaster Cloth from Activa Products 
Approximately 24" of wrap per student. The wrap comes in a width of 6" so I cut it in half for this project. My plan is to have the kids do the cutting when they finish their armature.
* Tempra paint
 I played around with a couple dimensions with the heart and decided that the 2" edge would be the best. It's the most accurate appearing ratio and it requires a lot less plaster wrap. Having the kids create those tabs of tape and fill in the gaps with excess tape will really help when they are creating their armature.
 I also played with several ideas for putting the wording on the heart. I first toyed with the idea of just letting them write on their hearts but my students do not have the best of handwriting, not even gonna candy coat it for ya (pun intended). Giving them a guide like the sheet which will ultimately become their carbon copy paper seemed like the best solution. 
I will definitely keep y'all posted on how my fourth graders do. While their projects dry, they'll be working on another sweet project that I'll be certain to share with you soon. Check ya later, Love Bugs!
 photo signature_zpsd10b3273.png

Tuesday, August 11, 2015

In the Art Room: First Day(s) of Art!

Hello, cats and kittens and welcome to the very first day(s) of art! It's been a wild -n- crazy week so far and, y'all, IT'S ONLY TUESDAY. Which means we're having fun, right?! Well, somebody is, anyway. Glue sniffing will do that to a gal. 
For the last couple of years, I've shared with you what my first day(s) of art class look like (go here and here for that, y'all) . I keep saying "day(s)" because my schedule is a lil different than the rest of the art teacherin' universe (I ain't complainin', I'm just sayin'). I see my first and second graders for 30 minutes, twice a week; my third and fourths for 60 minutes, once a week and kindergartentown (who don't start until next week) for 40 minutes, once a week. So! What I've got for you today is what I teach the youngers over the course of two classes and the olders in one class. Make sense? 

Before we get started, lemme just tell you a couple of things I decided at the start of this school year:

* My room doesn't have to be perfect but it does have to be functional on the first day. Y'all, I used to spend entire summers in my art room. Rearranging. Organizing. Making visuals. It was exhausting, time-consuming and I never gave myself a break! This year, I seriously spent a handful of days in my room preparing. I always redecorate my room with a theme (see my Paris-inspired art room and my Asian-themed art room) but this year, I've only just begun updating my decor. Mostly because I knew I didn't need it at the start of the year and I was enjoying every last drop of my summer!

* Introduce the art room, routines and other new stuffs gradually. I used to try to cram in everything in the first couple of art classes. What do you think the kid's first impression of art class was? Rules, Do's and Don't's, Procedures and Zzzzzz-snoozefest. I think that whole deal is flawed. The kids only hear about the first two minutes of whatever it is you are talking about anyway. You go over one million boring-ish things with them all at once and you've lost them! I want their first impression of art class to be a fun one so we are covering those necessary things in baby bites, over several art classes. And doing some fun stuff everyday, like painting on the first day of art class!
So, speaking of talking too much, here's a clip of me talking too much TO YOU about what goes down that first day. I go into more detail about what you see here in the post...but if you have any questions, you can find me in the comments, y'all. 
Those flash cards I mentioned? They say: inspire, art, artist, create, creative, imagine, unique, etc. All words that describe the kids, art class and what artists do! My first thru fourth grade students read these at the door. For kindergarten, I show them shape flash cards. More in this vocab blog post. 
This is the view of my art room from the doorway. This is what the students see when they enter my room. The "teacher chair" is on the right and the other students are to sit on the floor in rows in front of the "teacher" (the quotes are cuz the teacher is a student I picked at the door to both monitor student behavior and play the game "see, think or wonder".)
Here's what the kids seated on the floor see. A view of my giant telly with an image from our Artist Inspiration, Henri Rousseau. When I am finished quizzing the kids at the door, I ask the "teacher" who was the best behaved boy and girl. Those two kids will get to be the host of our end-of-art-class game The Smartest Artist
At this point, I take over and introduce our Word of the Week. What the kids don't know is that I am secretly introducing them to our art class routines as we do this each and every art class! Whenever they hear the WoW, they are to "whoop! whoop" which is one part annoying and two parts fun, depending on your mood.
After talking about our WoW and our Artist Inspiration, I (re)introduce my students to Jes, our mascot/traveling tiger! I made a Jes a couple of years ago (details here) and he traveled around the world like Flat Stanely. It was so fun, the kids loved it...and then the poor dude was shipped to China never to be seen or heard from again (in my imagination, he took a turn to Bangkok and decided it was so fun he never wanted to leave!). So I made a new one and the kids are so excited to send him packing. I'll keep you posted on how that goes as I'm going to need your help!
Then we made a list of all the places we thought Jes should go!
After a quick stretch, we talked about rules. Oh, rules. Double snooze. But we made ours all sorts of wild and crazy which I think I explained in el video. So, we'll just leave it at that!
 We have a new incentive this year with a sticker chart! I've never EVER done a sticker chart, y'all. I'm seriously the most unorganized and inconsistent person you will ever meet in your life. However, I juuuuust might be able to do this one. All the special area folk in my school are on board so we are hoping to do it together. The kids have the chance to earn two stickers by following the two thoughts above. 
At the end of a quarter, whatever grade level class has the most stickers is rewarded with (a super cheap/easy) party! Like a 5 minute dance party at the end of class, popcorn party(tho we have so many allergies, y'all. It might have to be peanut-free/glutenless/flavorless/why-bother-living candy of some sort), you get the idea. Who else does this? Has it worked for you? TEACH ME YOUR MAGICAL WAYZZZZ.
At this point, I wanna hear the kids talk because I'm tired of hearing myself. So I call roll. The kids are to respond with a "Hello, Mrs. Stephens" (which helps the newbies learn my name, to hear it said 20 other times!) and then I ask them a silly question like those seen above. Yesterday, I asked one boy, who was new, when his birthday was and he replied "Today!" So, OF COURSE we had to stop, drop and sing Happy Birthday. The kids love these questions because they are random and ridiculous. Which is always a good time, says me.
 Oh, lookie! I can's! I changed up how I post these and I'm really digging it. Let's zoom in, shall we?
 Big, simple, kid-friendly and with visuals! Thanks, Dollar Tree.
This will also help the kids know what supplies to gather for art projects of the day.
So this was the beginning-of-the-school year decorating that I did which I felt was necessary for that very first day. The cute stuff will come later. And when it does, room tour
Another new thing for us this year, the Look What I Learned Today board! I call on three kids to tell me one thing and jot it down. While I do, the kids do their "ooguh, ooguh, OOOOGUHHH" chat. It's fun to see what sticks with them! 
Our wrap up game at the end of class is The Smartest Artist. The Masterpiece Gallery is for the fun art the kids like to bring in to share. 
 Now, for the younger kids, that was the end of art class on day one. But for the olders, the fun was just starting. I told them their table assignments, sent them shopping at the store, had them drop their supplies off at their seats and meet me at my new demo table (seen in the center). After a quick texture painting and printing demo, the kids set to work!
This year, at Tennessee Arts Academy, the super awesome Laura Lohmann of Painted Paper, talked just about everyone into painting with our students on the first day of art. So we did! 
With a limited palette of yellow, blue, turquoise and white, we painted and mono-printed as many papers as we could until it was time to clean up.
We now have a huge stack of these beauties to use for our upcoming jungle-themed projects! Henri Rousseau, eat your heart out...
 So much happiness.
And a beautiful mess at the end of the day! I can't wait to share with you what we do with our papers but that will just have to wait. Mama needs to soak these feets! 

 photo signature_zpsd10b3273.png