If you haven't, you might wanna! For the last four weeks, I've been sending out weekly free lessons and downloads! So...if you'd like to take advantage, you might want to sign up. And now...back to the program...
This lesson is just the thing to brighten these long winter days. My students always love creating a variety of silly faces. AND this lesson comes with some free downloads which makes it even better! Tap here for the free heart face idea sheets.
After I got such a good response from my Roll-a-Snowman download (another freebie here) , I thought I'd create one for this lesson too. This is the perfect way for your students to practice their heart drawing before diving into the lesson. Grab a copy of the sheet here.
I know one of the toughest things for students is actually...drawing a heart! To remove that struggle, I did create a heart template. This way, you can simply slide it into a sheet protector and let them focus on the drawing activity.
I did share how to draw a heart with simple steps and the rest of the details of this game and lesson in a video too! So...if you need a little break, let me help em out a bit. You can find the video here:
Feel free to use and share in your art making world!
And BIG THANKS to all of you for making the launch of my new book The Paintbrush Ballerina a success! I know when you order the book, you receive an email to leave a review. If you have the time to do that, I would so appreciate it. I read each one and it really means the world to me!
Don't forget, that I created a bunch of FREE downloads to celebrate the launch of my book. Be sure and grab 'em. You can find them here and here.
Today I'm sharing lessons that are also Valentine's themed (or really heart/love themed!) but there are a little more in-depth and will take multiple class periods. Personally...I love a long project for these long winter days. It means less prep (after the first initial wave of tons of prep, ha!) and gives the kids something to really dig their teeth into. So, let's dive in! Just follow the lesson links and that will take you to the full lesson, video and resources!
Let's start strong with this Candy Hearts lesson that I did with my fourth graders! They loved creating large candy hearts and coming up with a (teacher-approved, ahem) saying. You can check out the lesson and video process here.
Spring is when I LOVE to dive into weaving so...why not get everyone prepped by doing a paper weaving project? It's a great way to remind your students of the weaving process. Or...introduce them to it! This is a weaving (with a little bit of sewing) project that I did with my first graders. You can check it out here.
Looking to dive into printmaking in the next couple of weeks? Here's a lesson that I did year after year with my second graders because it was such a hit! We made so many prints that we did some print swaps before adding our cut letters to these pieces. We even framed them with our scrappy messy mats! All the details can be found here.
Speaking of printmaking, would you believe that kindergarten created these?! We used foam stickers and had a blast. You can check out the lesson here.
My third graders FLIPPED OUT over creating these plaster chocolates with puffy paint icing! Send out an email requesting heart shaped boxes now and use them for a display or, do what we did, and make your own! Details here.
In the mood to try a new art supply? For these, we used Celluclay, one of my personal favorite supplies to use when I create! These were made with an aluminum foil armature and Celluclay on top. You can check out the details here.
Since these projects can take a while, you'll find you have some students who finish before others. I resolve that a couple of ways: I allow those students to 'assist' other artists by creating with them (with student permission, of course) or...I give them another lesson to do! This was one of those 'early finisher art lessons' that I created. I simply played the video for those kids and they got to work. This one is much easier than it looks! Here's the details!
Okay, listen, I get it. We're still in December and you may not want to be thinking about what's gonna go down in your art room next week (or this week? Do you return to school on Friday?). Regardless, I thought I'd help you out by offering some of my favorite EASY and engaging lessons that will allow you to ease your way back to the art room. Most of these lessons have a video so you can play that for your students while you grab your coffee and try to remember what day it is.
Let's start here! This lesson is ALWAYS a hit and, believe it or not, I do it with kindergarten. HOWEVER...when I return to school after a long break, the last thing I wanna do is prep like mad for 5 different grade levels. It stresses me out and, because our students our little mirrors who reflect us, it stresses the kids out. SO! I often do this lesson with EVERYBODY, kindergarten through 4th. Does it make for a lotta messy paint trays, paintbrush washing and overflowing drying racks? YES. But does it also make for a gorgeous display of hearts created by the whole school that is ready to be hung BEFORE Valentine's Day (always the goal, right?!). Yes! So, let's go. Full lesson here.
This is a fun one and totally addictive so...beware!
If you want to start with a little less mess, then just bust out the black, red and white oil pastels and get the kids drawing! They adore drawing cute stuff and these little Valentines critters are perfect for that. I created a video for each. You can check out the blog post with all the info here. We also did a stamped background that is totally optional. Here's the video for the bunny:
Now, if you want a demo on how to create the stamped heart background, be sure and check out the panda video (below) as I walk you through those initial steps.
Here's how you can draw a long with me to create this fox:
And here's how to create the background and draw that panda:
Here's the video for that:
And last but not least!
Let's draw this cute Valentine's Pup!
For your older students, third on up, they may enjoy creating this 3-D heart!
This one is super low-mess as all it requires are markers, water and a paintbrush (and an oil pastel once dry, but that's totally optional). I share the details in this blog post.
This project was done in just 30 minutes (the length of my art classes) and only uses chalk! I was also able to introduce my students to a contemporary artist for the process. Details here!
Of course, you should definitely share my book Larry the Line which also has two printable pages of line-inspiration in the back!
And if you are looking for a lesson that packs a powerful contemporary artist punch, then THIS lesson with an introduction to four artists who use hearts in their art is the one for you! I did this on a half day with fourth graders and they knocked it out in one class period!
I'm excited to share a little something I discovered with one of my favorite art supplies: Celluclay(this link will lead you to my Amazon list of supplies). As you might know...I've created a TON of creations with my students and for myself with Celluclay. It's a paper-based air-dry clay that really lends itself to a whole lot of exploration. HOWEVER...one thing I never loved about working with the stuff is painting my creation after the fact. It's got a rough, scratch surface which is difficult to paint AND you have to wait several days for it to dry completely BEFORE you can paint it. That is...until I discovered...you can TINT the clay! Let me show you how:
In this video, I'll share with you two ways of tinting your Celluclay with acrylic paint (although I've not tried it, I'm sure tempera paint would work just fine). You can prep the clay by tinting it ahead of time, wrapping it in plastic and storing in your fridge. This is what I'm doing for a 2-hour class I'm leading today. I've got all my colorful balls stashed in the fridge (ahem). OR...at another class I lead, I had the participants mix up their own clay! I demonstrate both methods in my video.
What I love about this method of tinting the clay is that I also don't have to struggle to paint in the small areas. For example, painting around those squiggles would have been a struggle and definitely would have had me questioning my life's choices. Now...I can just create the color of clay that I want!
I did cover each piece with a layer of satin-finish ModPodge to help further anchor the pieces in place, give the vases a finish and waterproof them a bit. ModPodge comes in so many different finishes now that it's awesome! They make a sparkle finish, and indoor/outdoor finish...you name it! In a pinch...diluted Elmer's glue also works in place of ModPodge if you can't get your kitten mittens on any.
I have worked with Celluclay with my students in the past. It's fun stuff, especially if you don't have a kiln or you have sculpture projects in mind. For a smaller scale project, my second graders created these sculpted hearts. If you tap the link, you'll find a video of the lesson for you to share with your students:
This was a lesson we did in just a few 30 minute classes! We used foil that we shaped into a heart as our armature. I pre-prepped the Celluclay which made it so much easier! Once dry, the students used acrylic to add color. We hung these in a little popsicle stick frame.
But back to the vases...I was going to include in this post all of the things I've created with Celluclay BUT...I've made so much that I think it deserves it's own blog post. So...that will be coming soon. I also have a ton of videos on my YouTube channel if you are curious about more Celluclay exploration. Check the playlist Clay Projects for Adults and Children for more.
I will warn you: making these vases is HIGHLY addictive! I even thought for a split second that I was going to go into the vase-making business and started day dreaming about opening a booth at a local craft fair! And then I looked around at all my other half finished art creations which were giving me the evil eye and thought....well...let's just take it one day at a time ;)
I don't know if you can see this but...look closely at the top of this vase. When the squiggles dried, they did pull away from the vase a little bit. I assume that is because I didn't have the squiggles secured to the vase well enough and they dried, thus pulling away, before the vase itself did. So really make sure you have your bits and pieces anchored down. That seems like a good rule of thumb for all aspects of life ;)
Please do let me know if you have any questions! You can always drop me a line on my YT channel. Unfortunately, due to spam comments, I did have to turn the comments off here. So sorry!
BTW...I know I've only shared a little of this big news on my Instagram but...did you know I wrote a Decide Your Direction art adventure book for kids? That's right!! I'm so excited and I'll be talking about this more super soon but until then...yay! I always read to my students while they work but I could never find the perfect "art" novel...so I wrote one! This book introduces 7 different artists and the reader decides which adventures to go on. It has 32 different endings and over 80 illustrations! Like I said, I'll share more here soon but if you just can't wait, you can get yourself a copy here! It's perfect for the holidays...and I'll even sign it for you!
Hey, y'all! The cicadas are coming! Or...in the case of here in Nashville, Tennessee, they are already here. It's been many years since our last cicada summer and while at first I was totally grossed out by these big carcass-leavin' bad boys (and girls), I know rather ... well, I was gonna say "like" but that's a stretch ... appreciate is probably a better word. I appreciate their...gee, what do I appreciate? Their cool look. It's like seeing a bug under a microscope, they are so stinkin' big!
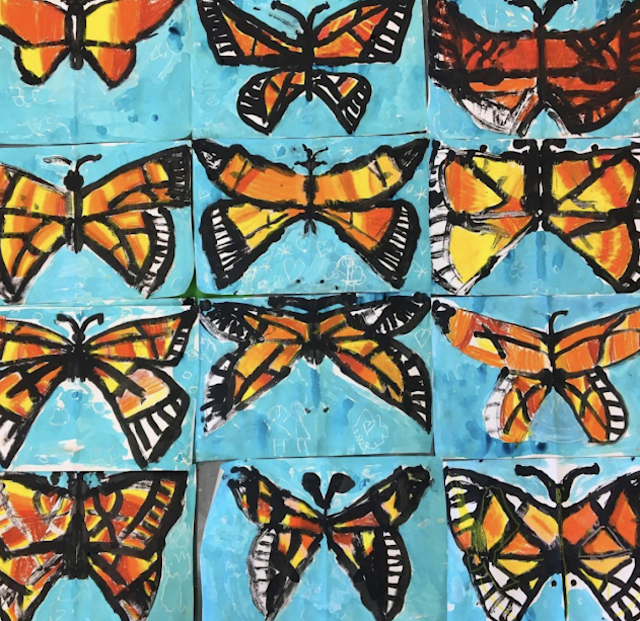
I've shared several symmetrical printing lessons in the past and they are always a huge hit with all of my students. We've done butterflies (you can find the lesson video in the link)...
Today I'm sharing my 25 Favorite Valentines/Love-Themed art lessons! From sub plans with handouts to clay and plaster projects, I've got something for everyone...including printmaking with kindergarten! Most of these lessons include kid-friendly videos, some have handouts and all are FREE! I hope you enjoy and...
Happy New Year!
I know next week means heading back to school...and it's just so hard to do after weeks off. I thought I'd try and ease the sting a little by offering up to you my favorite fun and easy lessons for celebrating LOVE as Valentine's Day is on the horizon. It's never too soon to start those Valentine's themed lessons and NEVER NOT a great opportunity to celebrate all things lovey dovey. Many of these lessons here come with a kid-friendly how-to video and, best of all, they're free! Just tap the highlighted link for more!
The above is a lesson I created for my kindergarten friends but it was so fun that I ended up doing it with several grade levels. It's that time of year when you really just wanna ease on back into art teacherin', right? So why not do so with a project where you just gotta get out one art supply (tempera paint and black oil pastels) and call it a day? It's much more relaxing that way...and when you are happy and relaxed, it will reflect in your teaching (and, hopefully, the students).
One of my all-time favorite things to teach first grade is...paper weaving! And I know what some of you may be thinking: SERIOUSLY?! Yes...because I got it down to a science! They make the looms, we weave together on a big loom I created, we do this on the floor and help one another...it's so fun! Here's the full lesson!
Nearly all of these lessons here are inspired by artists! Which means that students learn a little about both contemporary artists as well as artists of the past with these projects. Here we learned about Jen Stark!
For me, back to school after a long break meant back to the basics...a review of rules, routines and expectations. I cover all of that in my book Art Teacherin' 101...it's always a good time to get a handle on classroom management. No matter how could it is, it could ALWAYS be better, right? I share all of my tips and tricks in that book, if you are interested!
Of course, sometimes it's fun to just jump right back in with big and exciting projects! I've been all about the plaster and Celluclay in my own artwork lately...and kids do love it! More here.
Of course, back to school usually means PD meetings. One year, I convinced my admin to let me lead a workshop on creating these clay hearts with wings! I loved doing workshops with my faculty. It was a fun way to get everyone together in a relaxed way (which we never seem to do!) and enjoy creating and each other's company. To teach such a large group, I created a how-to video.
As you know, teachers are some of the worst students (I'd insert a laugh emoji but we all know it's true!) so having a pre-recorded video will help!
I've never met a kid who didn't LOVE printmaking! But it can be daunting and super messy...which means a lot of clean up for us. However...you CAN do printmaking with just markers and Styrofoam. Let me show you how we made these!
Wow! Did we LOVE creating these (see what I did there?!) And I have an easy method for you to make each one successful. You can check it out here!
This is a project I did with my second graders and they loved it! You can check out the video tutorial and lesson details right here!
Here's a fun lesson I put together to do in one class period! Well, for me, it took 2 classes as my class period is 30 minutes long. I did this with my fourth graders as a way to introduce them to four different artists...in one lesson! Check it out here.
Did we have fun with this one! We used old candy heart boxes and plaster to create our own faux chocolates. We also used tagboard and newspaper to create our candy boxes. It was so stinkin' fun. Full lesson here.
Look how realistic! Did I mention we used puffy paint?! Everything is better with puffy paint.
I really like to work big with my students. The bigger the paper, the better! It's a challenge with storage...but it's so worth it. These hearts were created on huge squares of paper. We chatted about Britto and did a line review...
Speaking of line...if you need a book to teach (or review) line with your students, did you hear I wrote a children's book!? Yep! it's called Larry the Line. If you are familiar with my Larry the Line poem, let me tell you this is the longer more in-depth version with idea sheets to be printed and shared in the back! You can pick up a copy here.
Big thanks to all of you that have purchased a copy and left a review! 83 5-star reviews is so amazing! Thank you all so much for the love and support. Okay, back to the lessons...
Another super popular lesson on my blog: My Chris Uphues Lesson! This one is perfect for a sub plan as it comes with a free handout.
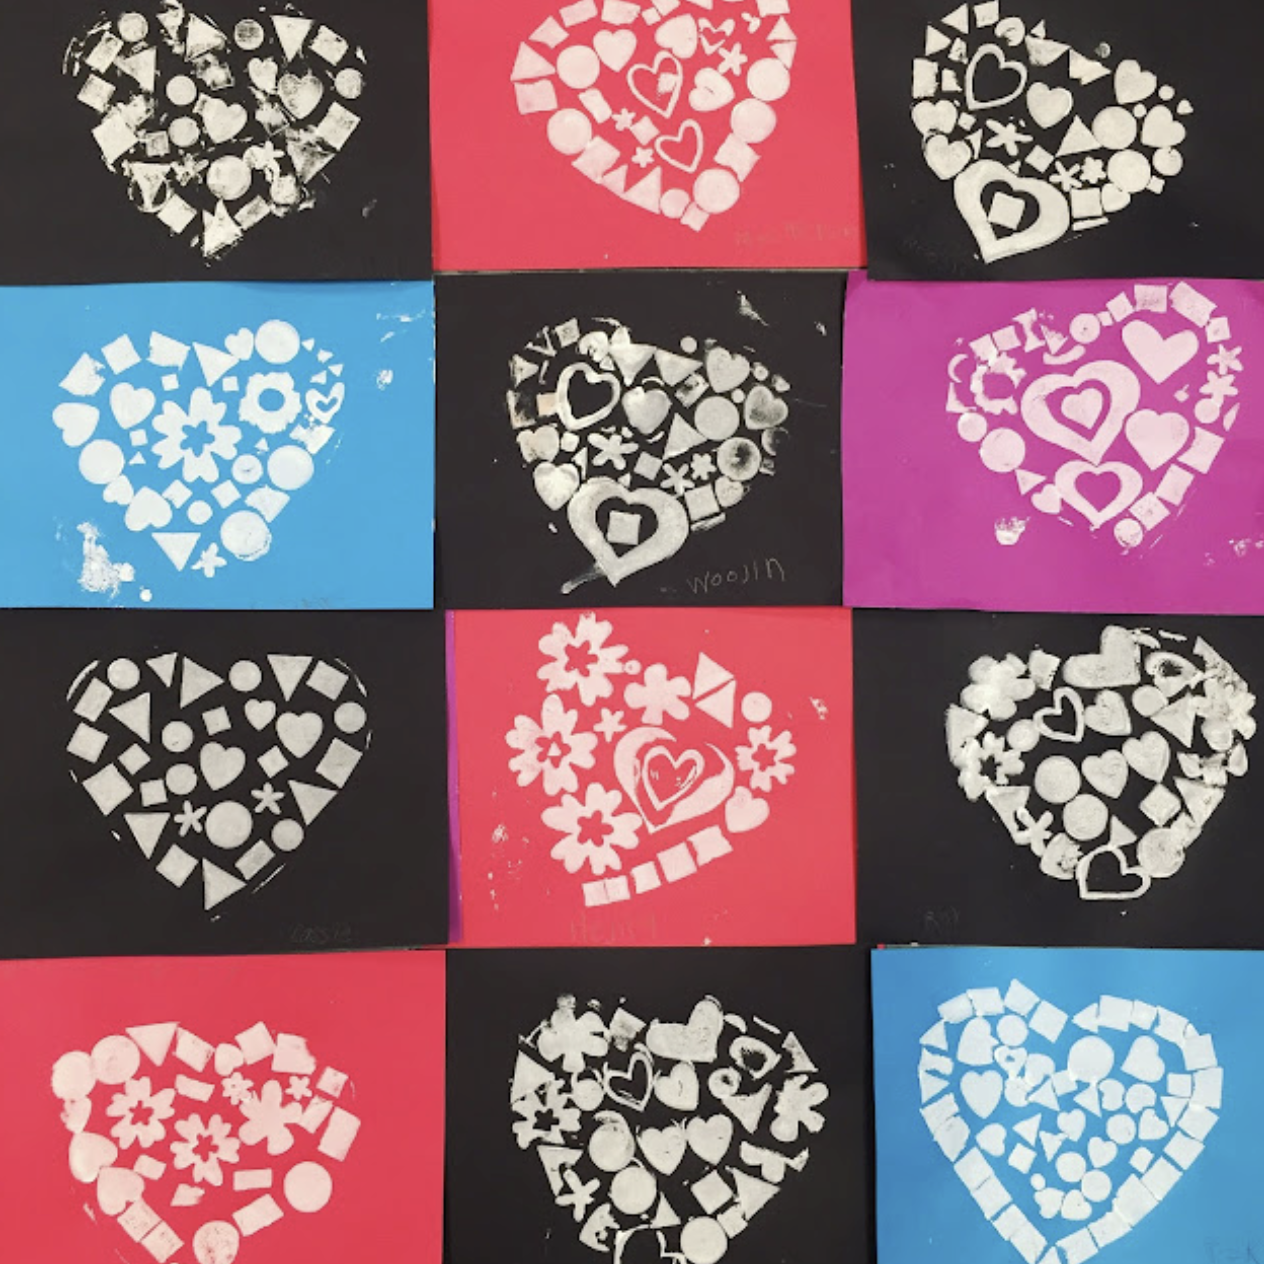
Check out these scrappy hearts made by first grade! This was actually a lesson with a focus on positive and negative space. The kids were so excited by the negative space their cut out hearts created that we filled the space with tissue paper on plastic. More here.
Aren't they so pretty up close?
And this is what we did with the hearts we cut out! Just black and white painted designs. Simple and so pretty!
Once your students are done printmaking, you can take the hearts and create THESE! Aren't they so pretty?!
Got scraps of painted paper laying about?! You're an art teacher, of course you do! Spend some time teaching the kids how to cute out hearts and create these cuties! Use them to hang as mobiles, put them in windows, send to faculty as love notes...the possibilities are endless. Details here.
Thanks for dropping by, y'all! Know that it's TOTALLY OKAY to ease on in to this new school year. The slow you go...the more they will GROW, I promise! Slow it down, focus on what matters and enjoy art teacherin!

.jpg)


.jpg)


.jpg)