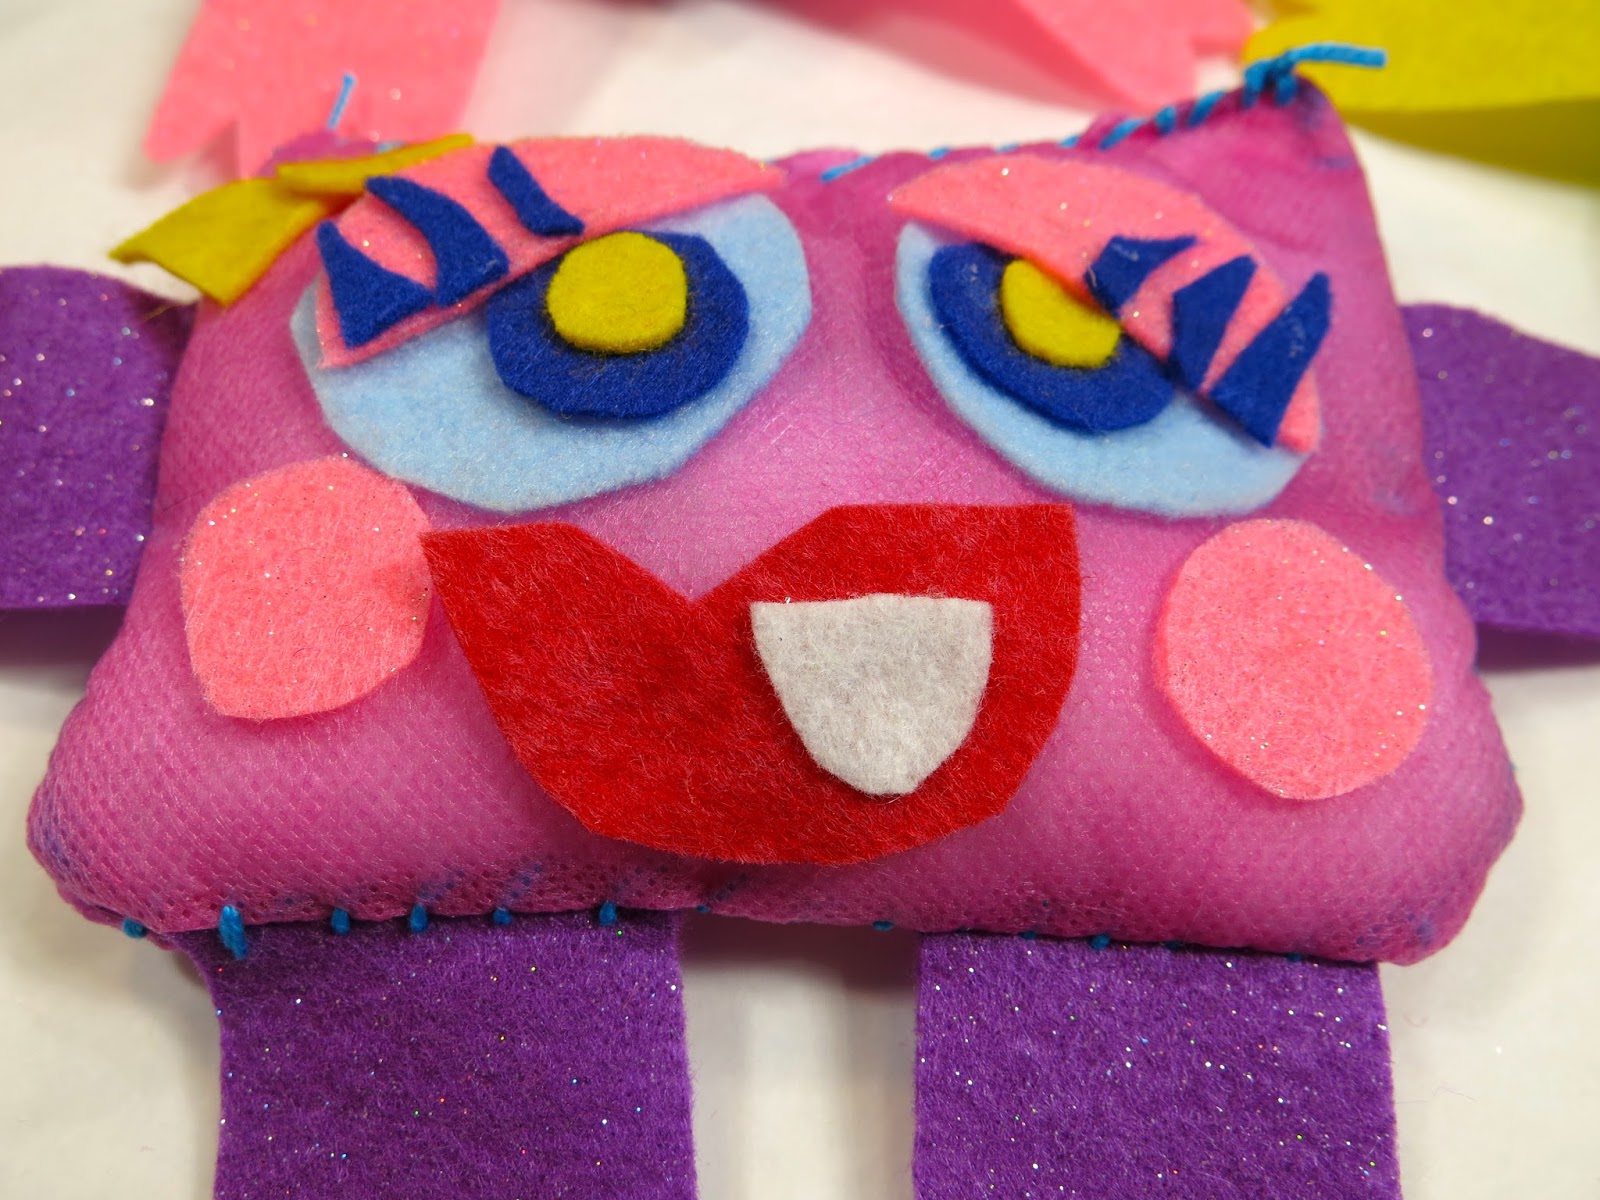
Going LIVE tonight, Wednesday at 8pm CST to talk about some art teacherin' issues! Hope you'll join me over here. See you real soon! As my fourth graders are wrapping up their Candy Heart Sculptures and drawing, I'm thinking ahead to a fun fibers unit for them. Last year, this group explored embroidery and did a really fabulous job. I know they will love expanding their knowledge and creating these fun stitched monsters!
I wanted a stitching project that would introduce them to the following: pattern cutting, pinning, sewing, stuffing and embellishing. I also wanted a fun contemporary artist tie-in and I found the artist behind Cotton Monster, Jennifer Strunge, to be perfect.
Aren't her monsters just the most amazing thing ever? I need one in my life, stat. Here's the video I created to introduce my kiddos to Jennifer and all things stitching! Feel free to use it in your art teacherin' world. I think it would be perfect for 3rd grade on up.
I anticipate this project will take my students 3 one-hour art classes. When I share my video, I show it to the kids in short bursts. I then allow them to go work and set my timer for the amount of time I expect it will take them. When the timer goes off, finished or not, all kids report to the floor for the next video viewing.
On Day 1, we'll learn about Jennifer Strunge, cut out arms, pin them in place and, hopefully, stitch one side. The following day, we should be able to wrap up the stitching, turn inside out and start working on the face. We will pulling out our Monsters of Creativity collages and looking at those for inspiration!
Day 3 (and, let's be honesty, probably Day 4) will include gluing the parts of the face down, stuffing and stitching closed.
I'm thinking of tasking my early finishers to think of themselves as toy creators and their monsters as their creation. As such, they'll need to think of their monster as a product. Who will it be sold to? How will it be packaged? What will be the price? Why should people buy it? I'll keep you posted on this adventure!
Have y'all done stitched monster projects with your students? Love to hear what you've done! And if you do this project, please be sure and let me know, I'd love to see your student's creations.
JUST A REMINDER! Join me this evening over on Facebook LIVE at 8pm CST. We'll be sharing ideas on what to do with those kiddos who finish early. Come with your tips and tricks and I'll share mine as well. Looking forward to chatting with you tonight! In an attempt to introduce my younger students to printing, reinforce the elements of art, work on our fine motor skills (we really need it, y'all!) and spread a little LOOOOOVE, I created a series of videos called Valentine Animals! Initially, I was going to put all of the How-to-Draw tutorials in one video but there were a couple of problems with that notion. First, the video would have been close to an hour! Long vids take too long to upload (and download when you want to use them in your art room). Second, I wanted to be able to find particular How-to's easily and having them in separate videos proved to be the best way to make that happen. So I present to you a series of four Valentine Animal videos. Feel free to use them in your art teacherin' world. I'd love to hear from you (and see your students' work) if you do!
This really started when the first grade team at my school approached me about doing a 101 Dalmatians art project for the 100 days of school. I came up with the project on the left. The firsties had just finished their weaving project so it was the perfect time to start something new. I thought the project brought so many elements together that it would be a perfect fit as a lesson for my kindergarten friends as well.
The panda video is the only one where I walk you through the steps to creating the heart stamps for printing. It's also the only video that I share how to carefully cut out and adhere the animal to the background paper. I didn't want each video to repeat so I only put those directions in this video.
Because my students are starting these this week, I don't have any finished ones to share...but I'll make sure to share when they are complete!
So the fox might be my fave. Here's the video:
As I mentioned in my previous post, I'm currently working with Faber-Castell so you'll see me using their supplies quite a bit. I'm excited to work with this company because I love their products. You can check out my review of their oil pastels here.
Did I mention that I've been recruited to dress as Cruella Deville for the 100th day? Oh yea, buddy! Here's the puppy video:
In case you are wondering why I did so many different animals, I am planning to have each kinder class do a different one. This will add more variety to our hallway display.
Hey, y'all! If you missed last night's Facebook Live chat, it was so fun! We talked about all things Art Show and so many fabulous ideas were shared. I'm so thankful for all of you that took the time to join the convo. You can still catch the archived chat right here and be sure to join me on Wednesdays at 8pm CST for the fun! My least fave thing? Repeating myself. As much as I love to talk, saying the same thing again and again to small people is, like, the worst. I have found a solution that works for me: Call and Response! I have chatted about it here as well:
The kids really enjoy Call and Response and it's very much apart of our art learning routine. Do you use this? What techniques do you use to help your students retain directions? Love to hear from y'all!
Every year I do paper weaving with my first grade artists...and every year, when the weavings are complete, I think, "well, now what?"
This year, my first graders FLEW through weaving without much help or reteaching from me. I was so excited that I decided to throw some simple stitching into the mix and I'm so glad I did. The kids nailed it and created a beautiful heart-tastic quilt to boot.
Day 1: If you've never done paper weaving with kids before, here is how I teach them to cut their looms. We used painted paper for our looms. Cutting our looms and weaving a couple of strips took us one 30 minute class.
Day 2: On our second day, we reviewed the weaving process. We sit in a circle and weave together. I like to use peer tutoring for those who understand weaving to help others. I find the kids do an excellent job teaching one another!
Our Love Quilt now hangs outside my art room! This is the work of two classes. My next two classes will have a different color scheme. I'll be sure to share when they are complete.
Day 3: The next art class, students chose a 12" square piece of construction paper. We learned all about symmetry as well as positive and negative shapes and how to cut out a heart! This was then glued over our weavings. We saved the positive shape hearts for our next project. As a wrap up, we had a drawing sheet full of symmetrical and asymmetrical images for the kids to draw.
Day 4: I had to do some prep work for this day, not even gonna lie. I hot glued another square paper on the back of the artwork to anchor the weaving (see below) and I hole punched the sides. For two classes, that took about 20 minutes. Then I cut the yarn to about 18" strips and had pieces of tape on hand for the kids.
To begin, each child anchored their yarn with tape on the back. I showed them out to do a whip stitch and they went to town. To end the stitch, they added another piece of tape on the back.
Early finishers helped those those who needed assistance. Everyone finished in under 20 minutes. This gave us time to add our names with silver Sharpie!
Once the kids were done, I laid the pieces out on the floor and decided to display the artwork quilt-style.
For that, I simply hole punched the tops and bottoms of the weavings and tied them together with two pieces of yarn. This created long pieces of art that I hung next to each other to create the illusion of a blanket. That took a mere 30 minutes!
I was so excited that with 4 30 minute art classes, the kids learned about weaving, symmetry and stitching...all while having a blast! I am so glad to have this beautiful masterpiece outside my art room.
Love to hear about your favorite projects that involve paper weaving!
Lately, I've been getting that 80's itch: I've had a hair crimper in my Amazon shopping cart for weeks, I've started shopping the 80s-inspired kids section at Target and my hair has been reaching bigger and bolder heights (thank you, Aqua Net!) Pretty soon I'll be busting out the Bangles, Bruce Springsteen and Def Leppard (okay, seriously, these are always on repeat in el Honda Azul). I can't help it, it's the era I grew up in...and the best era EVER. After the 20's, 40's, 50's and 60's/70's, of course. Ahem.
After making The Eyeball Dress, I've been [eye]balls to the wall obsessed with all things peepers. So when the dress was complete, I started painting eyes...an everything!
I have a decent assortment of wood beads and bangles thanks to etsy and late night online shopping. I've seriously had this stash of wooden beads and bracelets FOR YEARS and when I got the itch to paint over winter break, they were the victim. The diamond shape resembled eyes and, well, the rest was history.
Did I mention it was winter break and I was power watching the following: Schitt's Creek, Transparent and Arrested Development? Yes, twas good times.
It's so evident I have 80's-itis. Just a quick scroll thru my Insta-feed is proof of that. I think it's the color that gets me...and the patterns...and the happy memories. ALL of it! Can we just bring back jelly bracelets, charm necklaces, leg warmers and neon eyeshadow already?! Please check your banana clips and pegged pants at the door, ermkay?
After painting my beads, I decided that I couldn't have a necklace that was all eyes...so I splurged on some polymer clay and created some extra beads. Some I mixed and others I painted...
And I really had the very best time. Like, totally, It was rad, dude. By the way, I spoke with my 80's Gag-Me-with-a-Spoon accent today in art class...and a second grader whispered, "she's trying to sound young." Needless to say, I seriously contemplated sending him to Time Out. Like, whatever, eh!
If you are a teacher, then you've probably experienced team building activities. They can either be big hits or misses, depending on the mindset of the group. I work at a school with a very low turn over rate, a whole lot of history and love, both for the children and each other. However, knowing that we were coming back from a break of much needed time off, I knew it might be hard to feel that love when we really just want to hibernate until spring (I could simply be speaking for myself here!). Before break, I asked my amazing administration if I could possibly host a team building activity on our most recent professional development day. I was so thrilled that they agreed and even more happy with the beautiful results...
I chatted with the teachers about how we teach from our hearts and give our students wings to fly. Our students don't see us for our outward appearance but what is in our hearts. I used this sweet poem as a reference. I don't know who the author is of this poem, if anyone does, I'd love to know!
Knowing that I would have a packed house, I thought it would be best to record the process and show it on my big screen telly. Here is the video. I played it in phases, pausing it to allow the teachers time to work. It took us 45 minutes to create and clean up. Not too shabby!
I loved hosting the teachers in my art room...and they were the best of sports. I was asking them to step out of their comfort zone and they did so happily. It was so fun!
Knowing that these teachers might have a limited creative background, I wanted to remove any obstacles. I didn't want this to be a frustrating experience for them but a fun one. One where they could chat, laugh, create and forget about any stresses.
Here are some short cuts I provided: * Templates. In the video I told them that they didn't have to use them...but almost all of them did. I was glad I took the time to make them.
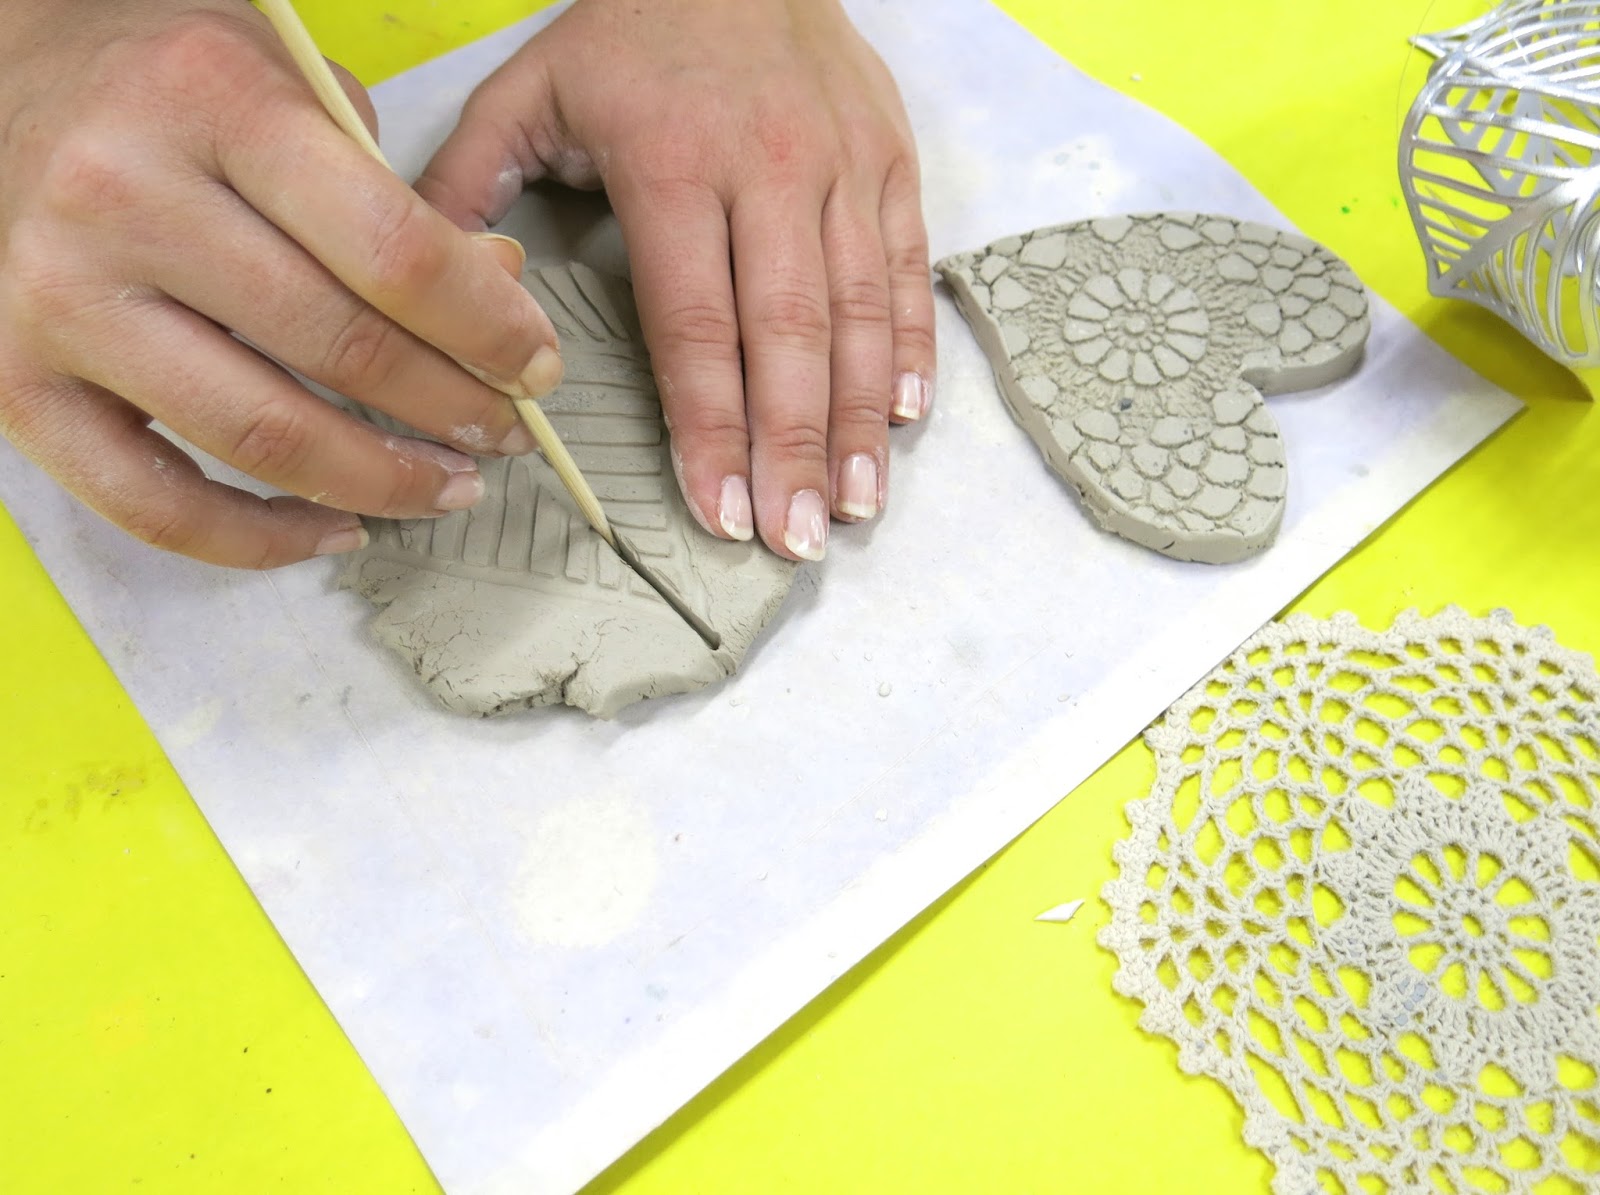
* Tons of Textures. I didn't want the teachers to have to wait on each other as I knew we wouldn't have time. For textures, we used doilies, placemats, burlap...anything with a beautiful raised surface.
* Toothbrushes and water cups. Instead of teaching them the slip and score method, I provided them with a tool that would get the job done much faster.
* Skewers. The best and cheapest clay cutting tool!
And, finally, I provided glaze. Yes, glaze! You can glaze on greenware (or fresh, outta the bag, clay). I plan to do a clear glaze over all of the pieces before they are fired in the kiln.
We had such a fun time, I'm so lucky to work with these people!
Have y'all ever done a team building activity before? Love to hear about it! Feel free to share this project with your admin and teachers. Also, this project is age appropriate for your elementary (and up!) students as well. We just might have to make this a school-wide endeavor. I'll keep you posted.
Last night, over here, we had a fun live chat titled: What I Wish I Knew as a First Year Teacher. We chatted for nearly an hour and so many of you contributed to a wonderful chat. Thank you! If you'd like to view the chat or learn from the awesome comments, the chat is still archived here. I did go ahead and condense the chat into my Top Ten Things I Wish I Woulda Known. Here are the Cliff's Notes: 1. Befriend your custodians. They are one of your biggest allies. 2. You ARE NOT the following:
* A Craft Supply Store. Share your supplies sparingly. * Support Staff. You have your own curriculum. You were hired to teach art...when you can squeeze in other subject areas, AWESOME! But don't build your curriculum around anything other than the art education of your students. * The School Sign Maker. Do those favors sparingly, your time is precious! 3. Test Drive ALL of Projects. Make examples...not to necessarily show your students but so you can troubleshoot any issues they might have along the way. 4. Don't Sweat the Verbage. There is gonna be so much stinky-smelly edu-talk that it will make your head spin. Don't get caught up in worrying too much about the latest edu-trends. Because just when you think you have it figured out, they'll switch the script. 5. Keep the Peace. Stay away from Negative Nancys, Patty Pot-stirrers and Glinda Gossips. Nothing good can come from those friendships. 6. Nail that Classroom Management. That should really be rule number one. You got that on lock-down and you can do anything. Not sure how to get your management under control? Then... 7. Seek a Mentor. Find a fellow art teacher and ask them for tips. See if you can go and observe them. Find a teacher in your building who you admire for his/her teaching style and seek their guidance. 8. CREATE! Make time to make stuff. This is what you teach! You gotta practice what you teach. 9. REST! Take time to unplug from school. You'll be a better teacher for it. 10. Reach Out. Attend your state and national art education conference, professional development opportunities and art classes. You can learn so much from other artists and teachers, reach out and find them! Love to hear your tips, y'all. Let's share with those newbies what we wish we would have known.
Hello, Cutie Pies and Love Bugs, won't you Be Mine on this Candy Heart Sculpture adventure? I'm so excited (and maybe a pinch sugar'ed up from one too many candy hearts) about this project I've got planned for my fourth graders. I've been kicking this idea around for sometime...but there were some issues I thought the kids might struggle with. After finding solutions that will make their sculpture making adventure a little easier, I put it all together in this here video.
To make your own Candy Heart Sculpture, you'll need the following: * Tag or poster board, one 2" X 24" and two 8" squares * Scissors * Stapler * Tape * Rigid Wrap Plaster Cloth from Activa Products Approximately 24" of wrap per student. The wrap comes in a width of 6" so I cut it in half for this project. My plan is to have the kids do the cutting when they finish their armature. * Tempra paint
I played around with a couple dimensions with the heart and decided that the 2" edge would be the best. It's the most accurate appearing ratio and it requires a lot less plaster wrap. Having the kids create those tabs of tape and fill in the gaps with excess tape will really help when they are creating their armature.
I also played with several ideas for putting the wording on the heart. I first toyed with the idea of just letting them write on their hearts but my students do not have the best of handwriting, not even gonna candy coat it for ya (pun intended). Giving them a guide like the sheet which will ultimately become their carbon copy paper seemed like the best solution.
I will definitely keep y'all posted on how my fourth graders do. While their projects dry, they'll be working on another sweet project that I'll be certain to share with you soon. Check ya later, Love Bugs!