Monday, January 14, 2019

In the Art Room: Top 14 Favorite Valentine's Day Lessons

Well, hello lovies! In this blog post, I thought I'd share with you 14 of my very favorite Valentine's Day inspired lessons...perfect for these chilly and cold months. Let's let warm fuzzies abound in the art room! 

To find the lessons, just follow the link. Many of them have a video to share with your kids. Also...several of them are sub plan videos! Perfect if you have to take a day. I know I could use one. 
First up are these sweet Jim Dine-inspired heart sculptures created by my second graders. We used Celluclay and aluminum foil to make these beauties and the kids loved making them. 
Next up are these amazing LOVE prints created by my first graders. We chatted about Robert Indiana before diving into these. We had a whole lotta printmaking fun with this one. 

Last year, I did this lesson with my second graders. They were able to choose their own "kind" four letter word (we had: nice, kind, love, glow, hope, good, etc.) and used strips of paper to create the letters. Those turned out so fun. 
First grade artists created these huge Romero Britto-inspired hearts last year with bleeding tissue paper and paint sticks. We made these on huge 18" square sheets of paper. 
Speaking of first grade, here's a peak at what mine are working on right now...weaving! Heart weavings that we'll put together to create a faux quilt. This is one of my favorite lessons but mostly because I do love to teach weaving. 
Chris Uphues is one of my very favorite contemporary artists to share with my kids because 1. he's the nicest and 2. his artwork speaks to them. It's so happy! My students adored this lesson a couple years ago! 
If you need a quick one-day lesson that will introduce your kids to a new artist, you might want to try this one on for size. It's inspired by J. Goldcrown and all you need is black paper and chalk for amazing results. 
One year, we were inspired by Peter Anton's fake food sculptures to make some box of chocolates of our own. Third grade thought this was the coolest project ever. 
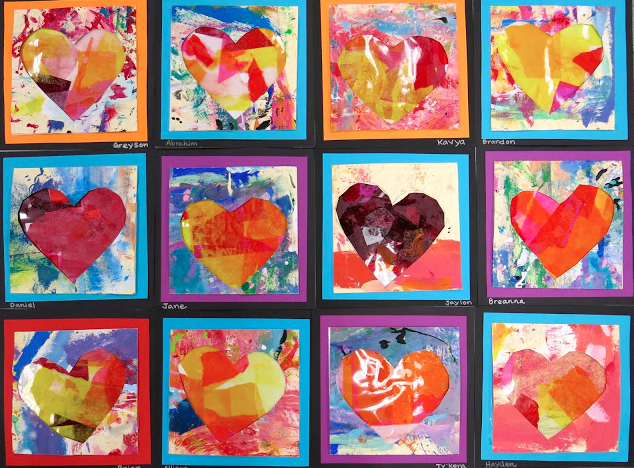
If you are like me, you do long art lessons...and then need a shorter one to pick up momentum again. I think my students might be the same way. This lesson is a quicker with beautiful results. Here's what we did with the paper after we cut the hearts how: filled them with a video of tissue paper!
And here's what we did with the hearts we cut out. So cute, right? 
This lesson is similar to the first I shared except that there are wings added with plaster. I'm thinking of doing this lesson with my third graders super soon...just need to work out the specifics...but I'm sure they will love it. Video details and more here. 
Need a sub plan? I did this Romero Britto inspired collaborative with my kids when I was out on jury duty. Lesson and video right here. 
Need something big and happy to spread the love? My kids EACH contributed to the Our School has Heart mural. Visit this post to see what each different grade level created for this mural from embroidery to painting to sculpture and needle felting! 
My fourth graders tackled this lesson a couple years ago right after they finished the following sculpture lesson...
Boy did we have a ball with this lesson! A super fun sculpture project for the kiddos. 
This lesson I created a little while back for my kindergarten and first graders. We loved the printed hearts and the fun guided drawing animals. Video lessons for each critter. 
Looking for a fun way to introduce your kids to four contemporary artists who use hearts in their work? This video lesson just might be for you!

Oh! And if you are looking for something to do with your faculty and staff to bring the love, you might want to check out these our Clay Hearts with Wings...a huge hit with my coworkers. Video too!

Okay, y'all...that was WAY more than 14 projects so have fun! 

 photo signature_zpsd10b3273.png

Thursday, January 10, 2019

In the Art Room: My Favorite Winter Art Lessons

Hey, friends! If the winter weather is causing you to have brain freeze and you are stumped for ideas on art lessons, I've put together this HUGE blog post filled with my favorite winter art lessons. Many of them also include instructional video...this way if you are out sick or find yourself feeling a little under the weather, you can simply have me be your art teacherin' sub. All I ask in return is that if you post projects that your students have created, inspired by my lessons, you give me a shout out. It's always nice to give art teachers credit for their lessons...especially when they share them for free as I'm doing here. I also LOVE to reshare your projects on my Instagram which would gain your more followers. So it's a win-win!

The Heather Galler coffee cups were created by my second graders some years ago and they are still a fave lesson of mine. You can find the details here. 
A HUGE hit with my students and other art teachers has been this Jen Aranyi inspired winter landscape. For this lesson, I created a video to share with you. My third graders really loved this project. 
I really am a sucker for black glue and chalk pastel, y'all. Each one of these fourth grade pieces was a stunner...and such a great lesson on using a new supply and color theory. Lesson with video here.
 This second grade selfie lesson introduced my students to the world of printmaking! We had a blast creating these prints for our hats and mittens. Complete lesson here.
In need of some lessons for the kindergarten crowd? This one was a hit with mine...video lesson here! 
Speaking of kindergarten...here is a winter landscape lesson that I've done with them for years. It teaches tint and shades as well as collage. You can find it here.
 My first graders were big fans of this project! Video and lesson details right here.
As my fourth graders wrap up this lesson, lemme tell you, the results have been amazing and it's quickly becoming my new fave project! More details with video here!
 Mural making is one of my fave things to do during these winter months. It brings us all together! You can find the details on this one here. 
This light up mural with ice skaters drawn by my fourth graders here.
And our very first mural collaboration from a while back, right here!
 Printing on fabric, making clay beads AND learning to sew?! YES this was a winner with the kids! All the details here. 
I LOVE metal relief projects...they are always a show stopper. I created these with my fourth graders a while back and they were a hit. Lesson here.

Need some more lessons? Check out THIS POST with five quickie winter projects! 

Also, be sure to check out this blog post for even more fun winter art lessons. Stay warm out there!

 photo signature_zpsd10b3273.png

Tuesday, January 8, 2019

In the Art Room: Snow Globe Cities!

When I posted this photo on my Instagram a while back it got a whole lot of love. I promised I'd share this lesson with you all and here I am! My fourth graders are ALMOST done with these, hoping to do the last step within the next couple of art classes. I'll be sure to share the end results. Until then, I've created a lesson video for you and your kids! I'll walk you thru the lesson break down and supplies in this blog post. 

I hope you and your students enjoy! 

Supplies:

* Watercolor paint. In the video, and in my room, the kids used Pelikan brand watercolor paint. I'll be sharing more about watercolor in a blog post tomorrow so stay tuned if you have quesions.

* Cardboard pizza rounds. I get mine from a restaurant supply place called GFS or Gordon Food Service. Amazon used to sell them. I usually can get 100 for under $20.

* Paper. I always order 80-90 lbs paper and we use that for EVERYTHING.

* Glitter (ugh!) or fake snow. I found some super cheap after Christmas!
Day 1: I see my fourth graders for an hour. On the first day, we were able to create our practice sketches and paint our final circles.
Day 2: What I didn't show in the video was how we added a little sparkle to our circles. At the start of art, the big circles were passed back. The kids "painted" them with ModPodge mixed with glitter. Once those were done, we chatted on the floor about how to paint these papers for their cities. 
Day 3: Cities! We really talked about how to make a building look 3-D and the kids rocked it. Many of them drew in pencil first...but that was just suggested, not required. 
Up next...cut these out, add or our cities and start on our snow! I'm excited, I cannot wait to see these complete! I'll be sure to pop back by and share more as we finish. 

 photo signature_zpsd10b3273.png

Monday, January 7, 2019

DIY: Latch Hook and Needlepoint Andy Warhol!

I just finished off my latest latch hook artist series: Andy Warhol! If you recall, I've already done Frida's portrait. I decided to create Andy next and make the pattern available to you! You can find it, along with the Frida pattern, right here. 
 I have not done a needlepoint version of Andy yet...I just got so excited about working on my next pattern that I moved on. I'm hoping to create a needle point version soon. For now, I'm just stuck with a Shaggy Andy. 

My goal is to create a series of these artists...making one big ole latch hook artist rug. Crazy? Yeah...but what else would you expect? 

If you've never latch hooked before, the supplies are available at most craft stores. You can find out details about the process here. 
To give you an idea of what the needlepoint version would look like, just check out the back of my latch hook! Of course this is the design in reverse...but it kinda gives you an idea. I love the back of latch hook just as much as the front...I might have to hang these so they can be seen from the front and the back!
 photo signature_zpsd10b3273.png

Sunday, January 6, 2019

In the Art Room: Penguins with First Grade

 Need a fun lesson for your first graders tomorrow? I think I might have something for you: these adorable penguins! This lesson teaches so stinkin' much: warm colors, brush control, using watercolors, painting spirals, a review of lines and shapes and much more. The kids loved creating these. 
I made  a video just for you to share with your students to walk them through this lesson. Here I'll break it down for you day by day.
 If this image looks familiar, that's because my kindergarten did a slightly similar lesson. You can check that out here

I see both my kindergarten and my first graders for 30 minutes twice a week. So here's how we spent Day 1 and 2: Painting spirals! Midway through day 2, most kids were finished painting their 12" X 18" papers with spirals. Once complete, the kids placed their work on the drying rack and worked on the following...
 With my shorter art classes, we don't have sketchbooks. Instead, we sketch on dry erase boards. This cuts down on paper waste...and, added bonus, kids LOVE drawing on dry erase boards. I got mine at the Dollar Tree. I created a step by step penguin so my students could practice independently while their classmates finished their paintings. This is something new I've been doing this year and I love it. Not a moment of instructional/practice/work time wasted...and no wasted paper either!
 Day 3: guided penguin drawing. These guys are huge, measuring in at 12" X 18". We used bingo daubers and drew on the floor. Yes, crazy...but it is the method that I found works best for me and my students. I had each place a messy mat under their penguin so we wouldn't get ink on the floor. Of course we did! It mopped up.
 Day 4: The following art class, we added the chalk to create form and painted. Some classes moved quickly enough that we were also able to cut them out!
 If you are looking for a fun winter collaborative project, that could be it! Skip the background painting and just create these. Add them to a backdrop and, ta da! Instant winter mural!
We hung these up with the kindergarten snowman for a fun and frosty display. Have fun, y'all!

 photo signature_zpsd10b3273.png